

You can’t dry what you can’t reach. Wet studs trapped behind drywall and insulation are ticking time bombs for mold, rot, and structural damage. Most homeowners assume running a fan or dehumidifier will magically pull moisture through sealed walls, but physics doesn’t work that way. This guide walks you through the exact drying sequence professionals use: equipment setup, moisture tracking, repositioning air movers, and knowing when studs are truly dry enough to rebuild. You’ll learn how to turn 7+ days of guesswork into a measured process with checkpoints that prevent costly mistakes.
Step-by-Step Stud Drying Technique and Timeline

Light clean water damage from small leaks dries in 24–48 hours with proper equipment. Moderate multi-wall damage requires 2–4 days, and major flooding takes 3–7+ days. Professional equipment (LGR dehumidifiers removing 100+ pints daily, high-CFM air movers) dries 2–3 times faster than household fans. The drying process moves through specific phases with checkpoints at each stage.
Day 0: Initial Setup and Equipment Positioning
Remove all drywall and insulation to expose studs completely. Standing water or trapped materials prevent airflow and keep moisture locked in place.
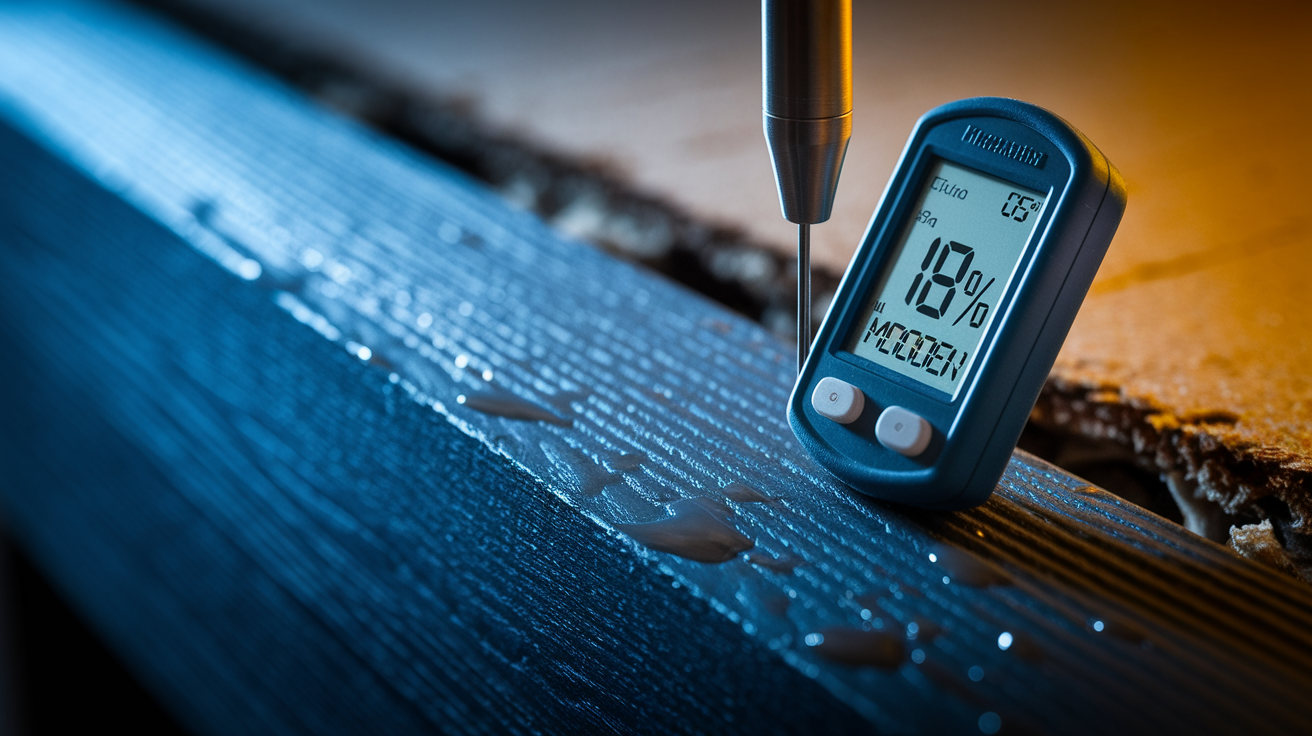
Take baseline moisture readings of all affected studs using a pin-type moisture meter at three heights: 12 inches from floor, mid-wall, and near ceiling. Record percentages for each location. Test unaffected studs in a different room for comparison. They’ll typically read 8–12%.
Position air movers at 45-degree angles across wall surfaces creating overlapping airflow patterns that move across stud faces rather than parallel to them. Air moving parallel just flows past without pulling moisture. Angle the nozzles so streams cross and create turbulence across the wood.
Place the dehumidifier centrally in the affected space with collection reservoir accessible for emptying. Seal the room with plastic sheeting over windows and doorways to prevent humid outdoor air from entering. Opening windows introduces moisture back into the space.
Set the thermostat to maintain 65–75°F. Warmer air holds more moisture vapor and accelerates evaporation.
Verify all equipment running continuously and check operation after 4 hours. Walk back and confirm air movers haven’t shifted position and dehumidifier compressor is cycling on.
Days 1-2: Rapid Moisture Extraction Phase
Take moisture readings every 24 hours at the same stud locations as baseline to track reduction rate. Write the numbers on the wall next to each test spot so you can compare directly.
Empty the dehumidifier reservoir every 6–8 hours initially as extraction peaks during the first two days. LGR units may collect 15–20 gallons daily when pulling moisture hard.
Reposition air movers every 12 hours to target different stud bays and surfaces, ensuring all framing gets direct airflow. Move equipment around so the same studs aren’t getting blasted continuously while others sit in dead air zones.
Watch for water pooling at the base of walls indicating continued drainage from wall cavities above. If water keeps appearing, there’s either a leak still active or a large volume trapped higher up that needs more time.
Maintain humidity below 50% by adjusting dehumidifier output if hygrometer readings climb. High humidity slows evaporation to a crawl.
Verify temperature stays in the 65–75°F range. If the space gets too cold, evaporation stalls even with perfect airflow.
Note any studs showing minimal moisture reduction. These may have hidden water sources or require additional access. A stud that stays at 18% while everything around it drops to 14% is getting water from somewhere.
Days 3-4: Progress Monitoring and Equipment Adjustment
Daily moisture meter readings should show steady decreasing percentages, typically dropping 3–5% per day with proper equipment. If you see 18% on Monday, 15% on Tuesday, and 12% on Wednesday, you’re on track.
Identify stubborn studs still reading above 15% and reposition air movers to concentrate on these problem areas. Sometimes rotating a unit 20 degrees makes the difference between stalled drying and continued progress.
Check for musty odors indicating hidden moisture pockets or early mold formation requiring additional access cuts. Your nose will detect moisture problems before they become visible.
Use hand pressure to feel for cool spots on studs suggesting trapped moisture behind surfaces. Wet wood feels cooler to the touch than surrounding dry framing even when surface moisture has evaporated.
Monitor room humidity levels twice daily ensuring the dehumidifier maintains sub-50% environment. If humidity creeps above 55%, mold risk increases.
Reduce dehumidifier reservoir emptying frequency as extraction slows to every 12–24 hours. The dramatic water collection of the first two days tapers off as the space dries.
Verify air movers haven’t shifted position and maintain proper angles across wall surfaces. Equipment gets bumped or slowly vibrates out of position.
Days 5+: Final Drying and Verification Phase
When moisture readings approach 10–12% target matching unaffected home areas, continue running all equipment for 24 additional hours after the target is reached. Readings can be misleading if deep core moisture hasn’t equilibrated with surface layers yet.
Take final comprehensive readings across all studs at multiple heights verifying consistent results. Don’t just check one spot per stud and call it done.
Retest 12 hours later to confirm percentages hold steady without equipment running. If numbers climb after the equipment stops, moisture is still releasing from somewhere.
Inspect studs visually for any soft spots or decay indicating wood rot requiring replacement. Press a fingernail into questionable areas. Healthy wood resists. Rotted wood dents easily.
Check for remaining musty odors suggesting incomplete drying. Even with perfect moisture readings, a smell indicates biological activity or trapped moisture your meter missed.
Document final readings with photos showing meter display and measurement locations for insurance records. Get the number and the stud location in the same frame.
Severely saturated lumber from prolonged flooding, exterior walls with thick insulation, or homes in high-humidity climates may require 7–10 days of continuous drying. Readings that plateau above 12% after 5 days indicate studs may need replacement rather than continued drying attempts. Patience in achieving complete verified dryness prevents premature reconstruction over damp framing that leads to hidden mold growth and structural rot.
Assessing Water Damage Severity and Categories in Wall Framing
Check for bulging or discolored drywall indicating water accumulation behind surfaces. Look for sagging ceiling areas that pose collapse risk. Examine water staining patterns to trace source and flow path. Note musty odors suggesting hidden moisture or early mold. Verify electrical safety by turning off power to affected circuits before touching wet walls or using metal tools near outlets. Recognize that drywall wicks water several feet above the visible wet line through capillary action, making damage extent larger than it appears. A water line 2 feet high often means studs are wet 4–5 feet up the wall.
| Water Category | Source Examples | DIY Safe? | Drying Approach |
|---|---|---|---|
| Category 1: Clean Water | Supply line leaks, burst pipes, rainwater, AC condensate | Yes if response within 24-48 hours | Standard drying with air movers and dehumidifiers, salvageable with proper technique |
| Category 2: Gray Water | Dishwasher/washing machine discharge, toilet overflow with urine, aquarium water | Caution, professional evaluation recommended | Antimicrobial treatment required, shorter drying window before materials must be removed, partial demolition likely |
| Category 3: Black Water | Sewage backup, river flooding, hurricane storm surge, toilet overflow with feces | No, professional remediation required | Complete removal and replacement mandatory, contains pathogens and toxins unsafe for homeowner handling |
Moisture meters with pin-type probes penetrate 1/4 to 3/8 inch into studs measuring electrical resistance and provide accurate readings of internal moisture. Readings over 12% indicate wet materials requiring continued drying. Pinless meters scan up to 3/4 inch deep without holes using electromagnetic sensors, useful for quick surveys. Thermal imaging cameras show temperature differences indicating trapped moisture behind surfaces appearing dry. Touch testing is completely unreliable since surfaces feel dry while interior gypsum core and wall cavities remain saturated. Your hand tells you nothing about what’s happening inside the stud or behind the vapor barrier.
Clean water can be safely DIY dried if response starts within 24–48 hours and drying completes within 3–5 days. However, clean water becomes Category 2 gray water after sitting 48+ hours due to bacterial growth from building materials and organic debris. Category 2 and 3 water damage is not safe for DIY repair due to bacteria and pathogens requiring proper protective equipment and disposal protocols. Attempting DIY drying on contaminated water creates serious health hazards. Most insurance companies require professional certification for Category 2 and Category 3 losses.
Removing Drywall and Insulation to Expose Wet Studs

Trapped moisture behind drywall and insulation prevents airflow and creates hidden mold conditions. Wet porous materials can’t dry effectively in place and become breeding grounds for bacteria within 24–48 hours. The paper backing on drywall is organic food for mold spores, and wet insulation acts like a sponge pressed against the studs.
Insulated exterior walls: Minimum 24-inch flood cut above highest moisture line to remove wet insulation. Fiberglass and cellulose hold water and release slowly, trapping moisture against studs. You can’t dry insulation in place no matter what equipment you use.
Non-insulated interior walls: Weep holes near floor (2-inch diameter every 16 inches between studs) if lightly wet. Flood cuts if heavily saturated or moisture readings high. Small access points work for minor wetting, but don’t try to save drywall if studs are soaked.
Baseboards and trim: Complete removal along all wet walls to prevent moisture trapping at drywall bottom edge and allow air circulation at floor level. Baseboard creates a sealed pocket where moisture accumulates.
Flooring materials: Carpet, padding, and underlayment removal in affected areas as these trap moisture against subfloor and bottom plates. Wet carpet pad is like a wet sponge sitting on wood for days.
Wall cavities behind cabinets: Toe-kick removal or access holes through cabinet backs to reach hidden wall sections. You can’t dry what you can’t reach with airflow.
Safety precautions: Turn off electrical power to affected walls. Wear protective equipment (gloves, eye protection, N95 mask for dust). Contain demo area with plastic sheeting. Test for asbestos in homes built before 1980.
Use a utility knife or drywall saw for flood cuts. Measure and mark horizontal cut line at consistent height, 24 inches minimum for insulated walls. Score face paper with the knife then snap drywall back to break cleanly. Cut through back paper to complete separation. Pull wet insulation out of stud bays carefully to avoid tearing and spreading moisture. Wet fiberglass falls apart easily. Dispose of wet materials immediately in sealed bags to prevent mold spores from spreading through the home. Document extent of removal with photos showing exposed studs and removed sections for insurance claims.
Special Drying Challenges with Exterior and Insulated Walls

Insulation fills entire stud bays blocking air circulation. Vapor barriers trap moisture on one side preventing escape. Multiple material layers (exterior siding, sheathing, studs, insulation, vapor barrier, drywall) create complex drying challenges where moisture moves slowly through the assembly. Water that entered through a leak on the exterior side has to travel through every layer to evaporate into interior air.
Wet insulation can’t be dried effectively in place regardless of equipment used and must be completely removed via flood cuts. Saturated fiberglass and cellulose hold water like sponges and release moisture slowly over weeks while blocking airflow to studs behind them. Trying to dry studs with insulation in place is like trying to dry a towel wrapped around a stick. The outer layers need direct air contact.
Walls Behind Cabinets, Tile, and Built-Ins
Remove cabinet toe-kicks to expose bottom plates and allow air circulation into lower wall cavity. The small gap created provides just enough access for air movement into the closed stud bay.
Drill 2-inch access holes through cabinet backs into wall cavities for inserting air mover hoses directly into stud bays. Position holes low near the floor to drain any trapped water and high near the top to vent moisture-laden air.
Tile and shower surrounds may require grout removal and tile demolition if saturation extends behind the waterproof membrane. Water behind a tile wall has nowhere to go and sits against the studs until the tile comes off.
Built-in shelving and entertainment centers may need complete removal for proper wall access rather than attempting inadequate drying. Furniture blocking wall surfaces prevents the air movement needed for evaporation.
Closed-in areas dry 2–3 times slower than open walls due to limited airflow and air mover positioning difficulties.
Position air movers to blow directly into open stud bays from bottom opening creating upward airflow through entire cavity. Place a second air mover at top if possible to create cross-flow. Position the dehumidifier to pull moisture-laden air from cavity openings. Verify both interior face and exterior side of studs reach 10–12% moisture target before installing new insulation as trapped moisture between layers causes long-term rot. Take readings through access holes or remove additional drywall sections to test the exterior side of studs. Consider upgrading to closed-cell spray foam insulation or faced batts with proper vapor barrier orientation during reconstruction to prevent future moisture problems.
Preventing Mold Growth on Wet Wall Studs

Mold spores exist everywhere in the air but require three conditions to colonize and grow: moisture content above 16%, organic food source like wood or drywall paper, and 24–48 hours of continuous wetness. Speed is absolutely crucial in water damage response since the window to prevent growth is extremely short. If you’re starting the drying process 36 hours after water intrusion, mold is already beginning to establish on wet surfaces.
Drying alone doesn’t kill established mold spores which remain viable and continue spreading. Visible black or green growth on studs or persistent musty odors after 48 hours of wetness requires professional mold remediation including physical removal, containment with negative air pressure to prevent spore spread, HEPA filtration, and antimicrobial treatment of affected surfaces. Attempting to simply dry over active mold growth spreads millions of spores through home air via equipment airflow creating respiratory health hazards. Air movers become mold distribution systems if you run them across contaminated surfaces.
Prolonged saturation lasting days to weeks (not just 24–48 hours) allows wood decay fungi to break down cellular structure causing soft spots, darkening, and structural weakness that compromises load-bearing capacity. Studs showing visible decay or soft texture when pressed with a fingernail require complete replacement not just drying since structural integrity is permanently damaged. Wood rot indicates water intrusion was present far longer than the mold timeline. A stud that dents under fingernail pressure is structurally compromised.
Mold prevention measures:
Start drying within 24 hours of water intrusion whenever possible to stay ahead of mold colonization timeline.
Maintain indoor humidity below 50% throughout entire drying process using dehumidifiers as mold can’t grow in low-humidity environments.
Remove all porous materials (wet insulation, drywall with paper backing) that can’t be fully dried within 48-hour window.
Ensure complete direct air circulation across all stud surfaces including edges and back faces, not just exposed front faces visible after drywall removal.
Verify complete dryness with moisture meter readings of 10–12% before any reconstruction to prevent hidden cavity growth behind new drywall where it can’t be detected until health problems develop.
When to Call Professional Restoration Services
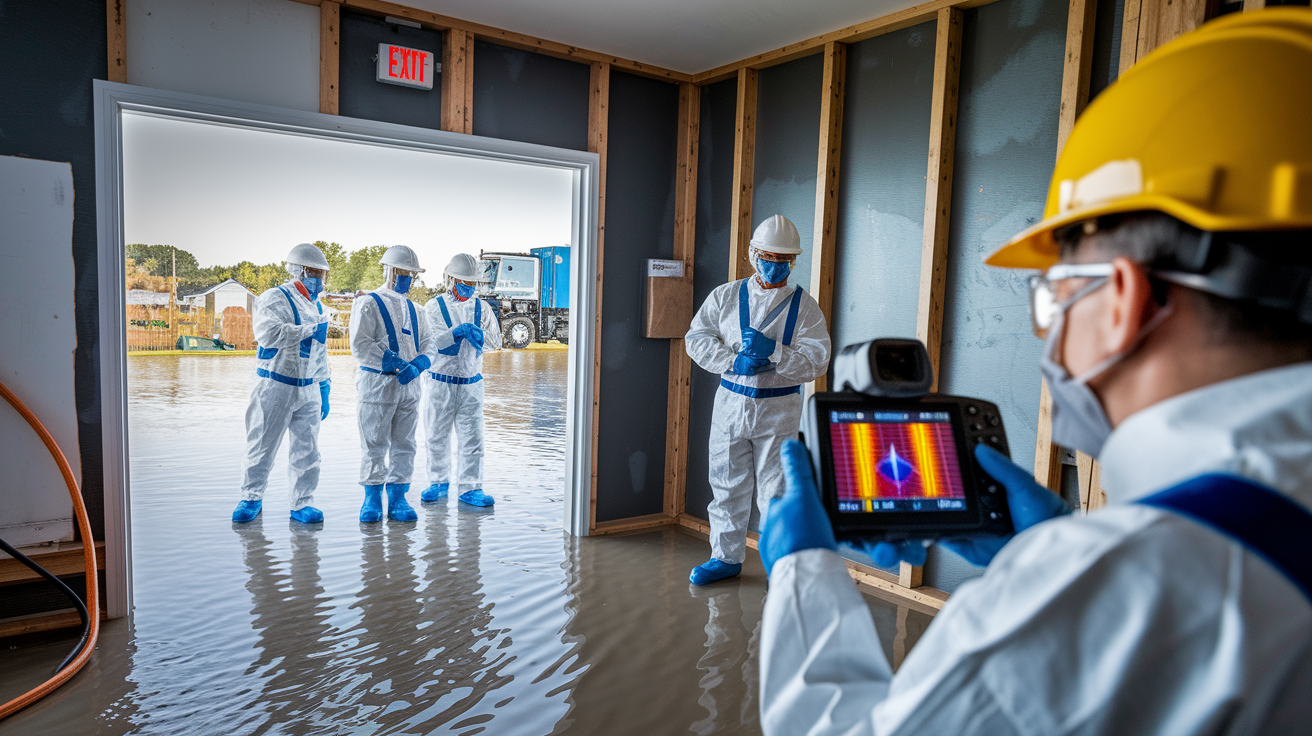
Many homeowners can successfully handle small clean-water incidents with proper equipment and technique. But certain situations require professional equipment capacity, specialized expertise, safety protocols, and insurance documentation that exceed DIY capabilities. Recognizing these situations early prevents expensive mistakes and health risks.
Call professionals when:
Category 2 gray water or Category 3 black water contamination present requiring antimicrobial treatment and specialized disposal.
Ceiling shows sagging, water pooling above drywall, or imminent collapse risk requiring immediate structural assessment.
Multiple rooms or entire floors affected requiring coordinated large-scale drying with dozens of air movers and industrial dehumidifiers.
Moisture detected inside HVAC ductwork or system components risking mold spread throughout home via air circulation.
Water damage affects load-bearing walls, floor joists, or structural framing members requiring engineering evaluation.
Visible mold growth on studs or persistent musty odor after 48 hours indicating remediation needed beyond simple drying.
Electrical wiring, outlets, or panels were submerged or exposed to water creating shock and fire hazards.
Insurance claim involves significant dollar amount requiring professional documentation, moisture mapping, and restoration certification.
IICRC-certified technicians have thermal imaging cameras finding hidden moisture in wall cavities and ceilings invisible to moisture meters. Industrial LGR dehumidifiers remove 140+ pints daily versus 30–50 pints for home units enabling 2–3 times faster drying. Wall cavity injection systems force heated air directly into closed stud bays. Truck-mounted water extraction equipment pulls standing water in minutes instead of hours. Antimicrobial treatments and proper containment handle contaminated materials safely. Psychrometric calculations optimize temperature and humidity for maximum evaporation rates. Insurance-accepted documentation includes moisture mapping and daily progress photos. For more guidance on understanding when DIY ends and professional help begins, see our complete breakdown of decision factors.
Professional restoration averages 500 dollars for moderate single-room repairs but prevents thousands in future mold remediation, structural repairs, or health problems from inadequate drying. Most homeowner insurance policies cover sudden accidental water damage from burst pipes and appliance failures making professional service cost-neutral after deductible payment. Documented professional drying with certification provides liability protection if mold appears months later. Attempting DIY on situations beyond skill level often leads to expensive complete rework when shortcuts fail and hidden moisture causes problems requiring walls reopened.
Post-Drying Verification and Reconstruction Preparation

Even after all studs reach 10–12% moisture target matching unaffected home areas, continue running dehumidifiers and air movers for an additional 24 hours then retest. Readings can be misleading if deep core moisture hasn’t equilibrated with surface layers yet. Shutting off equipment too early allows moisture from the interior of lumber to migrate back to the surface and raise readings again.
Take moisture readings across all previously wet studs at three heights: floor level, mid-wall, ceiling height using a pin-type meter. Test subfloor and bottom plates thoroughly as horizontal surfaces retain moisture longest and drain slowly. Verify readings match unaffected areas of home in different rooms, typically 8–12% depending on local climate. Take readings at the same time of day as baseline measurements for consistency. Morning readings can be 1–2% higher than afternoon readings due to overnight humidity changes. Document final readings with photos showing meter display and measurement locations with stud markings visible.
Examine all studs carefully for soft spots or darkened areas indicating wood rot or decay requiring complete board replacement before closing walls. Check for any remaining musty odors suggesting hidden moisture pockets that meters missed. Ensure wall cavities are completely clean of wet insulation debris and construction dust. Apply mold-inhibiting primer to studs if any water staining present even after complete drying. Verify electrical boxes and wiring are completely dry and show no corrosion before energizing circuits. Inspect subfloor for delamination or soft spots indicating plywood or OSB breakdown from saturation.
Install new insulation with proper vapor barrier orientation facing heated space. Hang drywall using moisture-resistant greenboard or paperless drywall in bathrooms, basements, or other high-humidity areas. Prime all new drywall with stain-blocking primer before finish coats to seal and protect. Reinstall baseboards and trim last after any flooring work to allow continued airflow during final cure period. Use oil-based or alcohol-based paint for superior moisture resistance and stain blocking on all repaired wall surfaces. For detailed guidance on planning your rebuild after water damage, review our complete reconstruction sequencing steps.
Final Words
Getting wet studs properly dry isn’t complicated, but it takes time and the right equipment running continuously.
Start fast, expose the framing completely, and keep air moving across every surface until your moisture meter confirms 10–12% on every stud you test.
Don’t rush reconstruction just because surfaces look dry. Hidden dampness always shows up later, and it shows up as mold or rot.
The few extra days you spend drying wet studs after water damage the right way saves you from tearing the same walls open again in six months.
FAQ
How do you dry out wet studs?
Drying out wet studs requires removing all drywall and insulation, then positioning air movers at 45-degree angles across exposed stud surfaces with a dehumidifier running continuously to maintain humidity below 50%. Complete drying to 10–12% moisture content typically takes 3–7 days depending on saturation level and equipment used.
How long does it take for drywall to dry after water damage?
Drywall drying time after water damage ranges from 24–48 hours for small clean-water leaks to 3–5 days for moderate damage when using professional air movers and dehumidifiers. However, wet drywall that sat for 48+ hours typically requires removal rather than drying due to mold contamination risk.
How do you dry out wet framing?
Drying out wet framing involves exposing all affected studs by cutting away drywall at least 24 inches above the moisture line, removing saturated insulation completely, then running air movers directly across wood surfaces with dehumidifiers until moisture readings reach 10–12%. Insulated exterior walls always require flood cuts since trapped insulation blocks airflow.
What draws moisture out of wood?
Drawing moisture out of wood requires creating low-humidity air conditions (below 50%) using dehumidifiers while circulating warm air (65–75°F) across all wood surfaces with fans to accelerate evaporation. The combination of reduced ambient humidity and direct airflow pulls moisture from wood fibers into the air where dehumidifiers extract it.
Can wet wall studs be salvaged or do they need replacement?
Wet wall studs can be salvaged through proper drying if they’re Category 1 clean water damage, show no soft spots or decay, and reach 10–12% moisture within 5–7 days of continuous drying. Studs exposed to sewage, showing visible rot, or remaining above 12% moisture after extended drying require complete replacement.
Should you remove insulation from wet walls before drying?
You should remove insulation from wet walls before drying because saturated fiberglass and cellulose hold water like sponges and block airflow to studs behind them. Wet insulation cannot dry effectively in place and traps moisture against framing, creating ideal conditions for mold growth within 24–48 hours.
How do you know when studs are completely dry?
Studs are completely dry when moisture meter readings consistently measure 10–12% matching unaffected areas of your home, readings remain stable after 24 hours without equipment running, and wood feels room temperature without cool spots. Test at three heights on each stud and verify readings hold steady before reconstruction.
What equipment do you need to dry wet studs?
Equipment needed to dry wet studs includes air movers positioned at 45-degree angles creating overlapping airflow patterns, a dehumidifier removing at least 30–50 pints daily for DIY or 100+ pints for faster professional units, and a pin-type moisture meter for tracking progress. Additional items include plastic sheeting for room sealing and extension cords.
Does heat help dry wet studs faster?
Heat helps dry wet studs faster by maintaining 65–75°F temperatures that allow air to hold more moisture vapor and accelerate evaporation rates from wood surfaces. However, excessive heat above 80°F without proper humidity control can drive moisture deeper into materials rather than extracting it, so controlled temperature with dehumidification works best.
When should you call a professional for wet stud drying?
You should call a professional for wet stud drying when dealing with Category 2 gray water or Category 3 sewage contamination, multiple affected rooms requiring industrial equipment, visible mold growth after 48 hours, or ceiling sagging indicating collapse risk. Professionals have thermal imaging cameras, industrial dehumidifiers removing 140+ pints daily, and insurance-required documentation capabilities.
