

You just ripped out soaked drywall and now you’re staring at wet studs wondering how long before mold shows up. The answer is about 24-48 hours if those studs stay wet, which is why drying framing fast isn’t optional. The right combination of fans, dehumidifiers, and regular moisture meter checks can get soaked 2x4s from 20% moisture content down to safe levels in about a week instead of letting them sit damp for a month while spores multiply in the dark.
Proven Methods to Dry Water-Damaged Wall Framing Fast
Framing lumber reading 18% or higher on a moisture meter is too wet for drywall installation. That number matters because mold spores wake up and wood rot starts when moisture hangs above 19%. You’re shooting for 12-14% moisture content, closer to 12% if you can get it. Kiln-dried lumber should hit 15% or lower. Pressure-treated can go to 17% before you button things up.
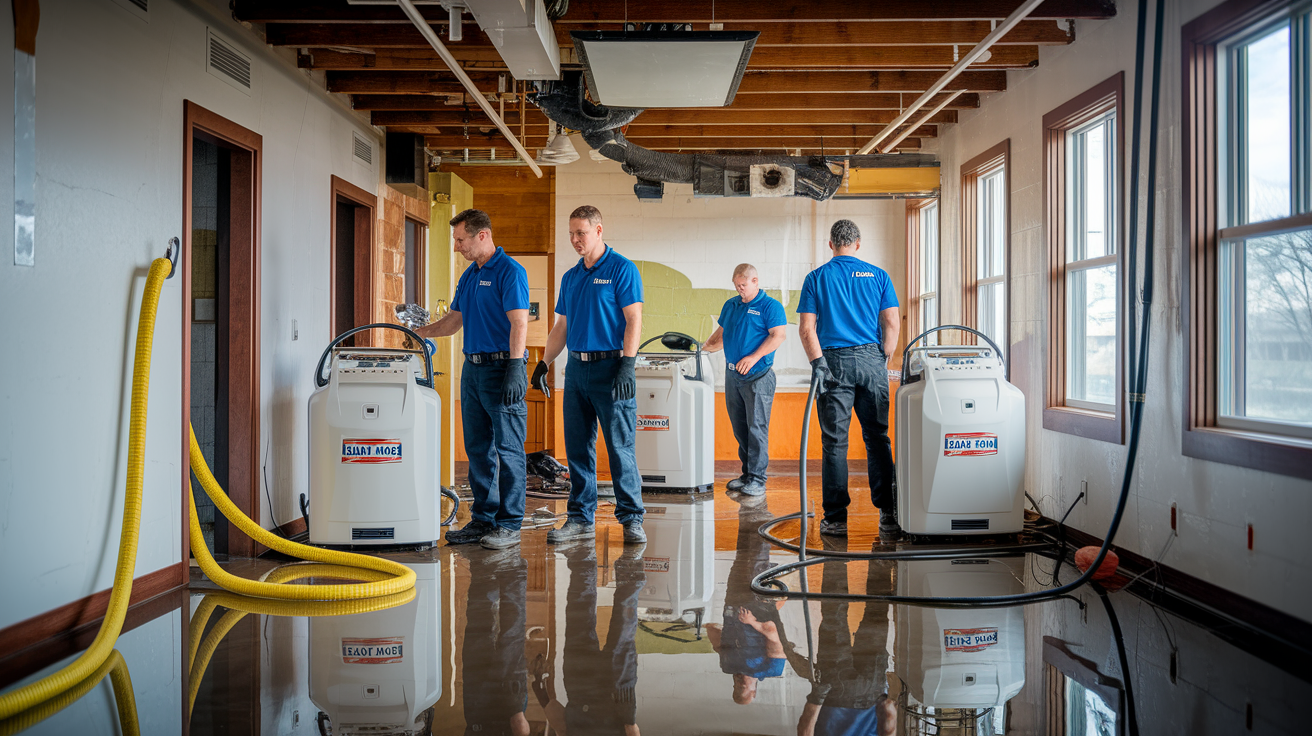
The fastest approach that actually works combines three things: constant air movement from fans, dehumidification when it’s humid outside (above 60%), and checking moisture levels regularly with a pin-type meter. This three-part setup dries soaked framing in about a week when it’s not freezing, compared to 3-5 weeks or longer if you just wait around. Skip any of these, and you’re either guessing or adding weeks to your timeline.
Moisture Meter Selection and Measurement Technique
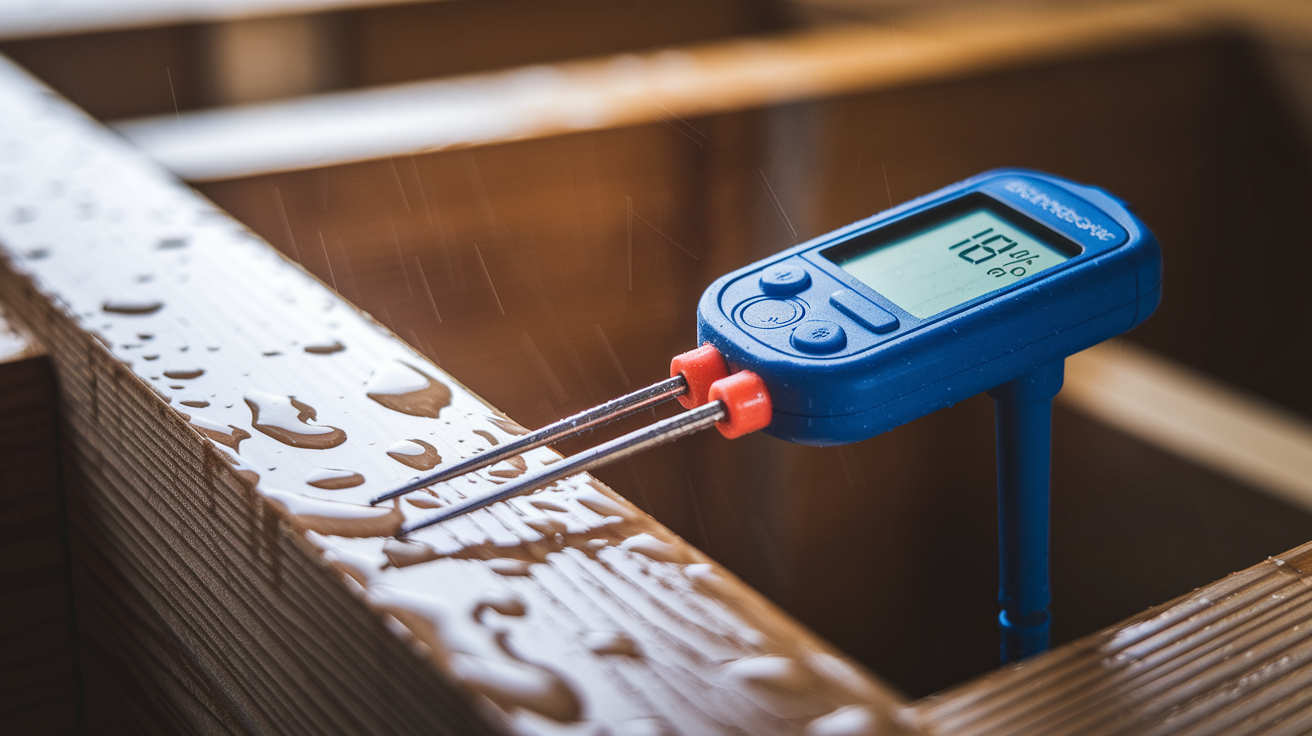
Pin-type meters are what you want for framing work. Something like the Extech MO220 (runs around $150) gives you solid readings where they count. Pinless meters read maybe 3/4 inch deep, which sounds helpful until you realize moisture often sits deeper in the lumber or trapped between your sill plate and concrete. Pin-type lets you push probes into the wood at different depths to find where water’s actually hiding.
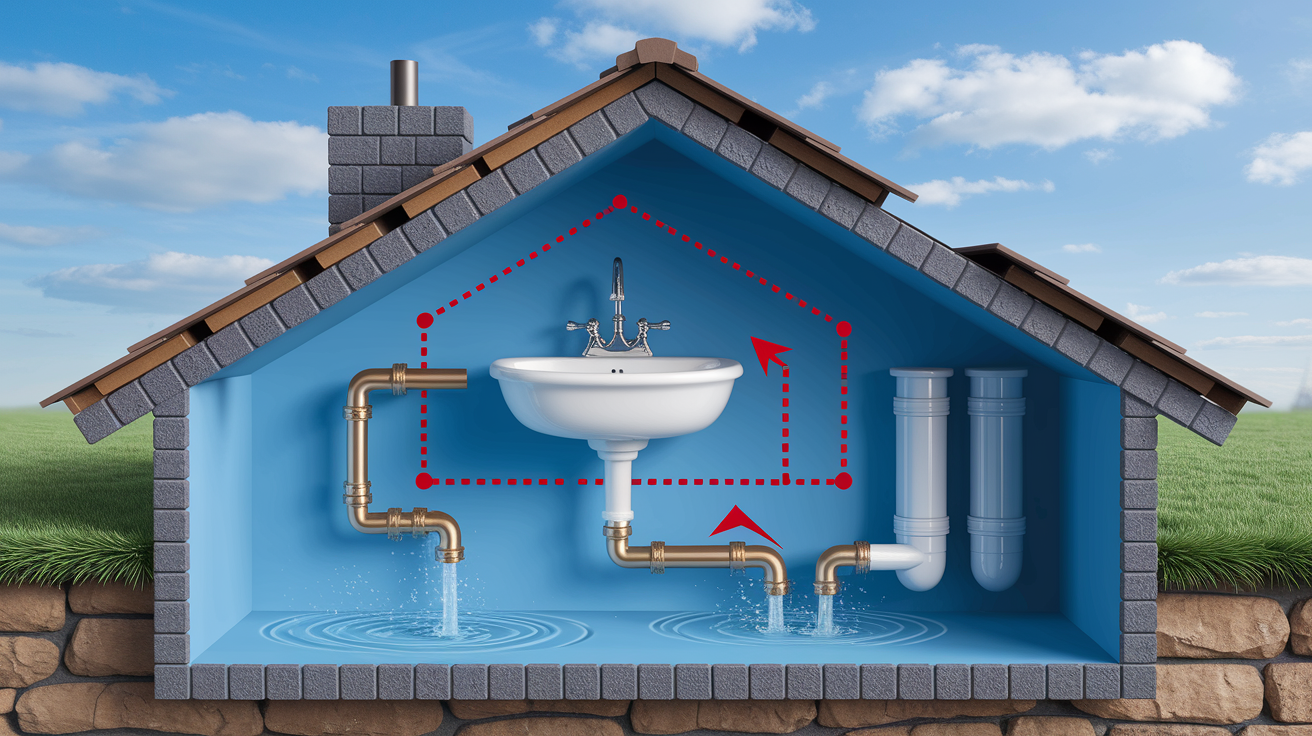
You need to measure three specific spots. Check bottom plates every fourth stud because gravity pulls moisture down and these plates soak up water from damp subfloors. Test every tenth stud at chest height to catch moisture that hasn’t dropped yet. Always check king studs (the doubled ones beside door and window openings) because they take forever to dry and shrink the most when they finally do.
While you’re actively drying, measure every 3-4 days. As you close in on target levels (within 2-3 percentage points), check daily. Write it down with locations. You need the trend, not just one reading.
1) Measure moisture with your meter at bottom plates and multiple stud spots to get a baseline and find the wettest areas
2) Set up carpet blower fans creating constant airflow across all wet framing, positioning them based on what your moisture readings tell you
3) Run a dehumidifier and close windows if outdoor humidity’s above 60%, or leave windows open if it’s drier outside
4) Check progress every 3-4 days and move equipment to areas that aren’t drying as fast
Expected Drying Timeframes
| Drying Method | Temperature Conditions | Expected Timeline |
|---|---|---|
| Fans plus dehumidifier | Non-freezing (above 32°F) | One week to drop from 18-20% to 14% or below |
| Fans only, no dehumidifier | Daytime temps above 45°F | 0.5-1% moisture reduction per day |
| Natural drying, no equipment | Outdoor temps above 60°F | 2-4 weeks |
| Natural drying in poor conditions | Cold and rainy weather | 6-12 weeks |
When outdoor humidity stays under 60% and temps run above 45°F, crack the windows and let fans pull fresh air in while pushing moisture-saturated air out. This works great in spring and fall most places. When outdoor humidity climbs past 60%, you’re just moving wet air around. Close the windows, seal up the space as much as you can, and run a dehumidifier with your fans. The dehumidifier strips moisture from the air while fans keep it moving across wet surfaces. That combo creates conditions for one-week drying even when the weather isn’t cooperating.
Air Circulation Strategies for Accelerated Framing Drying

Air movement is everything for structural drying. Still air against a wet stud does basically nothing. Moving air picks up moisture from the wood surface through evaporation and carries it away, creating a cycle that pulls moisture from deep in the lumber toward the surface where it can evaporate.
For a 2,500 square foot house, pros recommend 10 fans. For damage in one or two rooms, 3-4 fans running constantly can drop moisture content by 5 percentage points in about a week. That’s the difference between 20% (too wet, mold risk) and 15% (ready to close up). Position fans based on what your moisture meter shows you, not on even spacing. If bottom plates in a bathroom read 22% but bedroom studs are at 16%, concentrate airflow where the problem’s worst.
| Fan Type | CFM Rating | Power Draw | Cost |
|---|---|---|---|
| Carpet blower fan (Quest C1000) | 2,700 CFM | 2.4-2.8 amps | $300 purchase / $10 per day rental |
| Box-type air mover | 1,800-2,400 CFM | 2.5-3.5 amps | $250-400 purchase / $8-12 per day rental |
| Conch-shell fan | 3,000+ CFM | 3.0-4.0 amps | $350-500 purchase / $12-15 per day rental |
Placement matters more than how many fans you’ve got. Target wall cavities and bottom plates where moisture meters show high readings. Angle airflow across wet surfaces rather than straight at them. If you can set up a pattern where air enters from one side and exits on another, you’ll move more total air and dry faster. Mix fan types based on what you need. Carpet blowers work well in open framing, box-type air movers fit tighter spots, and conch-shell fans move the most air when you’ve got floor space.
Chain and padlock every fan to the framing. These need to run 24/7, and a $300 fan on an empty job site will walk away. Run them constantly, not on timers. That 0.5-1% per day drying rate assumes constant airflow. If you’re looking at a month rental at $150 versus buying at $300, buy the fans. You’ll use them again, and you won’t be dealing with return deadlines while trying to hit moisture targets.
Dehumidification Techniques for Wet Framing in High Humidity
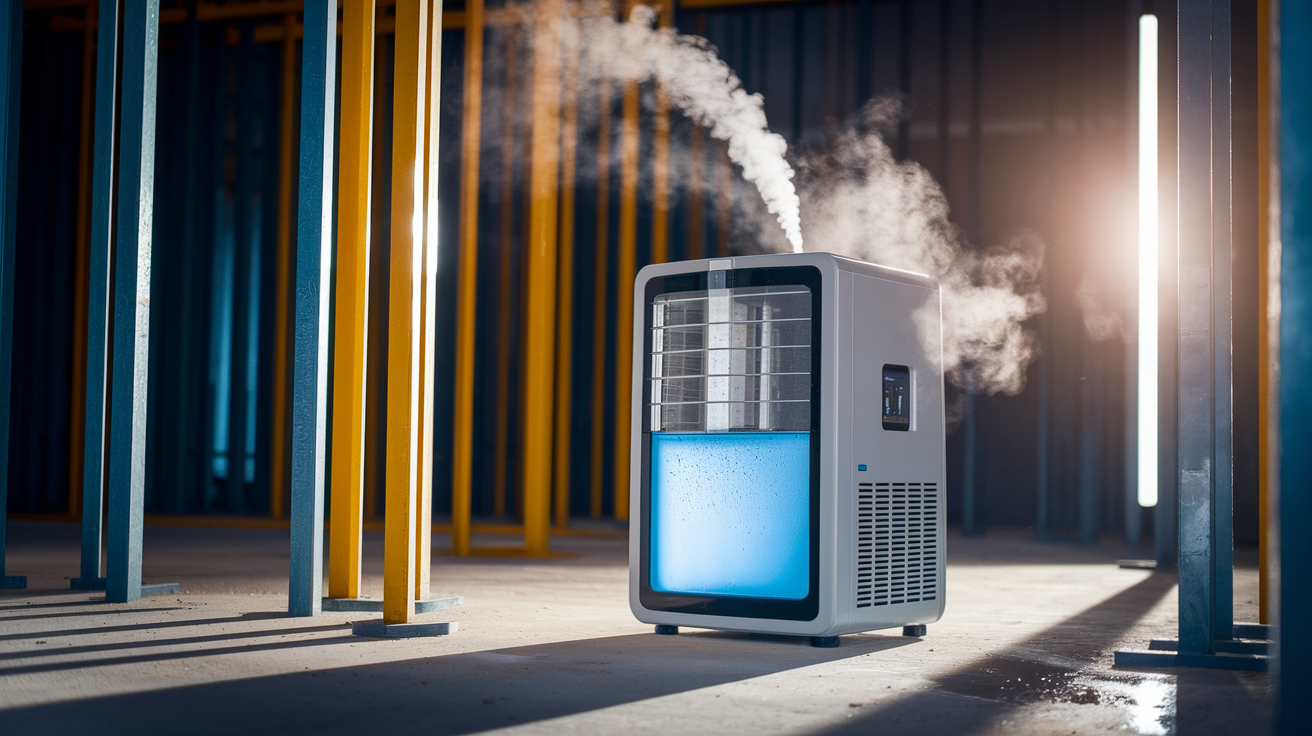
When outdoor air humidity exceeds 60%, fans alone just move damp air around. You need a dehumidifier to actually pull moisture out so your fans can pick up more from the framing. That 60% threshold matters because at higher humidity, wood absorbs nearly as much moisture from the air as it releases, and drying basically stops.
Residential dehumidifiers from hardware stores might handle a basement or bathroom, but they’re undersized for structural drying. Pro-grade units like the Quest PowerDry 4000 include a built-in hygrometer ranging from 30-70% relative humidity and can run continuously. The Dri-Eaz LGR Evolution is another one restoration companies use. These cost more and pull more power, but they actually remove enough moisture to change conditions in a whole house.
1) Close all windows and exterior doors to create a controlled space so the dehumidifier isn’t fighting outdoor humidity
2) Set your target relative humidity (55% for active structural drying when framing’s still wet, 45% from trim stage forward)
3) Put the dehumidifier somewhere central where your fans can move the dried air throughout the space
4) Empty the collection tank daily or connect a drain hose so it doesn’t shut off when the tank fills
For projects lasting more than a week or two, renting makes less sense than buying. A commercial-grade dehumidifier costs $800-1,500 but rents for $40-60 per day. Two weeks of rental already puts you at $560-840. If you’re a builder or deal with water issues regularly, buying pays for itself fast.
The combo of dehumidifiers and fans creates optimal drying. Fans evaporate moisture from wood into the air. Dehumidifiers remove that moisture from the air. Then fans bring newly dried air back to wood surfaces to pick up more moisture. This cycle runs constantly, pulling moisture out of lumber way faster than either fans or dehumidifiers could manage alone. In non-freezing conditions with both running, you hit target moisture levels in about a week.
Heat Application Methods for Cold-Climate Wall Framing Drying
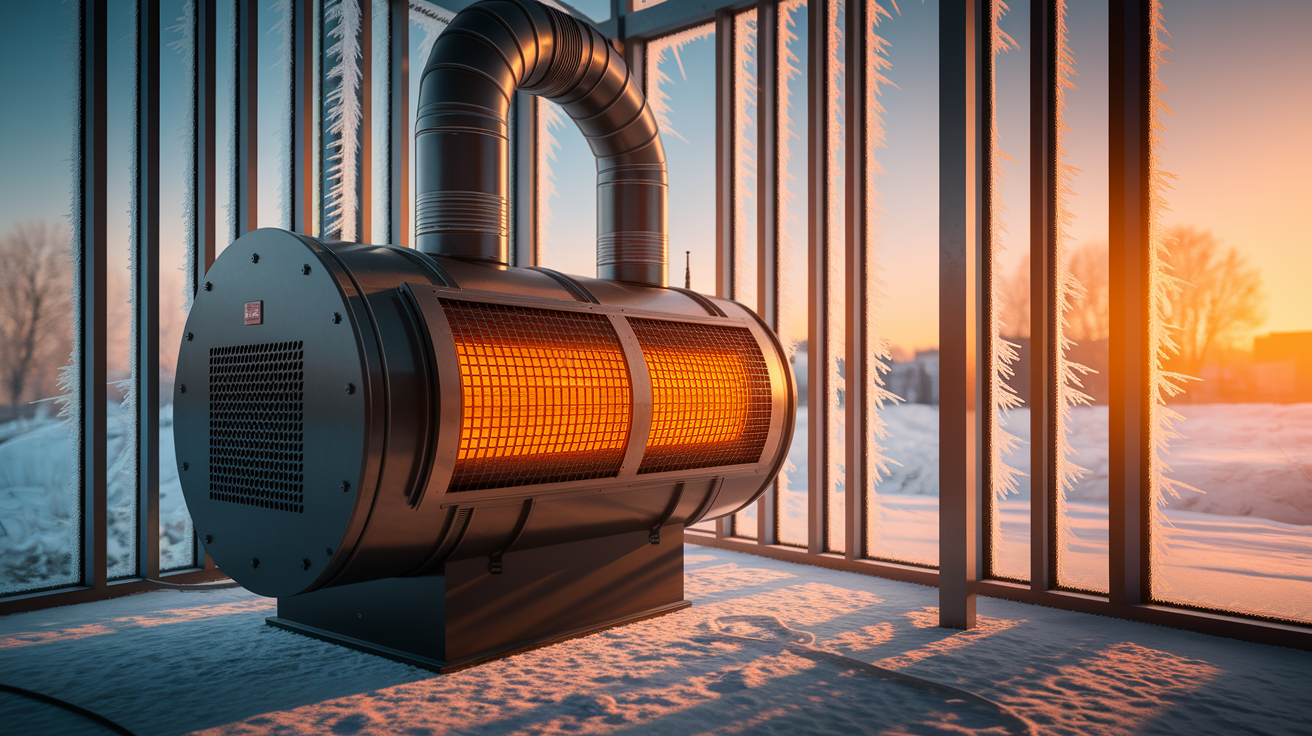
Never use propane heaters to dry wet framing. They dump one gallon of moisture into the air for every hour they run because combustion creates water vapor. You’ll be fighting the moisture you’re trying to remove.
Proper heating for structural drying needs combustion outside the structure with dry hot air blown inside. Indirect-fired diesel heaters rated at 90,000 BTU do this. The fuel burns in an external chamber, and a heat exchanger transfers warmth to clean air that gets blown into your building. No combustion gases, no added moisture, just dry heat. These can run up to three days on one external fuel tank without refueling.
- Dri-Eaz mobile furnace produced 85,000 BTU of dry heat (discontinued but still around in rental fleets)
- Dragon X2 produces 100,000 BTU and mounts on a trailer for job-site mobility
- Pro indirect-fired diesel heaters from various makers at the 90,000 BTU range with three-day runtime
Below freezing, drying time stretches way out. At 32°F and below, moisture in wood moves so slowly that natural drying basically stops. Even with equipment, it takes much longer. At 100% humidity, no drying happens regardless of air movement or heat. The air’s already holding all the moisture it can, so there’s nowhere for moisture from the wood to go.
In freezing conditions, you need all three working together: heat to get temperature above freezing, dehumidification to lower air moisture, and fans to move the conditioned air across wet surfaces. Position heater output to warm the coldest areas first (usually bottom plates and exterior walls), and run everything constantly. Check your moisture meter more often because you’re operating at the edge of what’s practical. If outdoor temps stay consistently below 20°F, seriously consider waiting for better weather if your timeline allows.
When to Remove Drywall and Insulation from Wet Wall Framing

Once moisture content exceeds 19%, mold spores activate and wood rot begins. That’s your line between “dry it in place” and “open it up.”
Wall cavities filled with wet insulation block airflow and trap moisture against studs. Fiberglass batts compressed with water lose their insulating value and create a moisture blanket that keeps framing wet. Spray foam holds water against wood even longer. If insulation’s visibly wet, compressed, or touched standing water, it needs to come out. You can’t dry framing through saturated insulation.
- Standing water that soaked wall cavities from floor to more than a few inches up
- Saturation reaching 24 inches or higher on walls from flooding or major leak
- Visible mold anywhere on framing, drywall, or insulation
- Insulation that’s wet to the touch, compressed, or changed color
- Contaminated water including sewage backup, flooding with mud or debris, or standing water with biological growth (see Water Damage Categories for detailed contamination level guidance)
Modern tight construction traps moisture inside wall cavities. Older homes had enough air gaps and poor weatherproofing that walls could dry to both sides. Today’s building practices create vapor barriers and sealed cavities that work great for energy efficiency but trap any moisture that gets inside. Once water enters a sealed wall cavity, it has almost nowhere to go without help.
When full drywall removal isn’t necessary but you need air circulation behind closed walls, create access openings. Pull baseboards and drill 2-inch holes low in the drywall to let fans blow air into the cavity. Cut out the bottom 12-16 inches of drywall to expose the most saturated bottom plates and lowest studs. These partial openings let you get airflow where it matters most without tearing down entire walls.
Mold Prevention Strategies During Wall Framing Drying Process

Mold spores sit dormant on surfaces everywhere, including on lumber. They activate when moisture content exceeds 19% and conditions stay wet. Your prevention plan is simple: get moisture below the activation threshold quickly and keep it there.
Antimicrobial treatments and EPA-registered fungicides add a safety margin when framing’s been exposed to contaminated water or stayed wet for more than a week. These products kill active mold and create a chemical barrier preventing new growth while drying continues. They’re not a substitute for actual drying, but they buy you time when the timeline isn’t perfect.
1) Start active drying within 24-48 hours of water exposure to cut down mold growth opportunity
2) Keep continuous airflow across all wet framing until every moisture reading reaches target levels
3) Apply EPA-registered fungicide to exposed studs and plates if drying extends beyond one week or moisture readings stay above 18%
4) Verify all moisture readings are below 15% (closer to 12-14% is better) and stable for 48-72 hours before installing insulation or closing walls
Visual inspection catches mold before it becomes a major problem. Look for discoloration (black, green, white, or orange spots), musty smell (which often shows up before visible growth), and fuzzy or powdery surface texture on wood. Check behind bottom plates where they meet the subfloor, in corners where air circulation’s weakest, and on any framing that was submerged or stayed saturated longest.
A case from a one-year-old house showed wood rot throughout the framing that came from improperly dried framing during construction, not from leaks after people moved in. The builder had closed walls when moisture readings were still above 18%, and the tight construction never let the framing dry naturally. Rot progressed inside the walls for a year before becoming visible. Opening walls revealed extensive damage needing stud and plate replacement that could’ve been saved with proper drying before closing everything up.
Drying Considerations for Wood Framing Versus Metal Studs
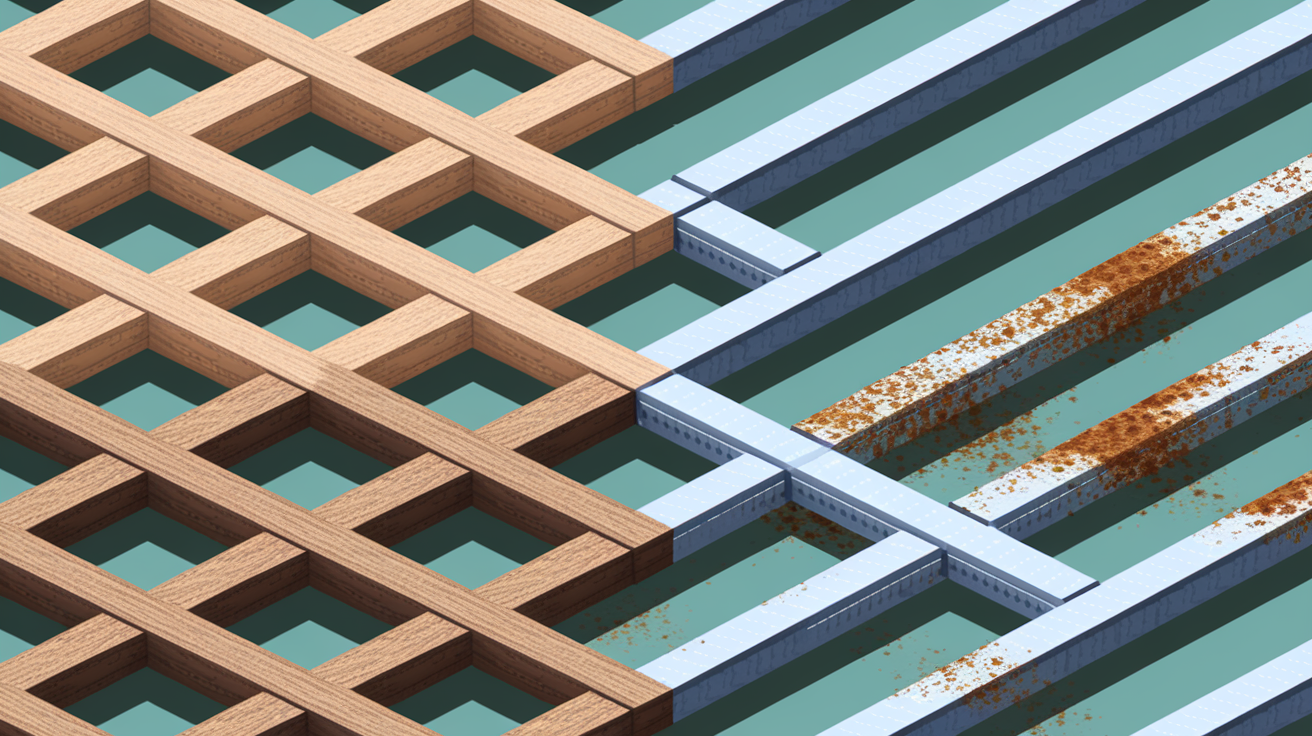
Metal studs don’t absorb moisture, which sounds like a win until you realize they create different problems. Water pools in the bottom track, sits on horizontal surfaces, and promotes corrosion of the steel itself. Rust shows up quickly on wet steel studs, especially if the water had any salt or chemical contamination. Metal framing still needs drying, just not because the studs themselves are holding water.
Wood framing absorbs water at different rates depending on how it was processed. Kiln-dried lumber arrives at job sites at 12-14% moisture but absorbs water from storage in the rain, job site flooding, or plumbing leaks during construction. Pressure-treated lumber contains chemical preservatives and more moisture to begin with, so target levels can be slightly higher (17% or less versus 15% or less for kiln-dried). Green lumber was never kiln-dried and starts with much higher moisture.
- King studs (the doubled ones flanking door and window openings) dry slowest and shrink the most because they’re either two full studs or a wider dimension with more mass to dry
- Shrinkage exceeding 5 percentage points after drywall installation causes visible finish problems including nail pops, cracks, and trim gaps
- Engineered wood products like LVL beams and rim board have different drying rates than dimensional lumber due to adhesives and manufacturing
- Metal connectors, joist hangers, and fasteners risk corrosion when wood stays wet against them for extended periods
With metal studs, moisture sits on surfaces rather than soaking into the material. This means faster drying once you get air moving, but the water has to go somewhere. Puddles in the bottom track don’t evaporate without airflow directly in the track. Tilt or drill drainage holes so water can run out rather than sitting. Surface rust appears quickly but doesn’t immediately wreck structural capacity the way rot does in wood. The bigger concern with metal framing is drying the wall cavity contents (insulation, drywall, sheathing) since the studs themselves won’t trap moisture the way wood can.
Wood framing reaches equilibrium moisture at 10-12% after one year of HVAC operation in an occupied home. That final shrinkage from installation moisture (ideally 12-14%) to equilibrium is small enough that finish materials can handle it. Close walls when framing’s at 18%, and that stud will eventually shrink to 10%, losing 8 percentage points of moisture. That much movement cracks drywall, pops fasteners, and opens gaps at trim joints.
Professional Restoration Versus DIY Drying of Wet Framing
Call a pro restoration company when water damage extends throughout the house, when the water source was contaminated (sewage, chemicals, or flooding with mud), when you see structural concerns (sagging floors, bowed walls, separated framing), or when saturation’s severe enough that standing water covered framing for more than 24 hours. Some situations are too big or too risky for DIY (see When to Call a Professional for Water Damage for detailed scenarios needing expert eyes).
Pro restoration companies bring equipment that’s not practical to own for one-time use. Thermal imaging cameras find hidden moisture inside walls and under floors without invasive testing. Commercial water extractors rated for high-volume removal clear standing water in hours rather than days. Pro-grade dehumidifiers like the Quest PowerDry 4000 or Dri-Eaz LGR Evolution run constantly and remove moisture faster than residential units. Indirect-fired diesel heaters producing 90,000 BTU add enough heat to keep drying happening even in winter.
| Approach | Equipment | Timeline | Best For |
|---|---|---|---|
| DIY with basic equipment | Box fans and consumer dehumidifier | 1-2 weeks or longer | Small isolated leaks, single room, no contamination |
| DIY with rented commercial gear | Carpet blowers and commercial dehumidifier | 1 week | Moderate damage, accessible framing, clean water, owner can check daily |
| Professional restoration | Full extraction equipment, drying suite, thermal imaging | 3-7 days | Extensive damage, contaminated water, structural concerns, insurance claim |
Pro services provide 24/7 monitoring with site visits or remote sensors, complete documentation with moisture maps and daily logs for insurance claims, and guaranteed results backed by industry certifications. They know how to talk to insurance adjusters and what evidence you need for claim approval. If you’re filing an insurance claim, pro documentation of the drying process often pays for itself in higher claim settlements.
DIY makes sense for localized leaks caught quickly, situations where framing’s accessible without major demo, clean water sources (supply line leaks, not sewage), and homeowners who have time to check moisture readings daily and adjust equipment. A bathroom supply line leak that soaked one wall and the floor below is very different from a basement that took three feet of flood water. Scale and severity determine whether DIY’s practical or if you need pro help.
Safety Precautions When Drying Water-Damaged Wall Framing

Shut off electrical power to all affected circuits before starting any drying work. Water and electricity create fatal combinations. Look for submerged electrical outlets, junction boxes, and wiring. Even if water drained, moisture inside electrical components creates shock and fire risks. Use GFCI-protected extension cords to power all drying equipment, and run those cords from unaffected areas or from temporary power outside the flood zone.
Water damage falls into three contamination categories that determine safety precautions. Clean water from supply lines (like a burst pipe or failed water heater) poses minimal health risk beyond slip hazards. Gray water from appliances (dishwashers, washing machines) contains some contaminants and needs gloves during handling. Black water from sewage or flooding carries serious pathogens and requires full protective equipment.
1) Wear appropriate PPE including waterproof gloves for any water contact, N95 or better respirator if mold’s visible or suspected, and rubber boots in standing water areas
2) Check structural stability before entering rooms with significant water damage by looking for sagging ceilings, bowed walls, and compromised floor support
3) Document all damage with photos and written notes before starting work, capturing moisture readings, visible damage, and overall scope
4) Make sure you’ve got adequate ventilation when running commercial drying equipment, especially in enclosed spaces where diesel heaters or high-CFM fans affect air quality
5) Never use open-flame heaters, propane heaters, or unvented combustion equipment in enclosed spaces during drying
When moisture readings exceed 19% and conditions have stayed wet for more than 48 hours, assume mold spores are activating. You might not see visible growth yet, but spores are starting their growth cycle. Wear respiratory protection rated for mold (N95 minimum, N100 or P100 for heavy contamination). Mold exposure causes respiratory irritation, allergic reactions, and can trigger asthma attacks. Not worth breathing it while you work.
Chain and padlock all fans to the framing to prevent theft during 24/7 operation. An empty job site with $2,000 worth of fans running will attract attention. Lock them down. Watch electrical load management carefully. Running 10 fans plus dehumidifiers can overload circuits if you’re not careful. Calculate amp draw for all equipment and spread loads across multiple circuits. A typical 15-amp circuit handles about 1,800 watts safely. Six fans at 3 amps each plus a dehumidifier at 6 amps exceeds that circuit’s capacity.
Addressing Common Moisture Sources to Prevent Re-Saturation
Drying wet framing is pointless if water keeps coming in. Fix the source before you commit time and equipment to drying, or you’re just bailing a boat with the drain plug out.
Common moisture sources include plumbing leaks (supply lines under pressure, drain pipes leaking slowly, and failed fixture connections), roof leaks (damaged or missing shingles, failed flashing at chimneys or valleys, and ice dams in winter), foundation problems (cracks letting groundwater in, poor grading directing water toward the house, and failed waterproofing), and condensation (HVAC systems creating moisture, poor ventilation in bathrooms and kitchens, and humid outdoor air hitting cold surfaces).
- Find and repair all active plumbing leaks before starting drying equipment
- Fix roof damage with at least temporary tarps before attempting interior drying
- Improve site grading and drainage around foundation to direct water away from the building
- Install vapor barriers on concrete slabs and crawlspace floors where they’re missing
- Address HVAC condensation issues including clogged drain lines, failed drip pans, and improperly insulated ductwork
- Protect any stored lumber from rain during construction by covering stacks or moving materials inside
Moisture trapped between the concrete slab and the bottom sill plate creates a unique problem. Water sits in that joint and wicks up into the framing through capillary action. Drying the framing from above isn’t enough. You need to address exterior water management through improved drainage, proper grading, and vapor barriers under slabs. This moisture source explains why bottom plates show the highest readings and take longest to dry, and why you must check them specifically every fourth stud.
During the drying process, protect the building from new water getting in. Tarp over roof openings, even if they’re temporary during construction. Stretch and secure plastic sheeting over window and door openings. If you’re dealing with basement or crawlspace moisture, pump standing water right away and keep pumping if it’s rising from groundwater. A case from a one-year-old house showed ongoing moisture problems came from an unresolved source during construction, not from new leaks. The builder never addressed why framing got wet initially, just tried to dry it and close walls. The problem stuck around and eventually caused rot.
Long-Term Monitoring After Wall Framing Drying Completion
Before you close any walls, verify all moisture readings have reached target levels and stayed stable. Stable means taking readings 48-72 hours apart without seeing an increase. If a stud reads 14% today and 14.5% in two days, something’s wrong. Either you’ve got an unresolved moisture source, or conditions changed (humidity increased, temperature dropped) and drying reversed.
Create a baseline moisture map before installing drywall and insulation. This means writing down final moisture readings at all locations where you previously measured high levels. Include specific stud locations (fourth stud from left corner, king stud at master bedroom door, bottom plate under bathroom window). Take photos of your moisture meter display showing the reading and location. This documentation serves two purposes: it proves framing was properly dried if questions come up later, and it gives you a reference if moisture problems show up after walls are closed.
1) Take final moisture readings at all locations where you previously recorded high levels during drying
2) Wait 48-72 hours with drying equipment off, then re-test every location to verify moisture content stayed stable and didn’t climb back up
3) Document all final readings with photos showing the meter display and location, and written notes recording stud ID and moisture percentage
4) Schedule a follow-up check after drywall installation but before paint or texture to catch any moisture rebound before finishing
Framing lumber reaches equilibrium moisture at 10-12% after one year of HVAC operation in an occupied home. That’s the moisture level where wood stops gaining or losing moisture from surrounding air. If you close walls when framing sits at 18%, each stud will eventually lose 6-8 percentage points of moisture and shrink significantly. Lumber shrinkage exceeding 5 percentage points after drywall installation causes nail pops, drywall cracks, squeaking floors, and separation at trim joints. The house settles visibly as every stud shrinks.
Building codes and insurance documentation affect how thoroughly you need to track moisture readings. Some places require third-party verification that framing reached acceptable moisture levels before covering work with insulation and drywall. Insurance claims almost always require documentation showing proper drying happened to industry standard. Your detailed moisture readings with dates and locations provide that documentation. Save it. You might need proof you did this right if problems appear months or years later.
Final Words
The best way to dry wet wall framing comes down to three things working together: consistent air movement across every wet surface, dehumidification when outside humidity climbs above 60%, and regular moisture meter checks every few days until you hit that 12-14% target.
Run your fans 24/7, measure the bottom plates where moisture hangs on longest, and don’t seal anything up until the readings stay stable for at least two days straight.
Get this part right, and you’ll skip the mold, rot, and finish cracks that show up later when framing was closed in too soon.
FAQ
How long does wet framing take to dry?
Wet framing takes approximately one week to dry when using fans and a dehumidifier in non-freezing conditions, reducing moisture from 18-20% down to 14% or below. Natural drying without equipment takes 2-4 weeks when outdoor temperatures exceed 60°F. Cold and rainy conditions extend drying time to 6-12 weeks. Air movement with fans alone reduces moisture content by 0.5-1% per day when outdoor temps stay above 45°F.
How to dry out wet framing?
To dry out wet framing, use carpet blower fans to create continuous airflow across wet studs, run a dehumidifier when outdoor humidity exceeds 60%, and measure moisture levels every 3-4 days with a pin-type meter. Target moisture levels of 12-14% (15% for kiln-dried lumber, 17% for pressure-treated) before closing walls. Focus airflow on bottom plates and wall cavities where moisture accumulates most.
How to dry wet wall studs?
Wet wall studs dry through a combination of air circulation, dehumidification, and moisture monitoring. Position carpet blower fans to move air across exposed framing continuously. Close windows and add a dehumidifier when outdoor humidity exceeds 60%. Measure bottom plates every fourth stud and every 10th stud at chest height with a moisture meter to track progress.
Will mold always grow on wet drywall?
Mold will not always grow on wet drywall if you dry it within 24-48 hours and maintain continuous airflow until moisture content drops below 19%. Mold spores activate and rot begins when moisture content exceeds 19%. Remove drywall if saturation exceeds 24 inches in height, standing water occurred, or contaminated water sources were involved.
What moisture level is acceptable for wall studs before closing walls?
Acceptable moisture levels for wall studs before closing walls are 12-14% ideally, with 15% or lower for kiln-dried lumber and 17% or less for pressure-treated lumber. Readings above 18% indicate the framing is too wet and must dry further. Verify all readings remain stable for 48-72 hours without increasing before installing drywall or insulation.
How many fans do you need to dry wet framing?
You need approximately 10 fans to dry wet framing in a 2,500-square-foot house, or 3-4 fans minimum for localized damage. Carpet blower fans rated at 2,700 cubic feet per minute provide effective airflow. Run fans 24/7 continuously and position them based on moisture meter readings targeting wall cavities and bottom plates.
When should you use a dehumidifier for drying wet framing?
You should use a dehumidifier for drying wet framing when outdoor air humidity exceeds 60%. Close all windows and doors to create a controlled environment. Set the dehumidifier to 55% relative humidity for active structural drying and 45% from the trim stage onward. Combine with fans for optimal drying in roughly one week.
What type of moisture meter is best for checking wet studs?
Pin-type moisture meters are best for checking wet studs, with digital models like the Extech MO220 priced around $150 providing accurate readings. Measure bottom plates every fourth stud where moisture content is typically highest from subfloor absorption and gravity. Check every 10th stud at chest height and measure king studs which take longest to dry.
Can you use propane heaters to dry wet framing?
You cannot use propane heaters to dry wet framing because they add 1 gallon of moisture per hour of runtime. Proper heat sources require combustion outside the house with dry hot air blown inside. Use indirect-fired diesel heaters rated at 90,000-100,000 BTU that run up to three days on one external fuel tank.
When do you need to remove drywall from wet walls?
You need to remove drywall from wet walls when saturation exceeds 24 inches in height, standing water occurred, insulation is visibly wet or compressed, visible mold growth appears, or contaminated water sources like sewage were involved. Wall cavities filled with wet insulation prevent airflow and trap moisture requiring removal for proper drying.
How often should you check moisture levels during drying?
You should check moisture levels every 3-4 days during active drying of wet framing. Measure more frequently as readings approach target levels to avoid over-drying or closing walls prematurely. Take final readings at all previously wet locations, wait 48-72 hours, and re-test for stability before installing drywall.
Does metal stud framing dry faster than wood framing?
Metal stud framing dries faster on surfaces than wood framing because metal doesn’t absorb moisture, but you must still dry wall cavities completely. Metal studs don’t support mold growth on the metal itself but risk corrosion when exposed to prolonged moisture. Wood framing requires reaching 10-12% equilibrium moisture content after one year of HVAC operation.
What causes wood framing to rot after water damage?
Wood framing rots after water damage when moisture content exceeds 19% and stays elevated long enough for mold spores to activate and decay to begin. Modern tight construction prevents natural drying that occurred in older homes. Moisture trapped between slab and sill plates or inside closed wall cavities creates conditions for rot.
Should you hire a professional for wet framing or do it yourself?
You should hire a professional for wet framing when extensive flooding occurred, contaminated water like sewage was involved, structural concerns exist, or saturation affects the entire house. DIY drying works for localized leaks, accessible framing, clean water sources, and situations where you have time to monitor daily with rented equipment.
