

You can’t tell if a 2×4 is dry just by looking at it. A stud that feels bone-dry on the surface might still be holding 25% moisture inside, and closing up that wall creates the perfect setup for mold and rot. The difference between proper drying and hidden disaster comes down to measurement, airflow, and patience. This guide walks you through the complete drying process: how to take accurate moisture readings, which equipment actually works, and how long you’ll really need to wait before rebuilding.
Assessment Protocol and Measurement Strategy for Wet Framing
You can’t trust what wet 2×4 framing looks like. A stud that feels dry to the touch might still be holding 22% moisture content inside, and closing up that wall creates the perfect environment for mold and rot. Accurate moisture readings are the foundation of every drying decision you’ll make after a flood. “Feels dry” or visual inspection? Completely unreliable. Baseline moisture readings must be taken within 24 to 48 hours of the flood event to map saturation patterns and establish a starting point for monitoring progress.
Framing recovery follows a three phase approach that takes 1 to 12 weeks depending on conditions. Emergency stabilization comes first (source control and water extraction in the first 24 hours). Active drying follows (equipment deployment with readings every 3 to 4 days to track progress and reposition fans). Verification happens last (confirming you’ve reached safe moisture thresholds of 15% or lower before closing walls). Each phase builds on the previous one. Skip verification and you’ll end up with hidden mold growth six months later.
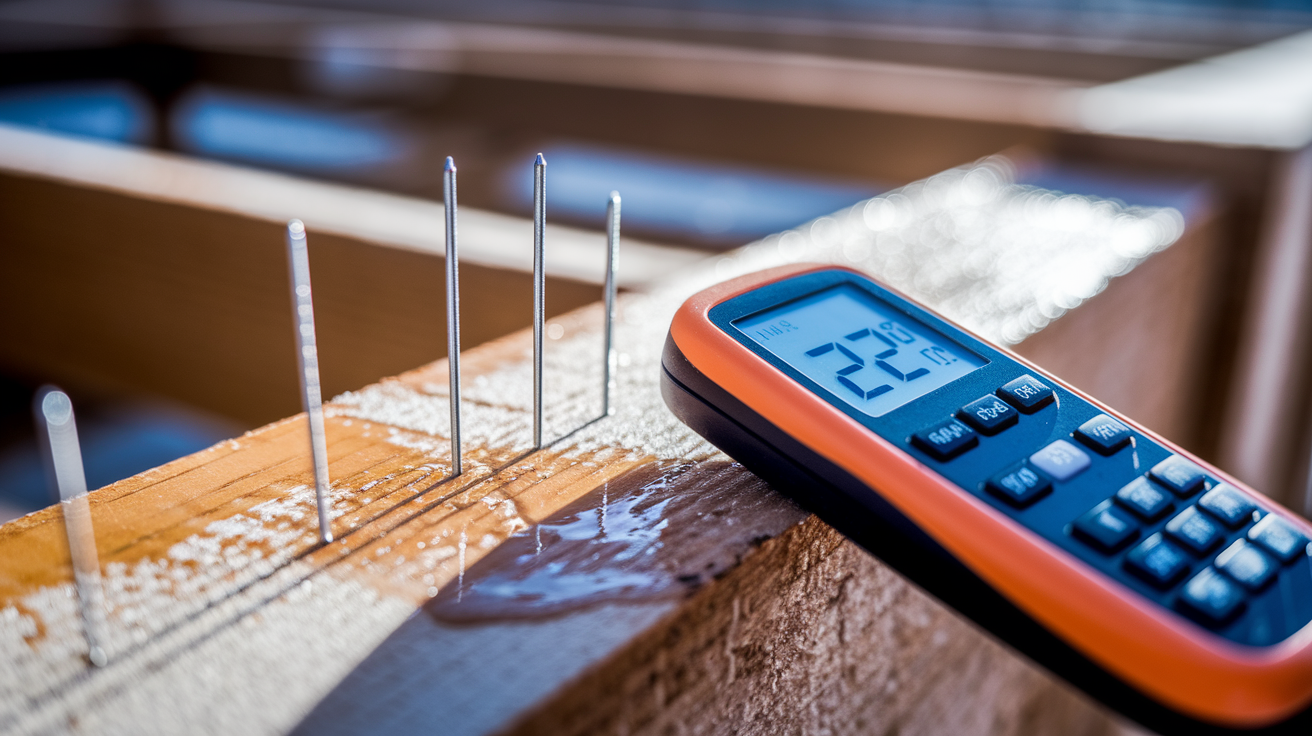
Pin type moisture meters are the right tool for checking 2×4 framing after flood damage. These meters have two metal pins you push into the wood, and they measure electrical resistance to calculate moisture content as a percentage. A quality digital pin type meter like the Extech MO220 costs around $150 and provides accurate readings for dimensional lumber. Higher end meters with data storage and download capability run $500 plus, but most homeowners don’t need those features. Pinless meters claim to read 3/4 inch depth without penetrating the surface, but they’re less reliable for framing lumber and work better on finished surfaces like hardwood floors.
Your measurement protocol determines whether you find all the problem areas or miss critical wet spots. Test every 4th stud at the bottom plates, where moisture accumulates from the subfloor and gravity pulling water down vertical studs. Bottom plates typically show the highest readings, often 20 to 30% moisture content in the first few days after flooding. Test every 10th stud at mid height (chest level when you’re standing) and near the top plate to confirm moisture isn’t wicking upward through capillary action. Always bury the meter pins completely into the wood for accurate readings, not just surface contact. Take extra readings at king studs (the full height studs beside door and window openings) and headers, because these larger members retain moisture longest and shrink the most during drying.
Essential immediate actions in the first 24 to 48 hours:
Shut off the water source causing the flood (close main valve, fix broken pipe, stop appliance supply line). Document all damage with photos and video for insurance before moving anything. Assess electrical safety by checking for submerged outlets, wet panels, or signs of arcing. Remove all standing water with pump or wet/dry vacuum. Establish baseline moisture readings with a pin type meter across all affected framing members. Determine water category (clean supply line water, gray water from appliances, or black water from sewage or ground flooding) for proper sanitation requirements.
Mark each tested stud with a permanent marker showing the moisture percentage and date. A stud tested at 24% on March 15 gets marked “24% 3/15” right on the wood surface. Take photos of your moisture meter display showing the reading, especially the highest numbers you find. Create a simple floor plan sketch showing which walls or areas have the worst moisture problems. You’ll rarely need more than 3 sequential readings marked on the same stud to track drying progress from start to finish. Check moisture content every 3 to 4 days during active drying, and switch to daily checks when readings approach the 15 to 16% threshold where you’re getting close to safe levels.
| Reading Location | Typical Initial Reading | Target Threshold | Action Required |
|---|---|---|---|
| Bottom plates | 20-30% | 15% or lower | Focus drying equipment here |
| Mid-stud height | 15-25% | 15% or lower | Standard drying protocol |
| Near top plate | 14-20% | 15% or lower | Monitor for consistency |
| King studs/headers | 18-28% | 15% or lower | Extended drying time needed |
| Final verification | Variable | 12-14% ideal | Ready for drywall |
Target moisture thresholds determine when your framing is safe to close up. The ideal range for kiln dried lumber is 12 to 14% before hanging drywall. Maximum acceptable is 15% for standard kiln dried studs and 17% for pressure treated bottom plates. Mold spores activate and rot begins when moisture content rises above 19%, so anything in that range is still at risk. Typical drying timelines run 1 to 12 weeks depending on outdoor temperature and humidity, your drying methods, and how saturated the framing was at the start.
Safety Assessment Before Starting 2×4 Drying Work
Safety checks happen before you touch any wet framing or plug in any equipment.
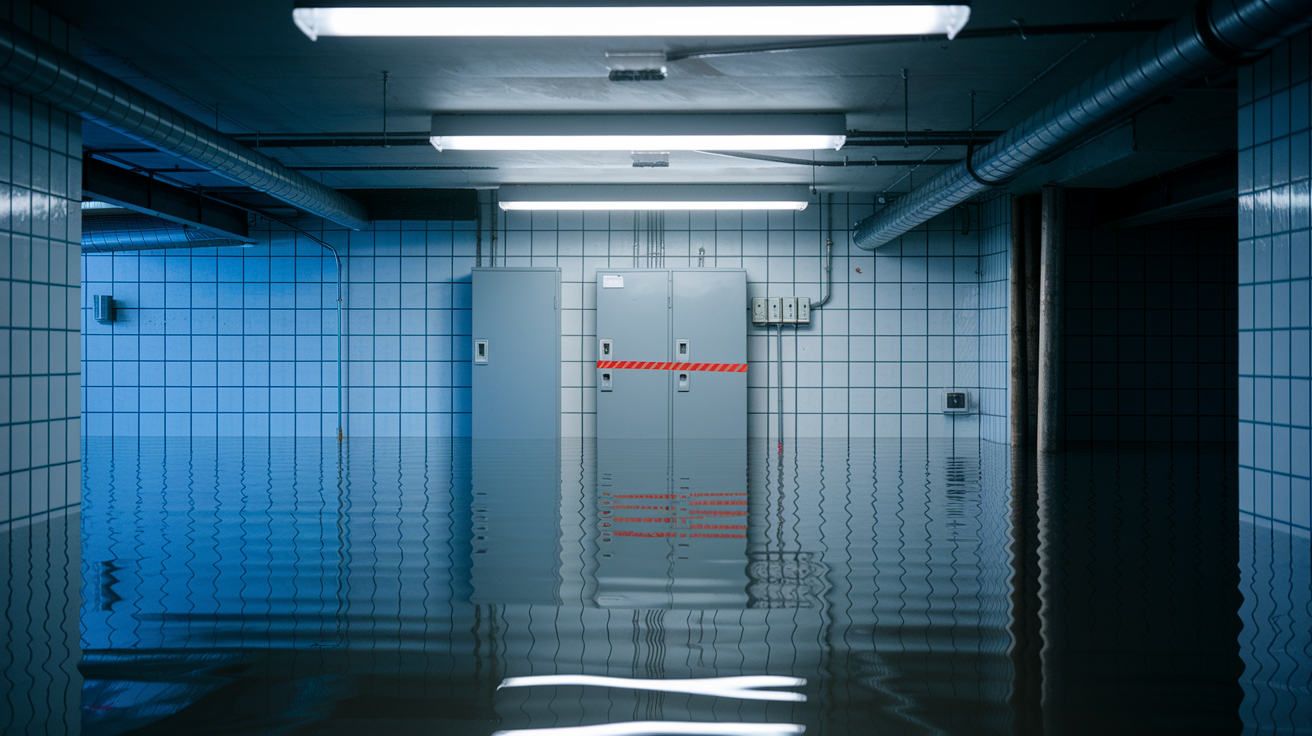
Electrical safety requires professional clearance in most flood situations. Verify that power is completely shut off to all affected circuits at the breaker panel. Never enter any space with standing water if electricity might still be live. Look for submerged electrical outlets, junction boxes, or wiring that was underwater. When flood water reached above outlet height or soaked insulation around wiring, call a licensed electrician to inspect the circuits and confirm it’s safe to proceed. Flipping the breaker off yourself doesn’t always mean the wiring is safe to be around, especially if connections got wet inside boxes or if wiring insulation degraded.
Water contamination category determines your safety precautions and whether you should handle the work yourself. Category 1 is clean water from supply lines (a burst pipe feeding a sink, a broken water heater connection, a failed appliance supply hose). This water was potable before the flood and requires minimal safety precautions beyond standard work gloves and eye protection. Category 2 is gray water from appliances like washing machine discharge, dishwasher backup, or toilet overflow that didn’t contain feces. This water has some contamination and requires increased caution. Category 3 is black water from sewage lines, ground flooding that came through the foundation, or any flood water that sat for more than 48 hours and developed bacterial growth. This category requires professional remediation in most cases, extensive PPE if you proceed on your own, and thorough disinfection protocols. For more on water categories and when to call professionals, check Understanding Water Damage Categories.
Required personal protective equipment by contamination category:
Category 1: Standard work gloves and safety glasses to protect from splinters and debris. Category 2: Add N95 respirator mask, waterproof rubber gloves, and rubber boots with good tread. Category 3: Full Tyvek protective suit, P100 respirator with cartridges, nitrile gloves under rubber gloves, dedicated boots, and full disinfection protocols after each work session.
Removing Building Materials to Expose Wet Framing

Wet framing can’t dry if it’s still enclosed by drywall, insulation, or vapor barriers. Removal decisions depend on how high the flood water reached, how saturated the materials are based on your moisture meter readings, and what contamination category you’re dealing with. A basement flood that came up 18 inches means you’re removing drywall and insulation up to at least 30 inches, because capillary action pulls moisture higher than the visible water line.
Drywall removal follows a specific pattern to expose framing while making eventual patching easier. Remove all drywall at least 12 to 24 inches above the highest visible water line, because moisture wicks upward through the paper facing and gypsum core. Cut horizontal lines using a utility knife and straightedge to create clean patch lines later. Score the paper facing on both sides, then snap the drywall along your cut line. Pull the baseboards off first, then remove the bottom section of drywall to expose the bottom plates and lower portions of the studs. If your moisture readings show 18% or higher on studs at the 4 foot height, keep cutting higher until you reach sections testing below 16%.
Insulation removal is non negotiable for anything that got wet. Fiberglass batts and blown cellulose insulation cannot be dried and reused once they’ve been saturated. Both materials compress when wet, lose their insulating properties permanently, and hold moisture against framing even after the studs start to dry. Pull all wet insulation and bag it for disposal. Closed cell spray foam might be salvageable if only the surface got wet and you can clean and dry it, but any foam that absorbed water needs to be removed because it traps moisture on the wood side of the barrier. Remove any plastic vapor barriers that were installed between the framing and drywall because they trap moisture against the studs and prevent drying.
Disposal considerations for removed materials:
Bag all contaminated materials from Category 2 or 3 water separately in heavy duty contractor bags. Avoid tracking wet insulation or debris through clean areas of the house. Rent a construction dumpster for the volume you’ll generate, typically 10 to 20 cubic yards for whole house work. Check local regulations for Category 3 material disposal, which sometimes requires special handling. Document all removed materials with photos showing quantity and type for insurance claims.
Exposed framing dries 3 to 5 times faster than framing that’s still boxed in behind drywall and insulation. This is the difference between 2 weeks and 8 weeks to reach safe moisture levels.
Air Movement Strategy for Drying Wet 2×4 Studs

Air movement is the most cost effective method for drying wet framing and can reduce moisture content 0.5 to 1.0% per day when conditions are favorable.
Commercial carpet blowers and air movers are designed for exactly this job and work far better than household box fans. A 2,500 square foot house with moderate flood damage typically needs about 10 fans positioned strategically based on your moisture meter readings. The rent versus buy decision comes down to timeline. Fans rent for about $10 per day or $150 per month, and commercial units cost around $300 to purchase. If you’re facing a 3 week drying timeline, renting makes more financial sense than buying equipment you’ll use once. The Quest C1000 two speed air mover is a solid choice that moves 2,700 cubic feet per minute while drawing only 2.4 to 2.8 amps, meaning you can run several on a single 15 amp circuit without tripping breakers.
Position fans to create direct airflow across the wet framing surfaces, not just general room air circulation. Place fans at floor level aiming upward at the bottom plates and lower portions of studs, because this is where moisture accumulates from gravity and subfloor contact. The goal is moving air across the wood surface to carry away moisture vapor, not creating a wind tunnel down the center of the room. Space fans 8 to 12 feet apart along walls with wet framing. After your first moisture meter check 3 to 4 days later, reposition any fans that aren’t showing progress in their coverage areas. A conch shell style carpet fan works well for general coverage, while box type air movers fit better in tight spaces like corners. A 50/50 mix of both fan types gives you flexibility to position based on room layout and problem areas.
Optimal fan operation for maximum drying effectiveness:
Chain and padlock fans to framing members to prevent theft from job sites. Run continuously 24 hours per day, 7 days per week for the entire drying period. Don’t turn equipment off at night or when you leave the house. Plan for 1 to 2 weeks of continuous operation to drop moisture readings from 18 to 20% down to below 15%.
Air movement alone works best when outdoor temperatures stay above 45°F and outdoor humidity reads below 60% on a basic humidity meter. When conditions are colder or more humid, you’ll need to combine fans with dehumidification equipment or supplemental heat to maintain drying progress.
Dehumidification Process for Enclosed Wet Framing Areas

Dehumidifiers become necessary when outdoor humidity exceeds 60%, and they’re essential for enclosed spaces like basements and crawl spaces where you can’t rely on natural ventilation. The equipment works by pulling moisture out of the air to lower relative humidity, which increases the evaporation rate from wet framing members. At 80% outdoor humidity, air movement alone barely dries anything because the air can’t hold much more moisture. Drop that to 45% humidity with a dehumidifier, and the same fans suddenly start removing 0.8 to 1.0% moisture content per day from your studs.
Two types of dehumidifiers handle different temperature ranges and budgets. Refrigerant or compressor models cost less to rent and work effectively in the 70 to 90°F temperature range, but they struggle to remove moisture once temperatures drop below 65°F. These are fine for summer flood recovery in climate controlled spaces. Desiccant models use a chemical process that works in cold conditions and performs better in unheated crawl spaces or during winter floods, but they cost more to operate and generate more heat. LGR (Low Grain Refrigerant) commercial units like those from Dri Eaz and Quest are the most effective option for serious flood recovery, and rental makes sense for the 2 to 4 week timeline you’ll need them.
Set your dehumidifier to “Always On” or “Continuous” mode during the active drying phase, not auto shutoff based on relative humidity. You want maximum moisture extraction happening 24/7. Close all windows and doors to create a controlled environment where the dehumidifier can actually lower the humidity instead of fighting an endless supply of moist outdoor air. Run your fans simultaneously with the dehumidifier, positioning them to circulate air from the wet framing toward the dehumidifier intake. Target 45 to 50% relative humidity during the framing drying stage. Some units like the Quest PowerDry 4000 include built in hygrometers with adjustable settings from 30% to 70% RH, which lets you dial in exactly what you need.
Practical dehumidifier operation details:
Empty collection buckets twice daily or connect a drain hose to continuous drainage. Position the unit centrally with 12 to 18 inches of clearance on all sides for airflow. Expect 10 to 30 gallons per day of water extraction during the first 72 hours of operation. Check for frost buildup on coils if you’re running the unit in conditions below 65°F. Monitor total amp draw across all fans and dehumidifier to avoid overloading circuits.
The combined fan plus dehumidifier approach typically achieves target moisture levels in 1 to 2 weeks, compared to 3 to 5 weeks or longer with fans alone in humid conditions.
Heat Application Methods for Accelerating Framing Drying Time

Heat increases the evaporation rate from wet framing and works most effectively when combined with air movement and dehumidification.
Drying timelines depend heavily on temperature. Natural drying in temperatures consistently above 60°F takes 2 to 4 weeks to drop framing from 18% moisture content down to 14%. In cold and rainy conditions, that same amount of moisture loss stretches to 6 to 12 weeks. Below freezing temperatures create extremely long drying timelines that make supplemental heat practically required unless you can wait until spring.
Avoid equipment that makes your moisture problem worse instead of better. Standard propane heaters (the common construction site torpedo heaters) add one gallon of moisture to the air for every hour they run, because combustion produces water vapor as a byproduct. You’re fighting against your fans and dehumidifier if you run propane heat. Never use the home’s HVAC system for construction heating or flood drying, because it voids the manufacturer’s warranty, spreads contamination and debris through the ductwork, and can damage components not designed to handle the dust load. Any heating equipment with combustion happening inside the space you’re trying to dry is the wrong choice.
Safe heating options use either electricity or external combustion with ducted heat delivery. Indirect fired diesel heaters have the combustion chamber outside the heated space, with only clean hot air blown into the room through ducting. Models rated at 90,000 BTU can run up to 3 days on a single external fuel tank. Electric space heaters are the safest DIY option and won’t add any moisture, but they cost significantly more to operate and work best for smaller affected areas like a single basement room. Commercial drying furnaces like the Dri Eaz Dragon X2 produce 100,000 BTU of dry heat, come mounted on trailers for easy positioning, and are available through equipment rental companies that service restoration contractors. The older Dri Eaz mobile furnace at 85,000 BTU is discontinued but sometimes still available used.
Target a temperature range of 75 to 85°F in the space you’re drying for optimal moisture removal without creating safety hazards or excessive energy costs.
Determining if Flood Damaged 2×4 Framing is Salvageable
Most kiln dried 2×4 framing can be salvaged if you dry it promptly and thoroughly, but Category 3 contamination and prolonged saturation lasting 3 weeks or more increase the odds you’ll need to replace members.
Replacement criteria for flood damaged framing:
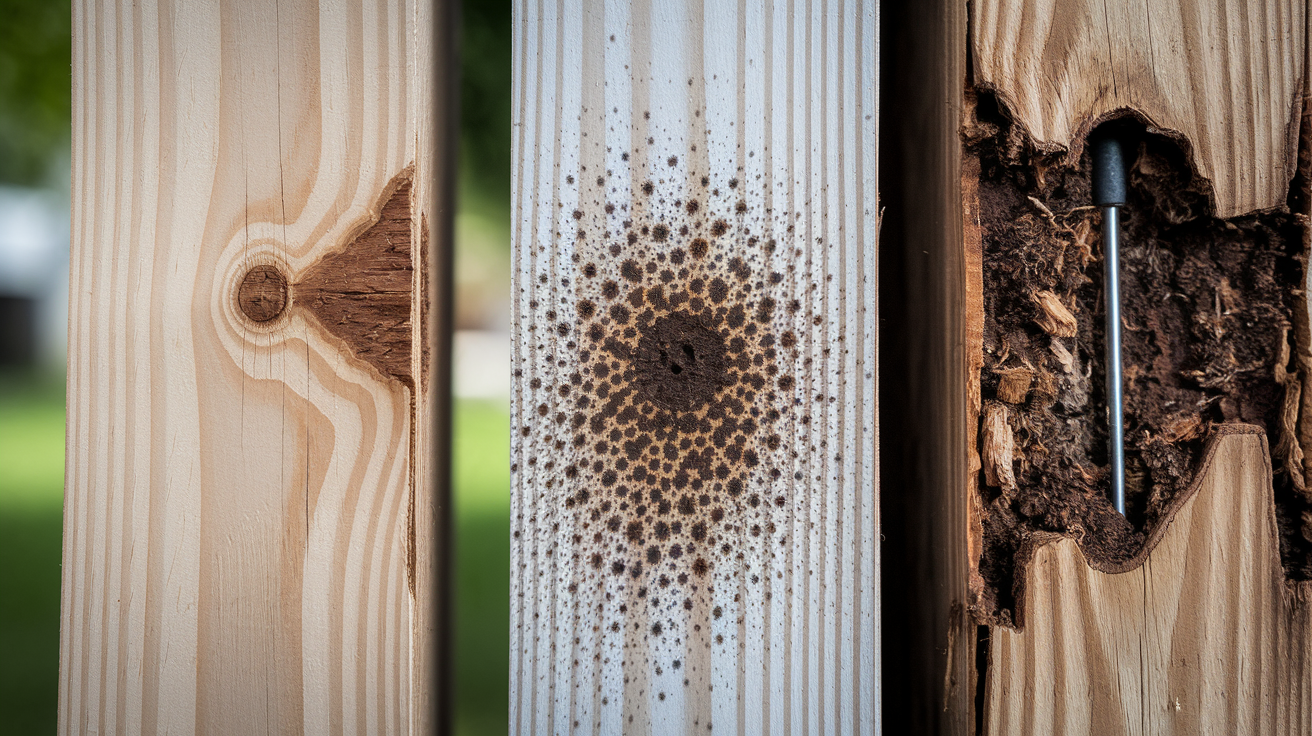
Visible mold growth penetrating deep into the wood grain, not just surface discoloration you can wipe off. Soft or spongy texture when you press a screwdriver tip into the wood, indicating rot has started. Warping or twisting beyond 1/4 inch over an 8 foot length when checked with a straightedge. Category 3 sewage contamination on any porous framing lumber. Structural cracks or splits extending completely through the member. Persistent musty odor that remains after thorough drying and cleaning.
Test for structural integrity on load bearing members before deciding whether to salvage them. Press the tip of a flat head screwdriver into the wood surface with firm pressure. Sound wood resists the point, while wood with decay starting feels soft and lets the screwdriver sink in with less force. Look for color changes, particularly darkening or blackening that goes below the surface layer. Check critical members like headers over door and window openings and king studs beside those openings, because these carry more load. Measure for bow or twist by holding a straightedge along each face and checking for gaps exceeding 1/4 inch.
Shrinkage concerns affect finish quality even when framing is structurally sound. Lumber that dries from 18 to 20% moisture content down to the eventual equilibrium of 10 to 12% can shrink enough to cause nail pops in drywall, cracking at corners, and visible finish defects. Losing more than 5 percentage points after drywall installation creates problems you’ll see within the first year. Consider replacing severely saturated studs in areas where finish quality matters most, like walls that will get tile surrounds in showers or featured walls in living spaces where cracks will be highly visible.
Bottom plates in direct ground contact and rim joists often need replacement more frequently than wall studs, because they experience prolonged saturation and contamination exposure from subfloor moisture and flood water pooling.
Mold Prevention and Antimicrobial Treatment During Framing Drying
Mold spores activate and rot begins when moisture content rises above 19%. You have a 24 to 48 hour window after flooding before significant mold growth starts on wood framing, assuming moisture stays trapped in that danger zone.
Prevention during active drying relies on keeping conditions unfavorable for mold growth. Maintain continuous air movement to prevent stagnant pockets where moist air settles and creates localized high humidity zones. Keep your moisture readings trending downward with daily monitoring so you catch any areas that aren’t drying as expected. Remove all wet porous materials like insulation and drywall immediately, because these materials support mold growth faster than bare wood framing. Never seal or enclose damp framing by installing new drywall before your moisture meter confirms everything is at or below 15%, because trapped moisture creates perfect conditions for hidden growth.
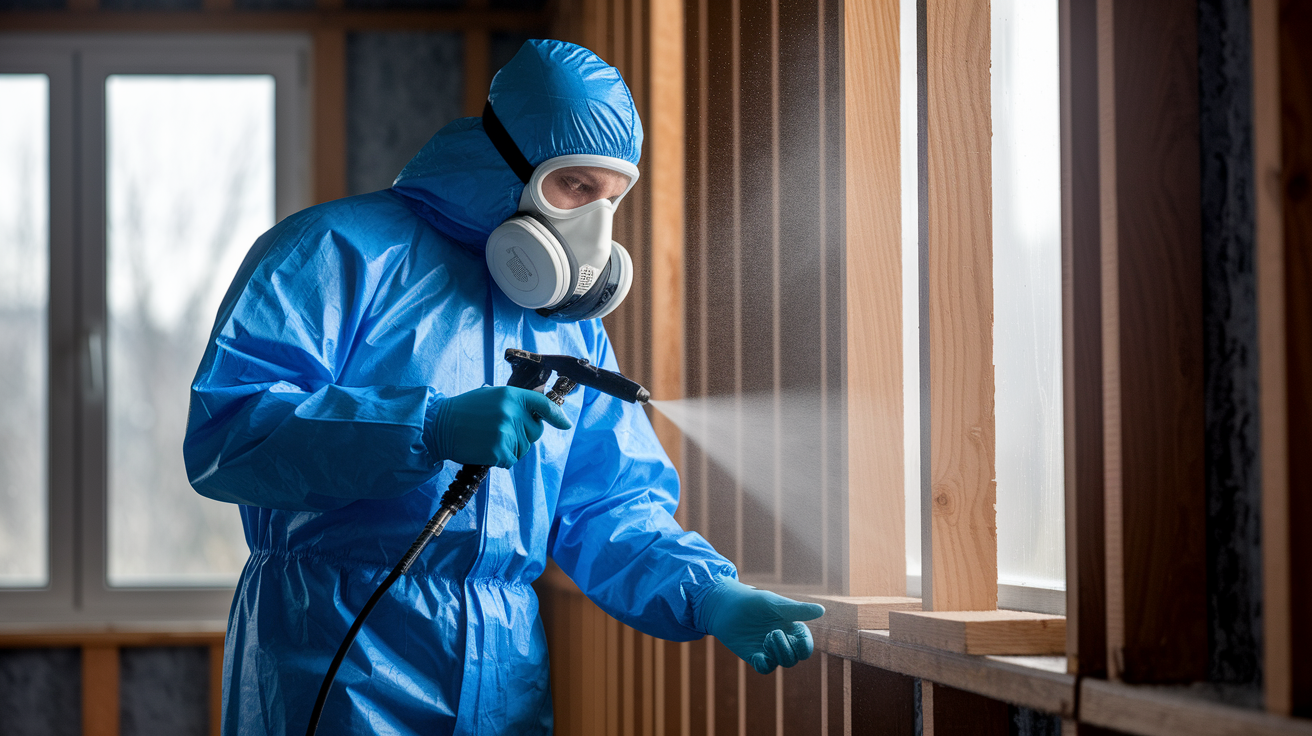
Antimicrobial treatment decisions depend on contamination category and whether you’re seeing signs of active mold. For Category 1 clean water on non porous surfaces, surface cleaning with a diluted bleach solution works fine. Mix 1 cup of bleach per gallon of water and wipe down the framing. Quaternary ammonium compounds (available as ready to use sprays at hardware stores) are recommended for Category 2 gray water situations. Category 3 black water contamination requires professional grade antimicrobials registered with the EPA for sewage remediation, and you should seriously consider full framing replacement rather than treatment when sewage has soaked into porous wood. Never rely on antimicrobials as a substitute for proper drying. Spraying mold killing chemicals on wood that’s still at 22% moisture just kills the surface growth while conditions remain perfect for new growth below the surface.
Application protocol for antimicrobial treatment:
Wear respiratory protection (P100 respirator minimum) during application of any antimicrobial chemicals. Apply treatment after initial drying has brought moisture content below 20% but before the final drying phase. Use a pump up garden sprayer for even coverage across all exposed framing surfaces. Allow 10 to 15 minutes of contact time before air drying. Do not rinse off antimicrobial treatment, let it dry in place.
Visible mold growth on framing surfaces means you missed the treatment timing window. Affected studs with growth penetrating into the wood grain should be replaced rather than treated, because you can kill surface mold but not remove the roots that have already colonized deeper wood fibers. Antimicrobial foggers are not effective for treating framing, because these chemicals require direct surface contact to work and fog just drifts around without adequate coverage.
For additional guidance on mold prevention timelines and EPA recommendations after flooding, see Mold Prevention After Flooding.
DIY Framing Drying versus Professional Water Damage Restoration

DIY framing drying is feasible for Category 1 clean water damage in accessible areas when you have available time and can rent commercial equipment.
DIY advantages include cost savings of $2,000 to $5,000 for a typical basement or main floor flood recovery. Equipment rental runs $500 to $800 for 2 to 3 weeks of fans, dehumidifier, and moisture meter purchase, compared to $3,000 to $8,000 for professional restoration services covering the same area. You need to commit 1 to 3 weeks of daily monitoring and equipment management, checking moisture readings, adjusting fan positions, and emptying dehumidifier buckets. You control the timeline and thoroughness, deciding when readings are truly safe rather than working within a restoration company’s schedule. The DIY approach works well for smaller affected areas like a single room or partial basement where equipment needs are modest.
Professional restoration is recommended when Category 3 sewage or ground floodwater contamination requires specialized cleaning protocols and disposal procedures you don’t want to handle yourself. Extensive affected areas like whole house flooding across multiple floors need 20 to 40 commercial air movers and multiple large dehumidifiers that cost more to rent than hiring a crew. Hidden or inaccessible framing behind closed walls or affecting second story floor joists may need professional moisture detection equipment like thermal cameras to map the full extent. Time constraints from work schedules that prevent daily monitoring make professional services worth the cost. Insurance coverage that pays for professional restoration without depreciation or large deductibles changes the cost equation significantly. Structural concerns requiring engineering assessment to determine if load bearing members are compromised also point toward professional help.
Professional service advantages:
IICRC certified technicians trained in proper protocols for each contamination category. Commercial grade extraction and drying equipment that outperforms rental equipment. Thermal imaging cameras that find hidden moisture in wall cavities and subfloors. Complete documentation for insurance claims including moisture maps and daily logs. Guarantee or warranty on completed work proving mold won’t develop. Typical 3 to 5 day emergency drying timeline versus 2 to 4 week DIY timeline.
A hybrid approach splits the work to get professional expertise where it matters most while reducing costs. Hire restoration professionals for the critical first 48 hours to handle emergency water extraction with truck mounted pumps and establish accurate moisture mapping across all affected areas. Then take over the extended drying monitoring and equipment operation yourself, following the professionals’ initial assessment and moisture map. You benefit from expert identification of hidden problem areas and proper equipment positioning, while saving $1,500 to $3,000 by handling the 2 to 3 week monitoring phase that doesn’t require specialized skills.
Insurance Documentation and Claim Process for Wet Framing
Document everything before you move or remove anything from the flood damaged areas.
Immediate documentation in the first 24 hours establishes the full scope of damage. Photograph all flooded areas before you extract water or start cleanup, capturing the water level on walls and the extent of standing water. Take photos of the water line on multiple walls to show how high the flood reached. Document the source of water intrusion with photos of the burst pipe, failed appliance connection, foundation crack where water entered, or roof leak that caused the damage. Shoot wide angle photos showing full room context, then take close up detail photos of specific affected framing members. Use your phone’s timestamp feature or make sure your camera date/time is set correctly so all photos have accurate metadata.
Document the drying process as it happens over the following weeks. Photograph your moisture meter display showing the percentage reading with the meter pins inserted into studs, so your insurance adjuster can see both the number and the testing method. Maintain a written log with three columns: date, location tested (north wall bottom plate, east wall mid stud), and moisture percentage. Mark tested studs with percentage and date using a permanent marker so there’s physical documentation written on the framing itself. Document your equipment deployment by photographing fan placement, dehumidifier settings, and any supplemental heating equipment. Save all rental receipts with equipment model numbers and rental periods shown clearly.
Claim support documents to compile:
Timeline showing flood discovery date and all response actions taken with dates. Before and after photo sets of affected areas from multiple angles. Daily moisture reading log showing progression from wet to dry over 2 to 4 weeks. Itemized list of all removed or replaced materials with quantities. Professional assessment letters if you hired anyone for inspection or consultation.
Insurance coverage varies significantly between flood policies and standard homeowner’s policies. Flood insurance policies through NFIP often exclude structural drying costs and cover only replacement of damaged materials, not the process of attempting to salvage existing framing. Homeowner’s policies typically cover sudden water damage events like burst pipes but exclude rising water from rivers, storm surge, or ground saturation. Understand whether your coverage pays replacement cost (full amount to replace materials at today’s prices) or actual cash value (depreciated value of damaged materials). Some policies require professional restoration services for coverage approval and won’t reimburse DIY equipment rental or labor.
Contact your insurance adjuster within 24 to 48 hours of the flood event and ask specifically what documentation they need for drying and monitoring costs before you begin work.
Tools and Equipment Checklist for 2×4 Framing Drying Projects
Proper equipment makes the difference between effective drying in 2 weeks versus struggling for 8 weeks with inadequate tools.
| Equipment Category | Specific Items | Purchase Cost | Rental Cost (Daily/Monthly) |
|---|---|---|---|
| Moisture measurement | Pin-type digital meter like Extech MO220 | $150 | Not typically rented |
| Water extraction | Wet/dry shop vacuum 6+ gallon capacity | $80-150 | $25/day |
| Air movement | Commercial air mover like Quest C1000: 2,700 CFM, 2.4-2.8 amps | $300 | $10/day or $150/month |
| Dehumidification | Refrigerant dehumidifier 50+ pint like Quest PowerDry 4000 with 30-70% RH range | $250-400 | $35/day or $200/month |
| Safety equipment | N95/P100 respirators, rubber gloves, eye protection | $40-80 | Not rented |
| Documentation | Digital camera/smartphone, permanent markers, notebook | $0-50 if not owned | Not rented |
| Demolition | Pry bars, utility knives, saw for drywall cutting | $60-120 | Not typically rented |
| Power distribution | Heavy-duty extension cords, power strips with surge protection | $50-100 | Not rented |
Equipment rental requires minimum 24 hour rental periods at most tool rental shops and equipment suppliers. Weekly rates offer better value when you’re facing a 2 to 3 week drying project, sometimes saving 30 to 40% compared to daily rates multiplied by 14 days. Some suppliers offer rent to own programs where rental payments apply toward purchase price if you decide to buy. Verify amp requirements before you rent multiple pieces of equipment, because running three fans plus a dehumidifier on a single 15 amp circuit will trip the breaker. Calculate total amp draw (listed on equipment nameplates) and make sure you’re staying below 12 amps continuous load on each circuit you’ll use.
Often forgotten items that will save you trouble:
Moisture resistant rubber gloves for handling wet insulation and materials without destroying cotton work gloves in an hour. Extra batteries for moisture meter, because nothing stops progress like a dead meter mid testing. Chain and padlock for securing rental fans to framing so they don’t walk off the job site. Dedicated logbook for tracking daily readings and equipment runtime so you’re not hunting for scraps of paper with notes.
Common Mistakes That Extend Drying Time for Wet Wood Framing
Understanding what slows drying helps you avoid adding weeks to a job that should take 10 days.
Critical mistakes that kill drying progress:
Closing up walls before moisture meter readings confirm framing is at 15% or lower leads to trapped moisture, mold growth in wall cavities, and rot damage that shows up 6 to 12 months later. Using propane heaters that actually add one gallon of moisture per hour to the air you’re trying to dry makes the problem worse instead of better. Running fans without dehumidifiers when outdoor humidity exceeds 60% just moves moist air around without removing moisture. Testing only the accessible studs at eye level while ignoring bottom plates and king studs leaves wet spots that you’ll discover after drywall is up. Turning off equipment at night to save $3 in electricity interrupts drying momentum and can add a full week to your timeline. Positioning fans to circulate room air rather than aiming direct airflow at wet framing surfaces creates nice breeze but ineffective moisture removal. Relying on visual inspection instead of moisture meter readings leads to sealing up framing that looks dry but still holds 18 to 19% moisture inside. Assuming all studs dry at the same rate ignores problem areas at bottom plates, corners, and king studs that need focused equipment positioning.
The consequences add up fast. Premature wall closure with framing still above 16% moisture traps water vapor and creates ideal conditions for mold growth at 80 to 90% relative humidity inside closed walls. Inadequate drying that leaves framing at 18% before drywall installation causes 5 to 8 percentage points of shrinkage during the first year of HVAC operation, leading to nail pops every 16 inches vertically, corner cracks, and settlement cracks that get blamed on foundation movement. Intermittent equipment operation where you run fans for 12 hours then shut them off for 12 hours can extend a 7 day drying job to 4 to 6 weeks because you lose drying momentum every time moisture reabsorbs from humid air during the off periods.
Consistent 24/7 equipment operation and thorough moisture mapping with meter readings every 3 to 4 days are the two factors that most influence whether you finish drying in 2 weeks or struggle for 2 months.
Rebuilding Timeline and Next Steps After Framing is Dry
Final verification determines whether your framing is genuinely ready for insulation and drywall or needs another week of drying.
Conduct a comprehensive moisture meter survey covering 20 to 30% of studs in affected areas rather than the spot checks you did during drying. Test every 4th to 6th stud at bottom plate, mid height, and near top plate to confirm all readings consistently measure 15% or lower. The ideal range before closing walls is 12 to 14% moisture content, which provides a safety margin for normal seasonal fluctuation. Ensure bottom plates read within 2 to 3 percentage points of the wall studs above them, because bottom plates that are still 3 to 4% wetter than studs will continue wicking moisture upward after you close the walls. Retest any members that seem questionable or show readings above 15% before you proceed.
Final Words
Drying wet 2×4 framing after flood isn’t about guessing when wood feels ready. It’s about hitting 15% moisture or lower with a pin-type meter, running equipment continuously, and checking every problem spot until the numbers say you’re clear.
Mark your studs, track your readings, and don’t skip the bottom plates where water sits longest.
Once you’re consistently below 15% across all tested members, you’re ready to close things up and move forward. You handled the hard part. Now rebuild it right.
FAQ
How long does it take for 2×4 to dry after rain?
Drying time for 2×4 framing after rain typically ranges from 1 to 12 weeks, depending on outdoor temperature, humidity levels, and drying methods used. Natural drying in temperatures above 60°F takes 2 to 4 weeks to drop from 18% moisture content to 14%, while cold and rainy weather can extend drying to 6 to 12 weeks.
What can I use to dry wet wood on a flood?
To dry wet wood after a flood, use commercial air movers or carpet blower fans positioned at floor level, combined with a dehumidifier when outdoor humidity exceeds 60%. Running 3 to 4 fans continuously can remove 5 percentage points of moisture in approximately one week, and adding heat when outdoor temperatures are below 45°F accelerates the process.
How to dry out wet 2×4?
To dry out wet 2×4 framing, remove surrounding drywall and insulation to expose the wood, position commercial fans at floor level aimed at bottom plates and lower studs, run a dehumidifier if indoor humidity is high, and monitor moisture content every 3 to 4 days with a pin-type moisture meter until readings reach 15% or lower.
How to dry out wet framing?
Wet framing dries out by exposing all surfaces through material removal, establishing continuous air movement with industrial fans, controlling humidity with dehumidifiers in enclosed spaces, and optionally adding indirect heat sources when temperatures drop below 60°F. Monitor moisture levels with a pin-type meter, focusing on bottom plates where moisture accumulates, and continue drying until all readings consistently show 15% or lower.
What moisture level is safe before hanging drywall on 2×4 framing?
The safe moisture level before hanging drywall on 2×4 framing is 15% or lower, with an ideal target range of 12% to 14% moisture content. Framing dried to this range provides a safety margin for normal seasonal moisture variation without causing nail pops, cracks, or finish problems after drywall installation.
How do you measure moisture in wet 2×4 studs?
Moisture in wet 2×4 studs is measured using a pin-type digital moisture meter by burying the pins completely into the wood at multiple locations: every 4th stud at bottom plates, every 10th stud at mid-height, and extra readings at king studs and headers. Mark each tested stud with permanent marker showing the percentage and date for tracking drying progress.
Can flood-damaged 2×4 framing be saved?
Flood-damaged 2×4 framing can be saved if dried promptly and thoroughly to below 15% moisture content, provided the wood shows no soft spots, severe warping beyond 1/4 inch over 8 feet, deep mold penetration, or Category 3 sewage contamination. Most kiln-dried framing is salvageable with proper drying protocols, though bottom plates and rim joists in prolonged ground contact often require replacement.
When should you replace wet 2×4 studs instead of drying them?
You should replace wet 2×4 studs instead of drying them when they show soft or spongy texture indicating rot, visible mold growth penetrating deep into wood grain, warping or twisting beyond 1/4 inch over 8-foot length, Category 3 sewage contamination, or persistent musty odor after drying and cleaning.
What equipment do you need to dry wet framing after a flood?
To dry wet framing after a flood, you need a pin-type moisture meter like the Extech MO220 ($150), commercial air movers or carpet blower fans ($300 purchase or $10/day rental), a 50+ pint dehumidifier ($35/day rental), wet/dry vacuum for water extraction, and personal protective equipment including N95 respirator and rubber gloves.
How often should you check moisture levels when drying 2×4 framing?
You should check moisture levels in 2×4 framing every 3 to 4 days during active drying to reposition equipment and track progress, then check more frequently as readings approach the 15% to 16% threshold. Rarely need more than 3 sequential readings marked on the same stud to confirm consistent drying trends.
Should you use heat to dry wet 2×4 framing faster?
You should use heat to dry wet 2×4 framing faster when outdoor temperatures drop below 60°F or when natural drying extends beyond 4 weeks. Use only indirect-fired diesel heaters or electric heaters, never standard propane heaters which add one gallon of moisture per hour to the air and worsen the problem.
What happens if you close walls before framing is dry?
Closing walls before framing is dry traps moisture against the wood, creating conditions for mold growth above 19% moisture content and causing nail pops, drywall cracks, and finish defects as studs lose more than 5 percentage points through shrinkage. Wait until all moisture meter readings show 15% or lower consistently before installing insulation or drywall.
Do bottom plates dry slower than wall studs after flooding?
Bottom plates dry slower than wall studs after flooding because they absorb water from the subfloor and moisture gravitates down vertical studs to accumulate at the bottom. Bottom plates typically show the highest moisture content, ranging from 20% to 30% initially, and require focused air movement and extended drying time.
When do you need professional help for wet framing instead of DIY?
You need professional help for wet framing instead of DIY when dealing with Category 3 sewage or floodwater contamination, extensive whole-house flooding across multiple floors, hidden or inaccessible framing locations, time constraints preventing daily monitoring, or when insurance coverage fully covers professional IICRC-certified restoration services.
How do you prevent mold on wet 2×4 framing during drying?
You prevent mold on wet 2×4 framing during drying by starting air movement and dehumidification within 24 to 48 hours before significant growth begins, maintaining continuous equipment operation to keep moisture readings trending downward, removing all wet insulation and drywall immediately, and keeping framing moisture content below the 19% activation threshold where mold spores germinate.
