

You just checked your framing lumber with a moisture meter and it reads 19%. Should you go ahead and hang drywall because the framing feels dry to the touch? No. Closing up wet framing is how you lock in mold, rot, and structural problems that cost thousands to fix later. Wet framing needs to drop to 12-14% moisture content before you seal it behind walls, and depending on weather, lumber type, and thickness, that can take anywhere from three weeks to several months. This guide breaks down realistic drying timeframes, what affects them, how to measure moisture correctly, and when to speed things up with fans, dehumidifiers, or heat.
Expected Drying Time and Moisture Content Targets for Wet Framing
Wet framing lumber reading above 18% on your moisture meter is too wet to keep building. You need to get those numbers down to 12-14% before hanging sheetrock. When temps stay above 60°F and it’s dry outside, natural drying takes about 3 to 5 weeks to bring moisture from 18% down to 14%. Cold and rainy weather? You’re looking at 6 to 12 weeks. Below freezing, natural drying basically stops and you’ll wait months without some kind of mechanical help.
Your target before closing up walls is 15% or lower for kiln-dried lumber, which usually shows up somewhere between 12% and 14%. Green or pressure-treated lumber can go up to 17%. These numbers aren’t arbitrary. Moisture content above 19% wakes up mold spores and kicks off wood rot. After a year of running your HVAC in a closed building, studs typically settle around 10% to 12%. If studs drop more than 5 percentage points after you’ve already installed drywall, expect nail pops, cracks, and trim pulling away from walls.
| Climate Condition | Temperature Range | Expected Natural Drying Time | Critical Factors |
|---|---|---|---|
| Warm/dry conditions | Above 60°F, low humidity | 3-5 weeks (18% to 14%) | Ideal for natural drying, minimal intervention needed |
| Moderate conditions | 45-60°F | 5-8 weeks | Fan circulation helpful, monitor outdoor humidity |
| Cold/damp conditions | 32-45°F | 6-12 weeks | Mechanical drying usually required, slow evaporation |
| Freezing conditions | Below 32°F | Months without heat | External heat source necessary, natural drying essentially stops |
| High-humidity environments | Any temp, above 60% RH | Extended timeline | Dehumidifiers required, close windows and doors |
| Saturated conditions | 100% humidity or rain-exposed | No drying occurs | Complete weather protection needed before any drying begins |
Humidity controls whether moisture can actually escape from wood into the air around it. When outdoor humidity climbs above 60%, moisture transfer slows way down and you need to close windows and doors, then bring in dehumidifiers alongside your fans. At 100% humidity, drying stops completely no matter how much air you’re moving. Rain during construction can bump wood moisture up by 30% or more, basically resetting your entire timeline.
Regional differences matter more than most builders think about. Winter framing in northern climates almost always needs mechanical drying because cold temps and short days kill natural evaporation. Summer construction in Arizona or New Mexico might need nothing more than basic ventilation. The balance between weather protection and airflow gets tricky during the exposed framing stage. Tarping keeps rain off but traps moisture underneath. A weather-tight roof and wall sheathing give you control over the drying environment, but you still need ventilation or mechanical drying once everything’s sealed up.
Before moving to your next stage, verify moisture levels with a meter at multiple locations. Closing up wet framing locks moisture inside modern tight construction where it can’t escape. That’s a recipe for mold, rot, and structural problems that show up months or years later.
Wood Species and Thickness Impact on Wet Framing Drying

Kiln-dried lumber shows up at job sites around 12% to 14% moisture content and stays stable unless you expose it to weather. Green lumber and pressure-treated wood start much wetter, sometimes above 20%, and take longer to reach acceptable levels for enclosed construction.
Softwoods like pine, spruce, and fir are standard for residential framing because they dry faster than hardwoods. Lower density means moisture can escape more easily from the wood cells. Hardwoods used in specialty framing (exposed beams, heavy timbers) have tighter grain and higher density, making moisture harder to release. A wet oak header will take way longer to dry than a pine header of the same size.
Thickness creates the biggest variable in drying time. A 2×4 stud has moisture traveling a shorter distance to reach the surface compared to a 2×10 or 2×12 header. The old rule for natural seasoning is 1 year per inch of thickness, which means a 6-inch beam would need 6 years to fully season outdoors. That rule doesn’t apply to emergency construction drying where you’re using active methods, but it shows why thick lumber holds moisture longer. Headers, beams, and rim boards dry slower than standard studs. Bottom plates dry slower than top plates because they absorb moisture from below and gravity pulls water down through vertical framing.
Engineered lumber like LVL beams and I-joists behave differently than solid-sawn wood. The manufacturing process compresses layers under glue and heat, creating material that resists moisture penetration but also releases it slowly once wet. An I-joist that gets soaked during construction may read acceptable moisture on the surface while the interior OSB web stays damp for weeks.
Measuring Moisture Content in Wet Framing Before Proceeding
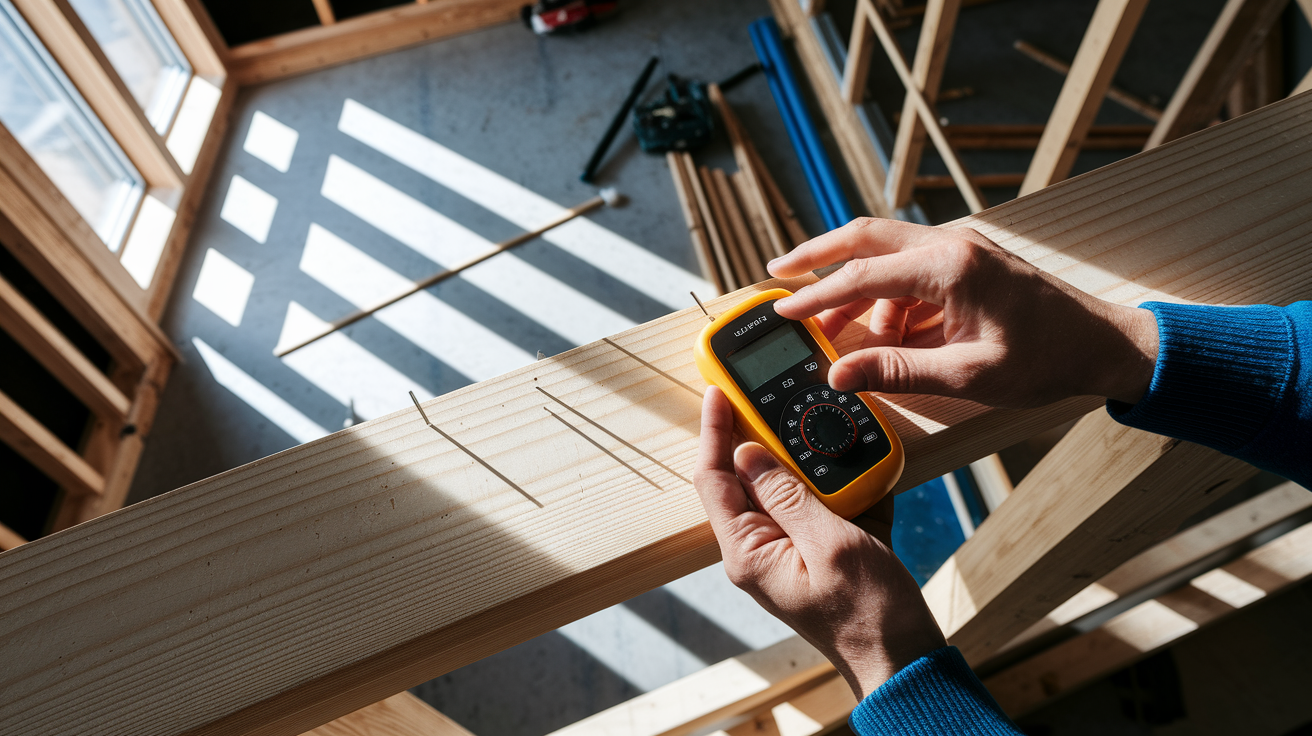
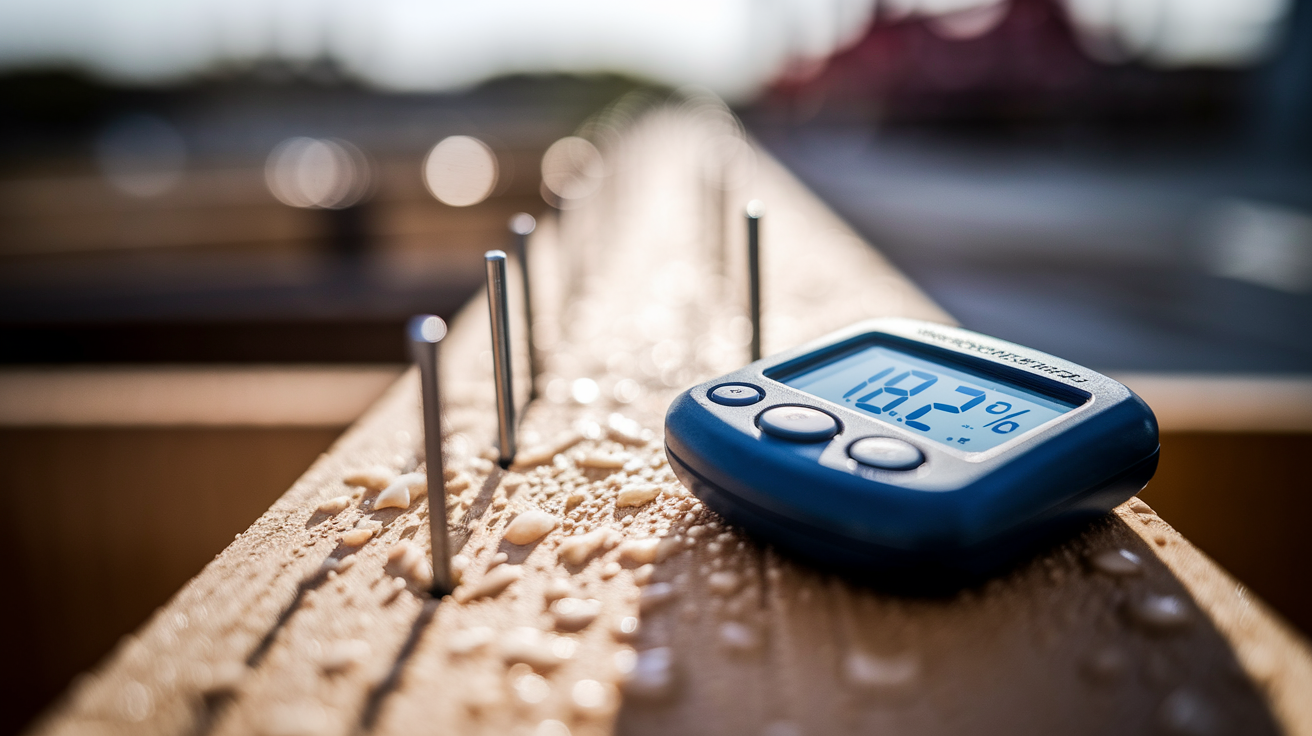
A moisture meter is the only reliable way to know if framing is dry enough to close up. Pin-type meters drive two metal probes into the wood surface and measure electrical resistance, which changes with moisture content. These meters read shallow depths, usually about 1/4 inch below the surface. Pinless meters use electromagnetic sensors to read deeper, up to 3/4 inch, but they’re less accurate in framing applications where you need exact moisture at specific points.
Pin-type moisture meters are standard for framing inspection. Quality models cost around $150 and last for years if you keep the pins clean and replace them when they wear down. The measurement protocol that catches problem areas before they’re hidden goes like this. Check every 10th stud at chest height and again near the bottom plate where it meets the subfloor. Check bottom plates every 4th stud because they consistently hold the most moisture, absorbing it from the subfloor below and collecting it from moisture that runs down vertical studs.
Critical measurement locations:
- Bottom plates (every 4th stud and at all corners)
- Top plates near roof penetrations or areas exposed to weather
- King studs and jack studs around door and window openings
- Headers and beams, especially at midspan where thickness is greatest
- Rim joists and band boards where exterior moisture can penetrate
- Any lumber that contacted standing water or was submerged even briefly
During active drying, check moisture content every 3 to 4 days to track progress. As you get close to your target level (14% to 15%), measure more often, maybe every other day. Create a moisture map on paper or your phone. Note which studs read high and track how those numbers change. This map tells you if drying is happening uniformly or if certain areas aren’t responding to your efforts. Bottom plates that stay wet while everything else dries indicate moisture wicking up from below.
Accelerated Drying Methods for Wet Framing Lumber

Forced Air Movement with High-Volume Fans
Carpet blower fans or air movers reduce moisture content by 0.5% to 1% per day when outdoor temps stay above 45°F. For a small section of wet framing, 3 to 4 fans running continuously can drop moisture content by 5 percentage points in about one week. A 2,500-square-foot house needs roughly 10 fans positioned throughout the framing to create adequate air movement before insulation.
Setup matters. Fans need to run 24/7, not just during work hours. Chain and padlock them to studs so they don’t walk off the job site. Point fans to create airflow that moves along wall cavities and across both sides of studs. Commercial-grade fans like the Quest C1000 two-speed model pull 2.4 to 2.8 amps and move 2,700 cubic feet per minute. These units cost about $300 to purchase or $10 per day to rent, which works out to $150 per month.
The math is straightforward. If framing reads 18% to 20% and you need to hit 14%, you’re dropping 4 to 6 percentage points. At 0.5% to 1% reduction per day, expect one week of continuous fan operation to reach your target, assuming temps stay above 45°F. Colder weather slows everything down.
Dehumidification for High-Humidity Conditions
When outdoor humidity exceeds 60%, moving air around just circulates damp air and drying stalls. Close all windows and doors and add commercial dehumidifiers to pull moisture from the air while fans keep it circulating. The combination of fans plus dehumidification brings moisture content down in roughly one week if temperature is adequate.
At 100% humidity, no drying happens regardless of air movement. You’re just pushing saturated air past saturated wood. Dehumidifiers remove water vapor from the air, lowering relative humidity inside the building and creating the gradient that allows moisture to leave the wood. One commercial dehumidifier covers about 2,500 square feet. Larger projects need multiple units spaced throughout.
This closed-building approach means your site needs to be weather-tight enough to hold conditioned air. You need a roof, sheathing, and doors that close. Without those, you’re trying to dehumidify the outdoors, which doesn’t work. For more context on managing moisture in structures, see water damage prevention.
Proper Heat Application
Heat speeds evaporation, but the wrong heat source makes things worse. Propane construction heaters add approximately 1 gallon of moisture to the air for every hour they run, which increases humidity and slows drying. Never use a homeowner’s furnace for construction heat. It voids the warranty and pulls construction dust through ductwork that will later serve living spaces.
Proper heat for drying wet framing requires an external combustion source sitting outside the building, blowing hot dry air inside through a duct. This approach adds heat without adding moisture. Diesel or kerosene indirect-fired heaters work. Electric resistance heaters work if you have adequate power service. Set up fans to distribute the warm air throughout the framing spaces.
Combining methods produces the fastest results. Heat plus dehumidification plus air movement attacks the problem from three directions. Equipment rental costs add up, but a week of intensive drying costs less than the callbacks and repairs from premature enclosure. When deciding between rental and purchase, consider how often you frame in wet conditions. If this is a one-time problem, rent. If you build in climates with unpredictable weather, ownership makes sense.
Construction Risks and Timeline Delays from Wet Framing
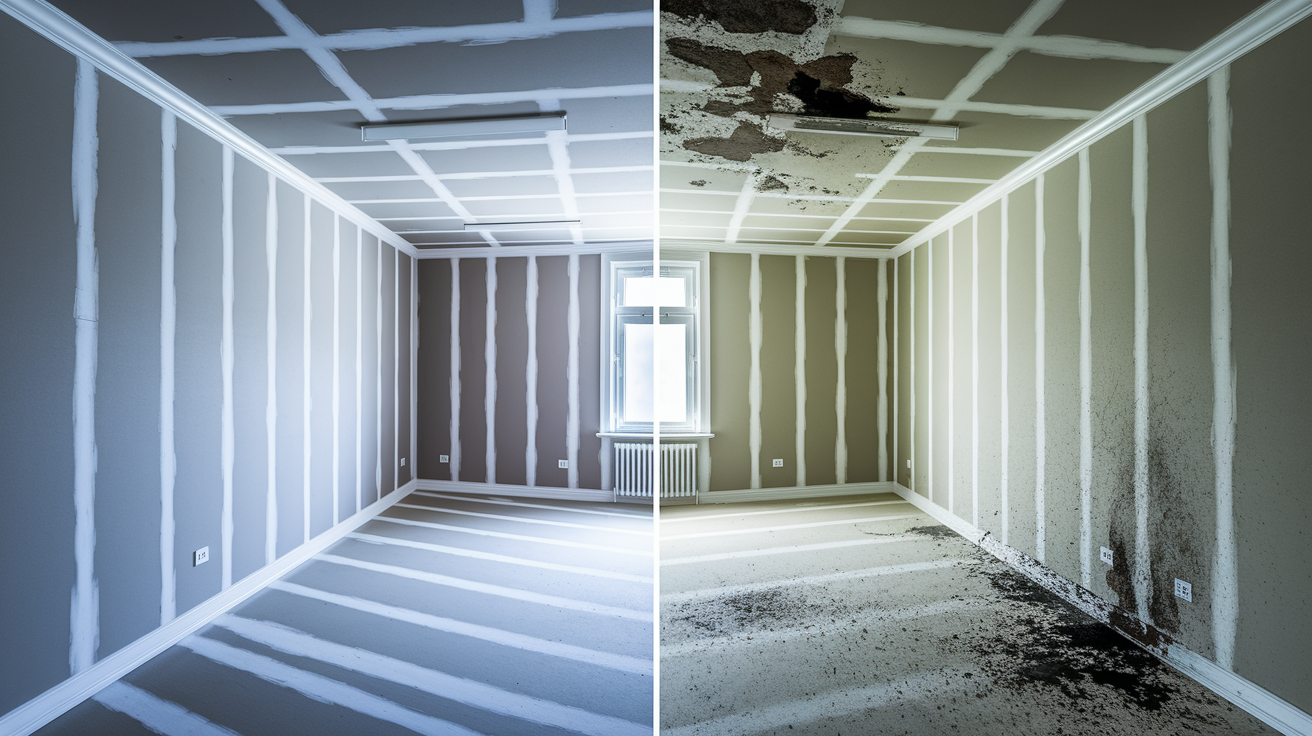
Proceeding with wet framing above 18% creates a bottleneck that affects every trade that follows and sets up serious long-term problems. Modern tight construction traps moisture inside walls where older leaky homes used to let it escape naturally through gaps and cracks. Once you close up wet framing with sheathing, insulation, and drywall, that moisture has nowhere to go.
Proper construction sequence with moisture verification:
- Verify all framing reads below 15% (17% for pressure-treated)
- Complete exterior weatherproofing with sheathing and building wrap
- Allow rough-in trades (electrical, plumbing, HVAC) to complete work
- Re-verify moisture content in framing before insulation
- Install insulation and drywall only after final moisture check confirms dry conditions
Realistic delay expectations depend on conditions. With active drying equipment and temps above 60°F, expect 1 to 2 weeks to drop from 18% to 14%. Cold and rainy weather stretches that to 6 to 12 weeks. Builders who rush this stage to meet deadlines end up with expensive callbacks when problems appear months later.
Specific problems from premature enclosure:
- Mold growth when moisture content stays above 19%
- Wood rot starting within 6 months in untreated lumber, faster in standing water or high humidity
- Nail pops as framing shrinks and pulls fasteners through drywall
- Drywall cracks along seams and at corners
- Floor squeaks from subfloor movement
- Trim separation and gaps as framing shrinks away from finish work
- Paint and finish adhesion failure on surfaces applied over damp substrates
The physics of trapped moisture explains these problems. As framing dries from 18% toward its equilibrium point of 10% to 12% after a year of HVAC operation, the wood loses volume and shrinks. Studs losing more than 5 percentage points after drywall installation cause visible finish flaws. A 2×4 that dries from 18% to 12% shrinks across its width, pulling nails through drywall and opening gaps in trim joints. For additional information about preventing moisture-related issues, see mold prevention.
Repair costs far exceed the cost of proper drying time. Opening walls to fix mold costs thousands. Repairing nail pops and cracks requires patching, sanding, and repainting entire rooms. Squeaky floors mean pulling finish flooring and re-securing subfloors. Coordination with subcontractors gets complicated when you need to bring them back for warranty work. Insurance and warranty claims face scrutiny when moisture problems are documented, and building codes in some areas require moisture verification before final inspection.
When to Stop Construction and Call a Professional

Three scenarios require professional assessment rather than continuing with DIY drying efforts. Moisture readings that won’t drop after 2 or more weeks of active drying with fans, dehumidifiers, and adequate heat indicate a hidden moisture source or absorption problem that needs expert diagnosis. Widespread moisture readings above 20% across multiple studs suggest the framing was already compromised before you started drying or that active moisture intrusion is happening. Discovery of standing water in wall cavities or hidden moisture pockets behind sheathing means the problem is bigger than surface wetness.
Warning signs that professional help is needed:
- Musty or moldy odors developing as framing sits
- Visible mold spots appearing on wood surfaces, especially black or green growth
- Wood discoloration with dark staining or waterlines
- Structural lumber showing warping, twisting, or cupping that wasn’t present initially
- Moisture readings increasing rather than decreasing despite active drying
- Disagreement among moisture meter readings in the same area, suggesting moisture stratification
Restoration professionals and experienced framers bring commercial-grade drying equipment that moves more air and pulls more water than rental units. They have thermal imaging cameras to find hidden moisture pockets and the expertise to create comprehensive moisture maps. A restoration company can set up a drying chamber that contains and intensifies the drying environment, bringing down moisture content faster than scattered fans.
Building inspectors in some areas require documented moisture levels before approving insulation and drywall installation. Even where it’s not required, documenting moisture readings before enclosure protects you from warranty claims and liability questions. Take photos of moisture meter readings with visible dates, keep a log of measurements over time, and save equipment rental receipts that prove you took appropriate action.
Preventing Future Wet Framing Problems During Construction
Prevention is easier than remediation, and a few proactive steps during construction eliminate most wet framing problems before they start.
Best practices to minimize moisture problems during construction:
- Schedule roof and wall sheathing installation promptly after framing is complete
- Stage material delivery to minimize exposure time on site before installation
- Inspect lumber moisture content at delivery and reject loads above acceptable levels
- Elevate lumber off the ground during storage using blocks or pallets
- Create positive drainage away from foundation before framing begins
- Protect subfloors from weather exposure with tarps or temporary roofing
- Maintain site drainage during construction by keeping perimeter ditches clear
- Plan construction timing around seasonal weather patterns, avoiding winter framing in wet climates when possible
Subfloor moisture management matters more than most builders realize. OSB and plywood subfloors under bottom plates create moisture transfer into framing lumber, especially if the subfloor got wet during foundation or framing work. Recheck plywood subfloors daily if they’ve been exposed to weather. Bottom plates absorb water from damp subfloors below and moisture gravitates down vertical studs, concentrating at the bottom plate. A wet subfloor can keep bottom plates damp for weeks even after the rest of the framing dries.
The relationship between building envelope timing and moisture control requires balancing competing priorities. Getting weather-tight quickly by installing roof sheathing and wall sheathing protects framing from additional moisture but creates an enclosed space where trapped moisture dries slowly. Open framing allows natural ventilation and faster drying but exposes lumber to ongoing weather. Proper material staging reduces this tension. Deliver framing lumber just before installation rather than weeks early. Protect material storage areas with tarps elevated on frames that allow air circulation underneath.
Site management practices reduce moisture risk without significantly impacting construction timelines. Keep the foundation perimeter graded so water flows away from the building. Don’t let puddles form under floor joists or around bottom plates. Stage exterior work during dry weather when possible. If rain is forecast, cover exposed framing with tarps before leaving the site, and remove tarps as soon as weather clears to avoid trapping moisture underneath.
Final Words
Wet framing typically takes 3 to 5 weeks to dry naturally when temps stay above 60°F, but cold or rainy conditions can push that to 12 weeks or more.
The key is measuring before you close anything up. Get your moisture meter readings below 15% for kiln-dried lumber and 17% for pressure-treated before installing drywall, or you’re sealing in future problems.
If you’re stalled by weather or high humidity, forced air and dehumidifiers can cut that time to about one week. It’s not always fun to wait, but skipping the drying step means mold, warping, nail pops, and expensive callbacks later.
Dry it right. Then build.
FAQ
How do you dry out wet framing?
Drying out wet framing requires air circulation, low humidity, and warm temperatures above 60°F. Run high-volume carpet blower fans 24/7 and use commercial dehumidifiers in enclosed spaces. Check moisture meter readings every 3-4 days until studs drop to 12-14% moisture content before continuing construction.
Will wet wood go back to normal?
Wet wood will return to normal moisture content if properly dried before enclosure, reaching 10-12% equilibrium after about one year of HVAC operation. If wet wood dries after installation, it shrinks and causes nail pops, cracks, squeaks, and trim separation, requiring costly repairs.
How do you dry out wet 2x4s?
Drying out wet 2×4 studs takes 3-5 weeks with temperatures above 60°F and good air movement, or 6-12 weeks in cold, damp conditions. Use forced air fans to speed drying by 0.5-1% moisture per day. Check bottom plates more often since they retain moisture longest.
Is it okay to work with wet wood during construction?
Working with wet wood above 18% moisture content is not safe for continued construction and risks mold growth, rot, warping, and finish failures. Dry framing to 12-14% moisture (15% maximum for kiln-dried, 17% for pressure-treated) before installing sheathing, insulation, or drywall to prevent long-term structural and cosmetic problems.
How long does framing lumber take to dry naturally?
Framing lumber takes 3-5 weeks to dry naturally from 18% to 14% moisture when outdoor temperatures stay above 60°F with low humidity. Cold and rainy conditions extend natural drying to 6-12 weeks. Below 32°F, drying slows significantly and may require mechanical assistance.
What moisture content is safe for framing before drywall?
Safe moisture content for framing before drywall installation is 12-14% for kiln-dried lumber and 15% maximum. Pressure-treated or green lumber should reach 17% or less. Installing drywall over framing above 18% moisture content traps moisture and causes mold, rot, and finish failures.
How does humidity affect framing drying time?
Humidity above 60% slows framing drying by preventing moisture from escaping wood into saturated air. At 100% humidity, no drying occurs regardless of air movement. Close windows and run dehumidifiers when outdoor humidity exceeds 60% to maintain drying progress.
Do you need fans or just dehumidifiers to dry wet framing?
Drying wet framing requires both fans and dehumidifiers for fastest results in enclosed spaces. Fans alone work in dry climates with outdoor humidity below 60%. Plan for 3-4 fans per small area or 10 fans for 2,500 square feet, running continuously alongside dehumidification.
How do you measure moisture in framing lumber?
Measure moisture in framing lumber with a pin-type moisture meter, checking every 10th stud at chest height and near the bottom plate. Check bottom plates every 4th stud since they hold the most moisture. Test multiple locations and record readings to create a moisture map.
Can you install insulation on wet framing?
Installing insulation on wet framing above 15% moisture content traps moisture inside walls and causes mold growth, rot, and structural damage. Wait until moisture meter readings confirm 12-14% moisture content at multiple locations before insulating or closing walls to prevent long-term problems.
What causes bottom plates to stay wet longer?
Bottom plates stay wet longer because they absorb moisture from damp subfloors and gravity pulls moisture down vertical studs into horizontal plates. Check bottom plate moisture every 4th stud and verify subfloor moisture content separately before assuming framing is dry enough for enclosure.
How much does commercial drying equipment cost for wet framing?
Commercial carpet blower fans cost about $300 to purchase or $10 per day/$150 per month to rent. Plan for 3-4 fans minimum for small areas or 10 fans for 2,500 square feet. Quest C1000 two-speed fans move 2,700 CFM and use 2.4-2.8 amps.
Does rain-soaked framing need professional drying?
Rain-soaked framing that increases moisture content by 30% or more typically needs professional assessment and commercial-grade drying equipment. If moisture readings stay above 20% after two weeks of active drying, or if musty odors and visible mold develop, call restoration professionals with moisture mapping expertise.
What happens if you close walls over wet framing?
Closing walls over wet framing above 15% moisture content traps moisture that causes mold growth above 19%, wood rot within 6 months, nail pops, drywall cracks, floor squeaks, and trim separation. Studs losing more than 5 percentage points after drywall installation create visible finish flaws requiring expensive repairs.
How does wood thickness affect drying time?
Thicker lumber requires longer drying time because moisture must travel farther to escape. A 2×10 or header takes longer to dry than a 2×4 stud. Natural seasoning follows the rule of one year per inch of thickness, but forced air drying accelerates this significantly.
Should you use heat to dry wet framing?
Using heat to dry wet framing requires external heaters blowing hot, dry air into the building from outside. Never use propane heaters inside since they add one gallon of moisture per hour, worsening the problem. Never use the client’s furnace as it voids warranties and damages ductwork.
