

Most people assume the hard part of water damage is drying everything out. It’s not. It’s cutting out the right amount of drywall without guessing where wet stops and dry begins. Cut too little and you’re sealing in moisture that feeds mold within weeks. Cut too much and you’ve added days of unnecessary work. This guide walks you through the exact sequence to remove water damaged drywall safely, from finding hidden saturation to making clean cuts that set up fast, solid repairs.
Assessing Water Damage Extent and Determining Cut Boundaries

The toughest call in drywall removal isn’t whether to cut. It’s where to cut. Remove too little and hidden moisture feeds mold behind your fresh repairs within weeks. Remove too much and you’ve created unnecessary work and expense. The standard rule solves this: mark your horizontal cutting line 12 to 24 inches above the highest point of visible water damage. This buffer zone accounts for how water wicks upward through drywall and insulation.
What you see never tells the complete story. Water travels upward through porous materials like a sponge soaking up spilled coffee. You might see discoloration only six inches up from the baseboard, but moisture meters will detect saturation three feet higher in the wall cavity. A moisture meter isn’t optional. It’s the tool that shows you what your eyes can’t see. Run the meter across the wall in a grid pattern, checking readings every foot horizontally and vertically beyond visible damage. Building materials should read below 15% moisture content. Anything above that number means you’re still in the wet zone.
Follow this inspection sequence before marking any cut lines:
- Locate the visible waterline by examining discoloration, texture changes, and paint damage along the wall surface
- Use a moisture meter on areas two to three feet above visible damage to detect hidden saturation from wicking
- Check for soft spots, bulging, or texture changes that indicate water absorption even without visible staining
- Drill small inspection holes near the top of suspected damage areas to check insulation saturation inside wall cavities
- Examine exposed wall framing through existing openings for darkening, soft spots, or deterioration
- Measure 12 to 24 inches above the highest moisture reading and mark this as your horizontal cut line
Once you’ve identified the true extent of damage, snap a chalk line at your chosen height. Measure from the floor up, not from the baseboard. Baseboards can vary in height and create uneven cuts. A consistent horizontal line measured from the floor gives you a level cutting guide and creates a straight seam for replacement drywall. Walk along the wall and verify your measurements every few feet.
Document everything with photos and written measurements before you start cutting. Capture the waterline location, moisture meter readings at different heights, and any visible mold or structural damage. Insurance adjusters and future buyers will want this evidence. Date-stamped photos showing moisture readings prove you removed adequate material and didn’t just patch over hidden problems.
Essential Safety Equipment and Precautions Before Cutting Drywall
Shut off electrical power to the affected area at the breaker panel before you touch a single tool to the wall. Water and electricity create fatal combinations, and cutting into walls risks hitting wiring you didn’t know was there. Flip the breaker, test outlets with a voltage tester to confirm power is dead, and tape over the breaker with a note so nobody flips it back on while you’re working.
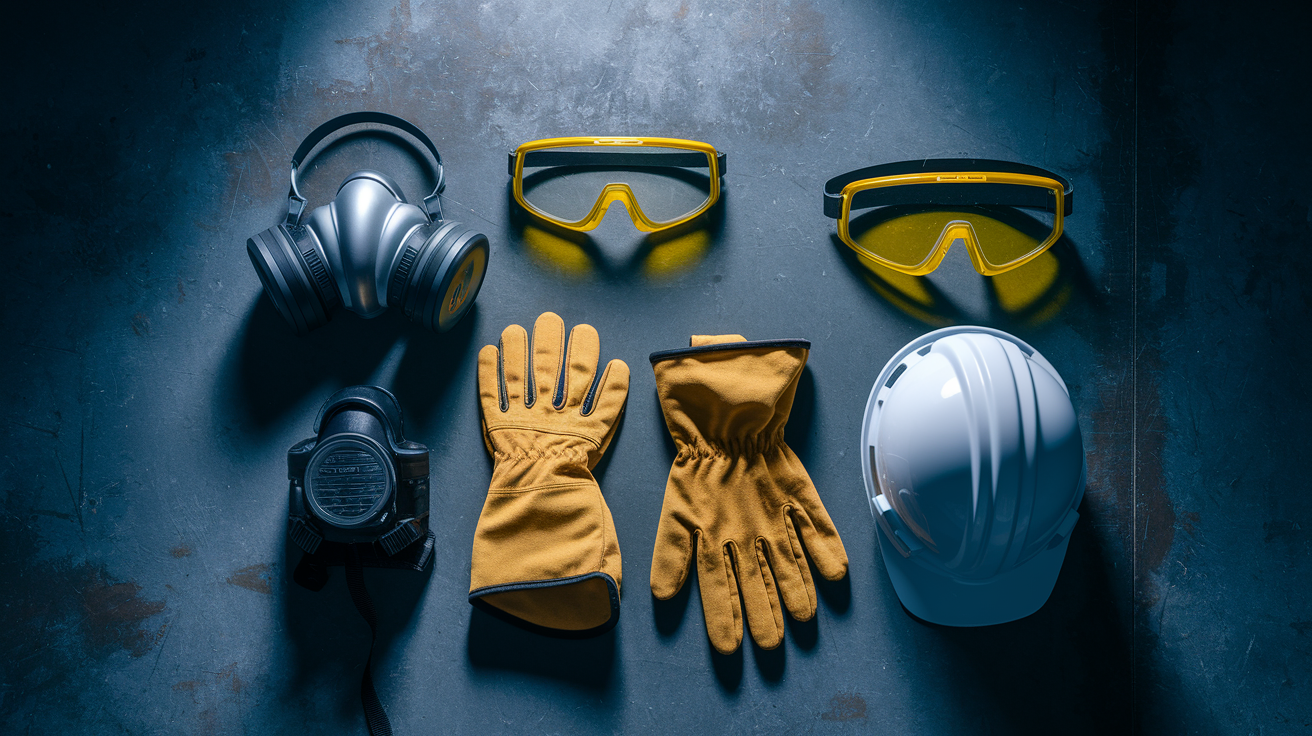
Put on your protective equipment before you start cutting:
- Safety goggles to shield eyes from falling debris, dust, and potential mold spores during cutting and removal
- N95 dust mask or respirator to filter airborne particles including drywall dust and mold spores from the work area
- Heavy work gloves to protect hands from sharp drywall edges, exposed fasteners, and potential contaminants
- Reinforced footwear with thick soles to prevent injury from nails, screws, or dropped tools in the work zone
- Long sleeves and pants to minimize skin contact with contaminated materials or irritating drywall dust
- Hard hat or bump cap when working on ceiling damage or in areas where overhead debris may fall
- Ventilation fans positioned to blow contaminated air outside through windows rather than circulating it through your home
Water damage falls into three categories, and your protection level should match the contamination risk. Clean water from supply lines (Category 1) requires standard dust protection. Gray water from appliances or toilet overflow without feces (Category 2) needs better respiratory protection and rubber gloves. Black water from sewage backups or flooding contaminated with soil or waste (Category 3) requires full contamination gear and potentially professional remediation. If you’re dealing with anything beyond clean supply water, upgrade your mask to a P100 respirator and consider whether professional help makes more sense than DIY.
Set up ventilation before you start cutting. Open windows on opposite sides of the space to create cross ventilation. Position box fans to push air from the work area toward the outside. Tape plastic sheeting across doorways to other rooms, cutting a small slit for access but preventing dust and spore migration into unaffected areas.
When to Call a Professional Instead of DIY Drywall Cutting

You can handle small, contained water damage from clean sources yourself. Think a toilet supply line that burst and affected one wall section under ten square feet with no structural sagging. Beyond that scope, the cost of getting it wrong typically exceeds the cost of hiring experienced help from the start.
Stop and call professionals for these situations:
- Mold growth covering more than ten square feet, indicating established colonies that require proper containment and remediation protocols
- Category 2 gray water or Category 3 black water contamination from sewage, flooding, or long-standing stagnant water
- Visible structural sagging in walls, soft spots in ceilings, or floors showing deflection from water damaged framing members
- Electrical outlets, switches, or visible wiring in the affected area that may have been submerged or remain wet
- Water damage affecting multiple rooms, entire floors, or spanning more than one exterior or load bearing wall
- Lack of proper safety equipment including moisture meters, containment supplies, or appropriate respiratory protection for mold exposure
- Properties requiring building permits or code compliance documentation for insurance claims or future resale purposes
Restoration professionals bring industrial dehumidifiers that extract moisture in days instead of weeks. They establish proper containment barriers with negative air pressure that prevents mold spores from spreading to clean areas. Licensed contractors carry certifications in water damage restoration and mold remediation that your insurance company may require for claim approval. Their work comes with warranties that protect you if hidden damage appears months later.
If you’re considering professional services, get estimates from at least three contractors. Verify each company carries general liability insurance and workers’ compensation coverage. Ask about IICRC certification (Institute of Inspection, Cleaning and Restoration Certification). It’s the industry standard for water damage restoration training. Request references from jobs completed in the past six months and actually call them.
Tools and Materials Needed for Drywall Cutting After Water Damage
Gather everything before you start cutting so you’re not making hardware store runs with one wall torn open and moisture still spreading. Most tools are available at any home improvement center, and several can be borrowed or rented if this is a one-time repair.
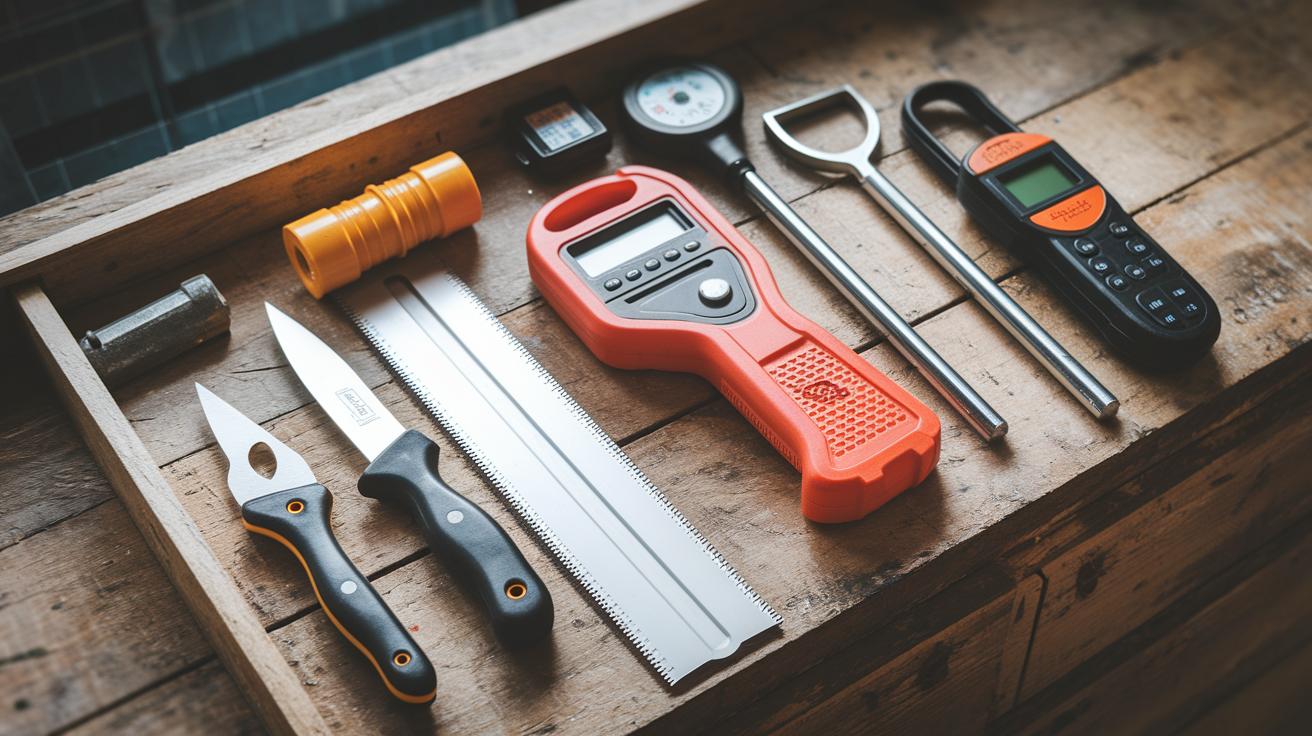
| Tool/Material | Purpose | Approximate Cost |
|---|---|---|
| Utility knife with fresh blades | Scoring cut lines through drywall face paper for controlled cuts | $5-15 |
| Drywall saw or keyhole saw | Cutting through drywall thickness after scoring with utility knife | $8-20 |
| Electronic stud finder | Locating wall framing members to plan vertical cut lines at stud centers | $15-40 (or $10-15 rental) |
| Chalk line | Marking straight horizontal cutting line at consistent height across wall length | $8-15 |
| Pry bar or cat’s paw | Leveraging cut drywall sections away from wall studs and removing fasteners | $10-25 |
| Moisture meter | Detecting hidden water saturation in drywall, insulation, and framing beyond visible damage | $25-60 (or $15-25 rental) |
| Heavy-duty drop cloths | Protecting flooring from falling debris, dust, and contaminated materials during removal | $15-30 |
| 6-mil plastic sheeting and tape | Creating containment barriers across doorways to prevent dust and spore migration | $20-40 |
Utility knives start at just a few dollars but make sure you have a pack of replacement blades. Dull blades tear drywall instead of cutting it cleanly, creating ragged edges that complicate patching. If you’re dealing with extensive damage, consider renting a reciprocating saw with a demolition blade. It speeds up cutting but requires more skill to control and risks damaging framing if you’re not careful.
Moisture meters range from basic pin type models to fancier pinless scanners. For a one-time job, the $30 pin type meter works fine. If you’re dealing with ongoing moisture issues or checking multiple areas, rental stores carry professional grade meters for $15 to $25 per day. Either way, you need objective moisture readings, not guesses based on how the wall feels.
Step-by-Step Guide to Cutting and Removing Water Damaged Drywall

Cut lines should land on stud centers. The middle of the framing member, not between studs. Standard wall framing runs 16 inches on center (measured from the center of one stud to the center of the next), though some walls use 24 inch spacing. When you install new drywall, both edges of the sheet need solid wood backing for screw attachment. Cutting at stud centers gives you that backing without adding extra blocking work.
Run your stud finder across the wall about two feet above your planned horizontal cut line. Mark stud center locations with a light pencil line. Studs run vertically from floor to top plate, so once you’ve found the center at one height, you can draw a vertical line all the way down. Most standard rooms have studs at roughly 16 inch intervals, but always verify with the finder rather than assuming.
Follow this sequence for clean, controlled cutting and removal:
- Confirm electrical power is shut off at the breaker panel and test outlets in the work area to verify no live current
- Snap a chalk line horizontally at 12 to 24 inches above the highest moisture reading, measured up from the floor for consistency
- Use the stud finder to locate vertical framing members and mark cut lines at stud centers using a straightedge for accuracy
- Score horizontal and vertical cut lines with a utility knife, pressing firmly through face paper and into the gypsum core to ½ to ¾ depth
- Cut completely through the drywall along scored lines using a drywall saw, keeping the blade perpendicular to the wall surface
- Create a starter hole by punching through the drywall a few inches below your horizontal cut line using a hammer
- Insert a pry bar into the starter hole and leverage the drywall section away from wall studs, pulling toward you to expose fasteners
- Remove all cut sections completely, pulling any remaining screws or nails from exposed studs and disposing of debris in heavy-duty bags
Scoring with the utility knife first prevents the drywall face paper from tearing raggedly beyond your cut line. Make several passes with the knife, cutting deeper each time rather than trying to slice through in one aggressive cut. The saw finishes what the knife started, cutting through the back paper and allowing clean separation.
When you cut at stud centers, both your removed damaged drywall and your new replacement sheet have solid backing. Cutting between studs leaves a floating drywall edge that will crack over time unless you install horizontal blocking between the studs. Extra work that proper planning avoids. Clean cuts at stud centers create the strongest possible repair foundation and the least complicated installation when you’re ready to patch.
Understanding When to Remove Insulation Behind Damaged Drywall
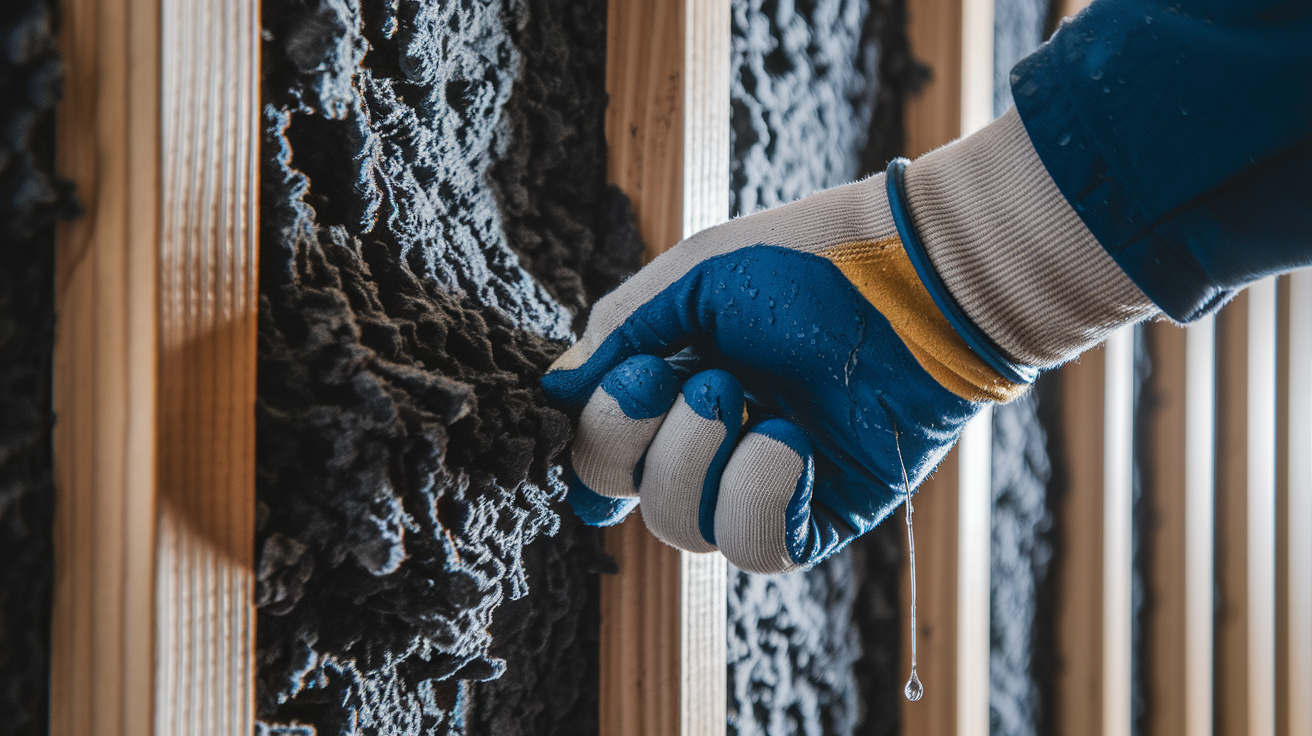
Wet insulation doesn’t dry effectively and creates ideal conditions for mold growth you can’t see until it’s established throughout wall cavities. Fiberglass and cellulose insulation cost pennies per square foot to replace. Far less than mold remediation after you’ve closed up walls around hidden contamination. When in doubt, pull it out.
Once drywall is removed, reach into the wall cavity and grab a handful of insulation. Squeeze it firmly. Wet insulation feels heavy, stays compressed when you release it, and may drip water. Check insulation at different heights inside the cavity because water wicks upward unpredictably. Discoloration, musty smell, or compressed appearance all indicate moisture saturation even if it doesn’t feel soaking wet to touch.
Insulation that contacted floodwater, sewage, or long-standing stagnant water must come out regardless of how it looks or feels. You can’t adequately clean porous insulation materials, and contamination remains even after drying. Bag it, dispose of it, and plan to install fresh insulation once wall cavities have fully dried.
After removing damaged insulation, let exposed wall cavities breathe. Position fans to blow air directly into the stud bays, not just across the room. Run a dehumidifier in the space to pull moisture from the air. Check moisture content in wall framing using your moisture meter. You’re targeting readings below 15% in the wood before you install new insulation or close up walls. This drying phase typically takes 3 to 7 days depending on humidity levels, airflow, and how wet things got initially.
Drying Requirements and Mold Prevention After Cutting Out Water Damage
Mold spores start reproducing within 24 to 48 hours after water exposure in typical indoor conditions. That’s your working window. Everything that got wet (drywall, insulation, framing, subfloors) must reach safe moisture levels in less than two days or you’re fighting mold growth instead of preventing it.
Set up drying equipment immediately after removing damaged materials:
- Position one or more dehumidifiers centrally in the affected space, emptying collection buckets every few hours or running continuous drain lines
- Aim box fans directly into open wall cavities at an angle to create airflow across exposed studs and into corners
- Open windows on opposite sides of the room to create cross ventilation that exchanges humid air with drier outside air
- Place air movers (high velocity fans) at floor level to dry subflooring, bottom plates, and lower wall sections where water accumulates
- Check moisture readings with your moisture meter every 12 hours, recording numbers to track drying progress across different locations
- Spray exposed framing, studs, and plates with antimicrobial solution labeled for building materials to prevent surface mold establishment
Mold during this phase appears as black, dark green, gray, or white patches on exposed wood framing, often with a fuzzy or slightly slimy texture. You’ll smell it before you see it in many cases. A musty, earthy odor that’s distinctly different from the wet wood smell. Some people experience allergic reactions to mold exposure including sneezing, coughing, eye irritation, skin rashes, or respiratory difficulty. If anyone in your household has asthma or immune system issues, they should stay out of the work area entirely.
Your target is simple: wood framing members should read below 15% moisture content on your moisture meter before you close up walls. Concrete and masonry can take longer to dry but should also drop below 15%. Keep equipment running and keep checking. One area might dry faster than another, so verify moisture at multiple spots rather than assuming uniform drying.
Surface mold on exposed framing (small patches without deep penetration) can be wiped down with antimicrobial cleaner or a bleach solution (1 cup bleach per gallon of water). Spray or wipe it on, let it sit for 10 minutes, then wipe clean with disposable rags. If mold has penetrated into wood grain, appears as thick colonies, or covers more than a few square feet on framing members, stop and call a mold remediation professional. At that point you’re dealing with established growth that requires proper containment and specialized treatment.
If you discover mold during drying, upgrade your respiratory protection immediately. Standard dust masks don’t filter mold spores effectively. Switch to an N95 respirator at minimum, or better yet a P100 if you’re dealing with visible colonies. Do not skip this step. Mold exposure accumulates with each breath in contaminated spaces.
Proper Disposal Methods for Water Damaged Drywall and Materials

Separate clean water damaged materials from anything touched by contaminated sources. A burst supply line that soaked your drywall is different from floodwater that may contain sewage, chemicals, or biological contaminants. Contaminated materials can’t go in regular construction debris bins in many jurisdictions and may require special handling or disposal sites designated for hazardous waste.
Double-bag all wet drywall and insulation in heavy-duty contractor bags (3 mil thickness or heavier). Wet materials are heavy and sharp edged. Cheap bags will tear and spread contaminated debris and mold spores through your home and vehicle during transport. Tie bags tightly to contain dust and prevent moisture from leaking out. Stage bagged debris in the contained work area until you’re ready to transport everything at once.
Contact your local waste management facility or municipal public works department about disposal requirements for water damaged building materials. Some areas allow wet drywall in standard construction debris dumpsters. Others require separate disposal at designated facilities. Materials contaminated by sewage or floodwater almost always need special handling. Call ahead rather than showing up at a facility that won’t accept your load.
Contain dust and debris during removal by keeping plastic sheeting barriers in place across doorways throughout the entire cutting and removal process. Tape sheeting to door frames at the top and sides, letting it hang to the floor where it can be weighted with boards or bags. Cut a vertical slit for access but overlap the cut sections so the barrier stays mostly closed. Every time you walk through the barrier, you’re preventing another few thousand mold spores or dust particles from migrating into clean areas.
Ceiling Damage: Special Considerations When Cutting Overhead Drywall

Cutting ceiling drywall means debris falls directly on you, tools slip more easily in overhead positions, and you can’t see what you’re cutting into until pieces drop. Add the weight of water saturated drywall (which can be twice as heavy as dry material) and you’ve got falling hazards that require different planning than wall cuts.
Inspect the ceiling before you touch it. Water damaged ceiling drywall sags when framing or fasteners have weakened. Press gently on suspicious areas from below using a broom handle, not your hand. If you feel significant give or movement, the ceiling is compromised and could come down in large sections when you start cutting. That’s a professional structural assessment situation before proceeding.
Wear a hard hat or bump cap for overhead work. Not optional. Falling drywall chunks can crack your skull or cause serious neck injuries. Safety goggles keep debris out of your eyes when you’re looking up at cut lines. Position a helper below to catch falling sections before they hit the floor, spreading dust and potentially breaking.
Follow these ceiling specific techniques:
- Support loose or sagging sections with temporary bracing (2×4 props wedged between floor and ceiling) before making any cuts
- Cut smaller sections than you would on walls (2 to 3 foot squares) to manage falling weight and control debris
- Have a helper positioned to catch cut sections as they release, preventing uncontrolled drops that spread contamination
- Inspect exposed ceiling joists and trusses for water staining, soft spots, or structural deterioration before proceeding with repairs
If ceiling joists show dark staining, soft spots when you press a screwdriver into them, or visible sagging even after wet drywall is removed, you’re looking at structural framing damage that needs engineering assessment before you close anything up. Water damaged framing can fail under load, and ceiling failures drop into occupied spaces below. This is not a DIY judgment call.
Wall Repair Planning: Patching vs. Full Drywall Replacement
Small holes under 8 inches across work fine with patch kits. Mesh patches and joint compound that feather into existing drywall surfaces. Damage from 8 to 24 inches calls for cut-out patches where you install a new piece of drywall backed by scrap wood strips screwed to the back of the existing drywall opening. Anything larger than 24 inches typically gets half-sheet or full-sheet replacement because patching big areas creates wavy surfaces that never look right.
Match your existing drywall thickness when buying replacement material. Standard walls use ½ inch drywall, while ceilings often get ⅝ inch thickness for sag resistance. Installing mismatched thickness creates a raised or recessed surface that requires excessive joint compound to blend. Compound that will crack and show the repair forever. Check the exposed edge of your existing drywall to verify thickness before you buy new sheets.
Cutting to stud centers creates the strongest repair because both edges of your new drywall sheet have solid backing. Irregular patch shapes that land between studs require you to install horizontal blocking between the studs. Cutting, fitting, and screwing 2×4 pieces into place to create backing. Every extra step adds time and another chance for mistakes.
Plan your material needs based on actual opening size, not just drywall square footage. You’ll need drywall sheets in appropriate thickness, joint compound (a 4.5 gallon bucket covers about 400 square feet of seams), paper or mesh drywall tape for seams, drywall screws (1¼ inch for ½ inch drywall, 1⅝ inch for ⅝ inch), primer, and finish paint. Buy joint compound in larger quantities than you think you need. Finishing drywall takes multiple thin coats, and running short mid-job means uneven drying times that show in the final surface. Finishing steps include taping seams where new drywall meets old, applying three progressively wider coats of joint compound with feathering at edges to blend transitions, sanding smooth once fully dried (usually 24 hours between coats), and priming before final paint to ensure uniform sheen and color.
Final Words
Knowing how to cut drywall after water damage starts with proper assessment, measuring 12-24 inches above visible waterlines, and locating studs for clean vertical cuts.
Once you’ve verified the area is electrically safe and completely dry, the actual cutting process goes quickly with a utility knife and drywall saw.
The hard part isn’t the cutting. It’s patience during the drying phase and honest assessment about whether you’re dealing with clean water in a small area or something that needs professional help.
Take your time with the moisture meter readings, don’t skip the insulation check, and cut to stud centers whenever possible. Your repair will go smoother.
FAQ
How high should you cut drywall after a flood?
A: You should cut drywall 12 to 24 inches above the highest point of visible water damage. This ensures complete moisture removal since water wicks upward into materials beyond what you can see, potentially saturating insulation and framing feet above the waterline.
Is drywall ruined if it gets wet?
A: Drywall is ruined if it gets wet and must be removed and replaced, even if only a few inches contacted water. Water-soaked drywall loses structural integrity, promotes mold growth within 24 to 48 hours, and cannot be effectively dried once saturated.
How long does it take for drywall to dry from water damage?
A: Drywall must dry completely within 48 hours to prevent mold growth. Use dehumidifiers, fans, and cross-ventilation to dry exposed framing and cavities. Verify moisture levels below 15% with a moisture meter before installing new drywall to ensure complete drying.
How do you cut damaged drywall after water exposure?
A: Cut damaged drywall by marking a horizontal line 12 to 24 inches above damage using a chalk line, locating studs with a stud finder, scoring cuts with a utility knife, and sawing through with a drywall saw at stud centers for clean edges.
Do you need to remove insulation behind water-damaged drywall?
A: You need to remove all wet insulation behind water-damaged drywall because insulation is difficult to dry, holds moisture that promotes mold, and loses effectiveness when saturated. Insulation replacement is inexpensive compared to later mold remediation costs.
When should you call a professional instead of cutting drywall yourself?
A: You should call a professional when damage exceeds 10 square feet, involves contaminated water from sewage or flooding, shows structural sagging, contains visible mold growth, or interferes with electrical or plumbing systems requiring specialized expertise and safety protocols.
What tools do you need to cut water-damaged drywall?
A: You need a utility knife for scoring, drywall saw for cutting, stud finder for locating framing, chalk line for marking, pry bar for removal, moisture meter for detecting hidden water, and protective equipment including safety goggles and dust mask.
Should you cut drywall at stud locations after flooding?
A: You should cut drywall at stud centers after flooding because edges need solid backing for secure attachment of replacement sheets. Cutting at stud locations creates cleaner repairs, eliminates the need for additional blocking, and produces stronger finished walls.
How do you prevent mold growth after cutting out water-damaged drywall?
A: Prevent mold growth by drying exposed wall cavities within 48 hours using dehumidifiers and fans, maintaining moisture levels below 15% verified with a moisture meter, applying antimicrobial spray on framing, and ensuring adequate ventilation before closing walls.
What are the safety requirements before cutting wet drywall?
A: Safety requirements before cutting wet drywall include shutting off electrical power in affected areas, wearing safety goggles, dust mask or respirator, work gloves, and reinforced footwear, and establishing proper ventilation to prevent exposure to mold spores and contaminants.
How do you dispose of water-damaged drywall properly?
A: Dispose of water-damaged drywall by double-bagging wet materials in heavy-duty plastic bags to prevent mold spore spread, separating clean-water damage from contaminated materials, and checking local regulations for construction debris and potentially hazardous waste disposal requirements.
What makes cutting ceiling drywall after water damage more difficult?
A: Cutting ceiling drywall after water damage is more difficult because debris falls directly onto you, sagging indicates potential structural compromise requiring inspection, overhead work demands different positioning and headgear, and falling pieces require helper assistance for safe removal.
Should you patch or replace entire drywall sheets after flood damage?
A: You should patch areas under 8 inches, replace half-sheets for damage between 8 and 24 inches, and install full sheets for larger areas. Replacing to stud centers creates stronger, more professional repairs than irregular patch shapes.
