

Most people wait too long to remove wet drywall, thinking it’ll dry out and be fine. It won’t. Saturated gypsum doesn’t recover. It crumbles, sags, and grows mold inside where you can’t see it until the smell hits. Knowing when to remove damaged sections and how to do it without creating bigger problems separates a clean repair from a months-long mold issue. This guide walks you through the safety checks, the actual cutting and removal process, and how to avoid the hidden mistakes that turn a manageable project into a costly mess.
Assessing Water Damage Severity and Removal Necessity
Getting this part right is the difference between tearing out too much (and wasting money) or leaving too much (and inviting mold). Before you pull on gloves and start cutting, you need to know if that wet spot actually needs removal or if you can dry it out and treat the surface.
Look for these signs that removal is necessary:
- Blistering. When the paper bubbles up away from the gypsum core, it won’t stick back down even after drying. Those bubbles trap moisture and make perfect little mold pockets.
- Sagging. If a ceiling or wall section droops or feels soft when you push gently, the gypsum’s lost its structure. It’s not firming back up.
- Widespread discoloration. A few inches of staining might be salvageable. When discoloration spreads across multiple square feet or shows rings from repeated wetting, the damage goes deeper than surface level.
- Soft spots when pressed. Push your finger gently against the wall. If it gives easily or feels spongy instead of firm, moisture’s compromised the core.
- Visible mold growth. Black, green, or white fuzzy patches mean spores have colonized the porous gypsum. Surface cleaning won’t reach colonies growing inside.
- Water lines showing flood height. Horizontal stain lines tell you exactly how high water sat. Everything below that line’s been saturated and likely needs removal.
Use a level tool to check if walls are still plumb. Hold a four-foot level against the surface and look for gaps. Sections that bow out or cave in have lost structural integrity and can’t be salvaged. A moisture meter reading above 17% in drywall means it’s still too wet to save without extended drying, and readings that stay elevated after several days often point to damage in the gypsum core itself.
Surface staining from brief exposure might paint over cleanly once dried, especially if the water was clean (supply line, not drain water) and you caught it within hours. But when the paper facing delaminates from the core, when you can peel the surface layer away with your fingers, or when the material feels crumbly, you’re past cosmetic fixes. The extent of damage matters more than the water source alone.
When damage extends to structural walls, when you’re looking at more than one room’s worth of removal, or when ceiling damage covers significant square footage, get a professional assessment. Framing might need evaluation, and the scope might require permit work that only licensed contractors can pull.
Identifying and Stopping the Water Source First
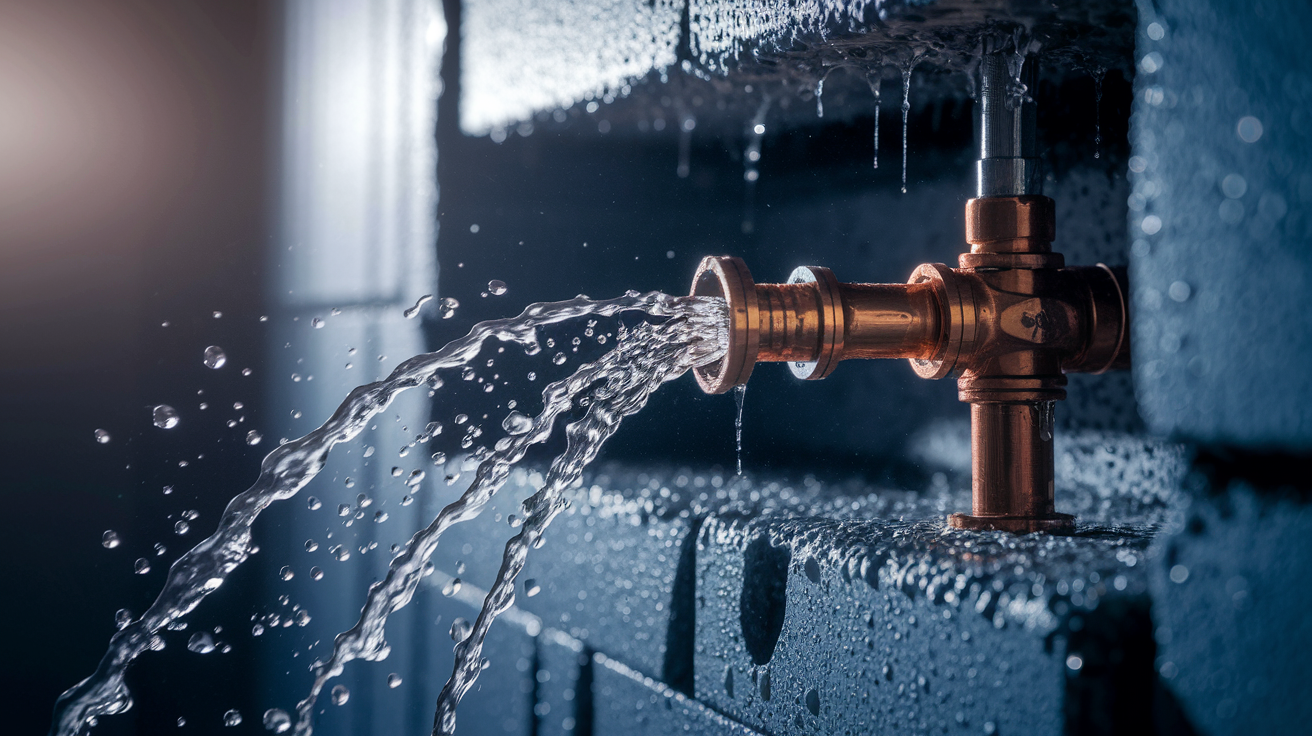
Removing wet drywall while water keeps flowing is like bailing out a boat with the drain plug still open. And before you touch anything wet, you need power shut off to those areas or you’re risking electrocution along with water damage.
Common water sources behind walls include:
- Burst supply pipes (hot or cold water lines under pressure)
- Leaking drain pipes (slower seepage from corroded or loosened connections)
- Roof penetrations (around chimneys, vents, or damaged flashing)
- Window seals (water tracking down from failed caulking or flashing)
- Foundation cracks (groundwater intrusion during heavy rain)
- HVAC condensation (drain line clogs or disconnected drain pans)
- Appliance failures (washing machine hoses, water heater tanks, dishwasher lines)
- Second floor bathroom leaks (wax ring failures, tub surrounds, shower pans)
To trace a hidden leak behind drywall, cut a six square inch inspection hole in the damaged area using a utility knife or drywall saw. Cut low on the wall where damage is visible, then shine a flashlight inside and look up along studs and pipes. You’ll often see wet insulation, active dripping, or water stains on the backside of the drywall that point to the source.
Once you’ve located the problem, turn off the water supply before attempting any repair. For localized leaks, shut the fixture shutoff valve (under sinks, behind toilets, at washing machine boxes). For pipe failures inside walls, turn off the main water shutoff where the supply enters your home. Flip circuit breakers to cut power to any outlets, switches, or light fixtures in or near the wet area. Even if outlets look dry, moisture can travel through walls and create shock hazards.
Minor supply line repairs (replacing a compression fitting, tightening a loose connection, patching a pinhole leak with epoxy putty) are manageable DIY work if you’re comfortable with basic plumbing. But if you’re seeing active spray, if pipes are corroded and crumbling, if you can’t access the damaged section without major demolition, or if it’s a drain line leaking sewer gas along with water, call a licensed plumber. The plumbing repair needs to be solid before you invest time in drywall work.
Photograph the water source, the damaged areas, and any visible pipe or roof problems. Those images matter for insurance documentation, for explaining the situation to contractors, and for your own records if issues recur later.
Required Safety Equipment and Essential Tools
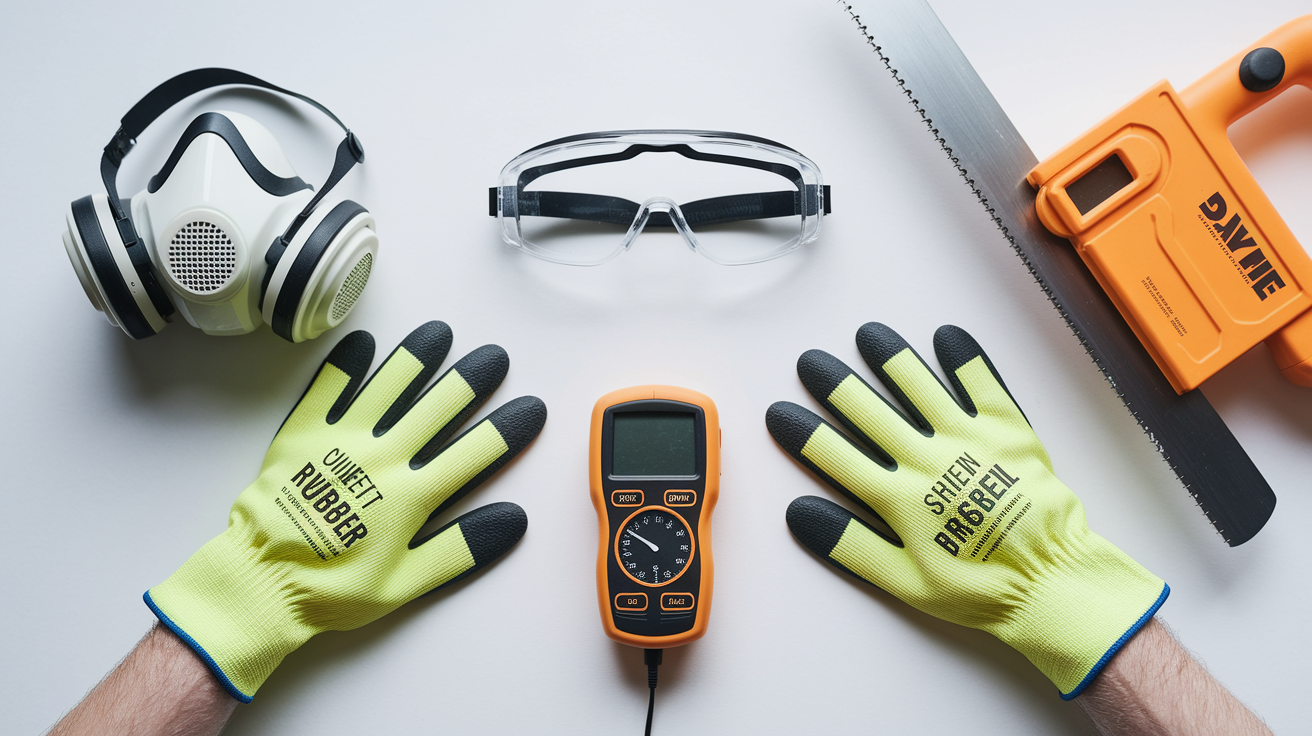
Water damage creates hazards beyond just getting wet. Contaminated water carries bacteria. Disturbed drywall releases gypsum dust. And electrical systems don’t care if you didn’t mean to touch that wet wire.
Protective Equipment by Water Category
Water damage falls into three contamination categories, and your protection needs scale with the risk. Clean water comes from supply lines, rainwater, or condensation. Gray water includes discharge from washing machines, dishwashers, or toilet tanks (not bowls). Black water means sewage, toilet bowl overflows, or flood water that sat long enough to grow bacteria.
- N95 or N100 respirator/dust mask (all categories). Drywall dust clogs your lungs. Mold spores make it worse. Wear a mask anytime you’re cutting, sanding, or removing damaged material.
- Safety goggles (all categories). Not just glasses. Goggles seal around your eyes to keep dust, debris, and contaminated water droplets out.
- Heavy duty waterproof gloves (gray and black water). Nitrile or rubber gloves rated for chemical resistance, not thin latex gloves that tear easily.
- Nitrile gloves (clean water). Sufficient for clean supply line damage, but swap to heavier gloves if you encounter mold or questionable water.
- Long sleeves and pants (all categories). Cover skin to prevent contact with contaminated dust and materials. Old clothes you can throw away after are ideal.
- Rubber boots (gray and black water). Keep contaminated water off your feet and prevent slipping on wet floors.
- Head protection (all categories). A simple bump cap or hard hat matters when working around ceiling damage or in cramped spaces.
If you’re working with black water contamination, stop. That level of exposure calls for professional remediation crews with hazmat training. The porous nature of damp drywall creates an ideal environment for mold growth, and once sewage bacteria colonize that material, home level protection isn’t enough.
Essential Removal Tools
| Tool | Purpose | Priority Level |
|---|---|---|
| Moisture meter | Measure moisture content in drywall, studs, and subfloor to confirm extent of damage and verify complete drying | Essential |
| Stud finder | Locate framing members so you can cut to stud centers and avoid cutting electrical wires or pipes | Essential |
| Utility knife | Score and cut drywall face paper, make inspection holes, trim edges | Essential |
| Drywall saw | Cut through drywall without hitting wires or pipes behind it (safer than power saws for exploratory cuts) | Essential |
| Reciprocating saw | Make long straight cuts quickly once you’ve confirmed cavity is clear | Helpful |
| Pry bar | Pull away damaged drywall sections, remove trim, extract stubborn fasteners | Essential |
| Hammer | Tap drywall loose, knock out damaged sections, remove trim carefully | Essential |
| Drill/driver | Remove screws from salvageable areas, install backing boards, drive fasteners during reinstall | Essential |
| Shop vacuum | Control dust during cutting and removal, clean work area before drying phase | Helpful |
| Flashlight | Inspect wall cavities, check behind insulation, verify you found the water source | Essential |
A moisture meter is not optional equipment. It’s how you know that damp spot extends three feet beyond the visible stain, that the framing is still wet even though surface drywall feels dry to touch, and that the cavity has actually dried enough to close back up. Guessing at moisture content is how people seal mold and rot inside their walls.
Have heavy duty trash bags or a small dumpster staged before you start cutting. Wet drywall is heavy (roughly 50 to 60 pounds for a 4×8 sheet when saturated), and you don’t want it sitting around creating more moisture problems while you figure out disposal.
Complete Step by Step Removal Process
This overview connects the detailed work covered in surrounding sections into the sequence you’ll actually follow on site. Each step references where to find the specifics, so you’re not drowning in repetitive detail here.
- Assess damage severity to confirm removal is actually needed rather than just drying and surface treatment (covered in the Assessment section above).
- Identify and stop the water source, then shut off electrical power to affected areas (covered in the Water Source section above).
- Gather safety gear and tools appropriate for the contamination level you’re dealing with (covered in the Equipment section above).
- Mark and cut out damaged sections along stud centers, not random shapes that make patching harder (covered in the Cutting section below).
- Remove fasteners from salvageable edges and extract the damaged drywall pieces carefully to avoid damaging framing.
- Inspect the wall cavity for hidden damage, wet insulation, mold on framing, and plumbing or electrical issues (covered in the Inspection section below).
- Address any mold growth on framing or in cavities before moving forward (covered in the Mold Detection section below).
- Allow complete drying using fans, dehumidifiers, and ventilation until moisture meter readings stabilize in acceptable ranges for multiple consecutive days (covered in the Drying section below).
- Dispose of damaged materials properly based on contamination category and local regulations (covered in the Disposal section below).
- Install replacement drywall only after confirming the cavity and framing are completely dry and structurally sound (covered in the Installation section below).
The water source and electrical safety come first, always. You can’t dry anything out while water keeps flowing in, and wet electrical systems kill people. Once those are handled, removal itself is straightforward demolition work if you’ve got the right tools and you’re cutting to framing members instead of hacking random holes.
Rushing the drying phase is where most DIY water damage repairs fail. Moist drywall loses structural integrity quickly due to its porous nature, but the real problem is sealing damp framing, insulation, and cavities behind new drywall. That trapped moisture grows mold you won’t see until it smells or until health problems start.
Timeline expectations for a typical bathroom or bedroom with moderate damage: assessment and source repair on day one, removal on day one or two, cavity inspection and cleaning on day two, then three to seven days of active drying depending on initial moisture levels and weather conditions. Installation and finishing add another two to four days. If you’re seeing timeline pressure from a landlord or insurance adjuster, push back. Proper drying is not negotiable.
Cutting Out Damaged Drywall Sections Safely
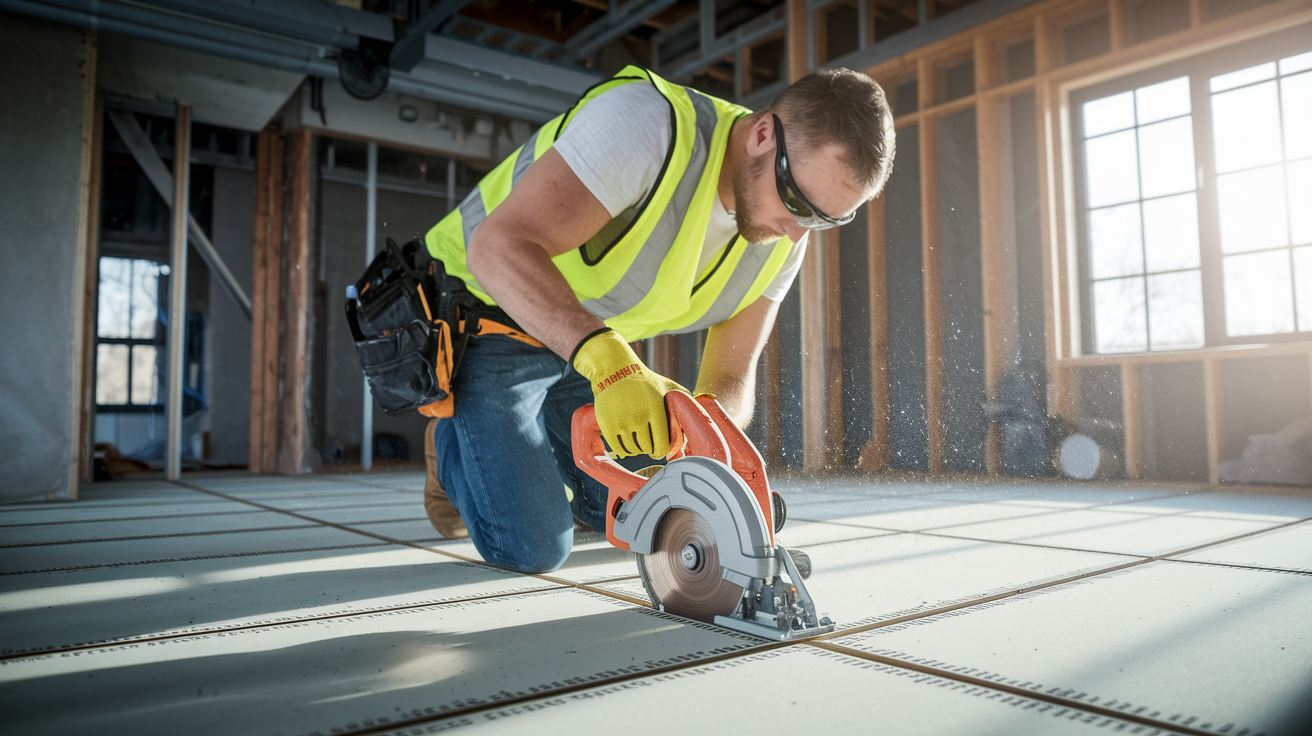
Clean cuts to stud centers make installation of replacement panels straightforward. Ragged edges and cuts that land between studs create patching headaches and weak spots.
Follow this sequence for controlled removal:
- Mark cut lines using a pencil, level, and framing square. Vertical cuts should land on the center of studs (typically 16″ on center, sometimes 24″). Horizontal cuts can run anywhere, but straight lines look better and patch easier.
- Locate studs with a stud finder, marking their centers with light pencil marks. Double check by tapping the wall and listening for the solid sound versus hollow sound, or by driving a small finish nail through the drywall in an area you’re removing anyway.
- Check for obstacles inside the wall cavity by cutting a small inspection hole first. Look for electrical wires running horizontally (usually 12 to 16″ above outlets), plumbing vent stacks, and HVAC ducts.
- Score the face paper with a utility knife, running the blade along a straightedge or level multiple times. For thin drywall (1/2″), scoring the face paper deeply makes snapping cleaner.
- Cut through with a drywall saw starting at the scored line. A drywall saw has a pointed tip that punches through easily and coarse teeth that cut fast without binding. Keep the saw angled slightly away from the wall cavity to avoid snagging wires or pipes.
- Switch to a reciprocating saw for long straight cuts once you’ve confirmed the cavity is clear. Use a fine tooth blade and set the saw to low speed to minimize vibration and control.
- Cut to stud centers, not between studs. When your cut line lands on a stud, you’ve got solid backing to attach the new panel. Cuts between studs require adding backing boards later.
The score and snap method works well for horizontal cuts on walls. Score the face paper heavily with a utility knife, then snap the drywall back away from the cut. Slice through the back paper with the knife and the piece comes free cleanly. But for vertical cuts, for ceiling work, or when working around remaining sections you want to save, sawing all the way through gives you better control.
Cut rectangular sections even if damage is irregular. A rectangle patches easier than a complex shape. Mark your cuts to extend at least 6 inches beyond visible damage in all directions, because moisture wicks through drywall and the wet zone is always larger than the stain zone.
Ceiling drywall adds gravity to the problem. Get a helper or rig a temporary support (a T brace made from 2x4s works) before you complete the final cut. A 4×8 sheet of soaked drywall weighs 50 to 60 pounds and will crash down on you or pull apart mid removal if you don’t support it.
Inspecting Wall Cavity and Framing After Removal
With damaged drywall out, you can see what was happening behind it. This inspection phase catches problems that would otherwise stay hidden until they get worse.
Checking Framing Members
Use a moisture meter to check wood studs, top plates, and bottom plates. Press the meter pins into the wood at multiple points, especially anywhere you see water staining or darkening. Readings above 19% moisture content in framing lumber mean the wood is too wet and at risk for rot or mold. Readings above 25% indicate active wetting that requires more source investigation.
Look for soft spots in studs by pressing a flathead screwdriver into questionable areas. Sound wood resists. Rotted wood dimples easily or lets the screwdriver sink in. Check for visible mold growth (black or white fuzzy patches) on the framing, especially on bottom plates near floors and top plates near ceilings where water tends to pool.
If framing damage is minor (surface mold on sound wood, isolated soft spots), treatment might be possible. But if you’re seeing widespread rot, if studs flex when you push them, or if mold growth is extensive, you need a contractor or structural engineer to evaluate capacity. Replacing framing members is beyond typical DIY scope, especially on structural walls.
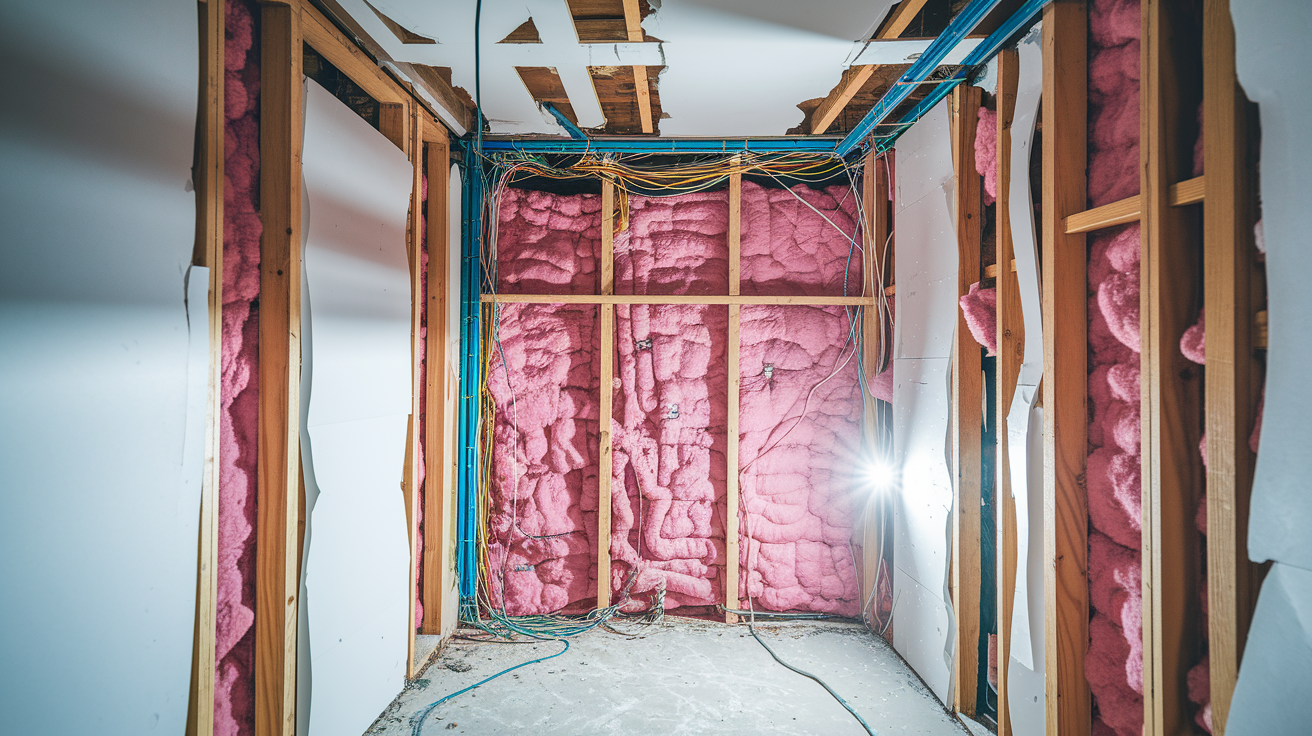
Insulation Assessment
Wet fiberglass insulation is worthless. It loses R value when compressed by water weight, and it holds moisture against framing for days or weeks. Pull wet fiberglass batts out and discard them. They won’t dry out properly, and trying to save $20 worth of insulation costs you way more in mold remediation later.
Spray foam insulation is more forgiving. If it got wet from clean water and you catch it early, it can dry in place. Use a moisture meter to check foam at different depths. If readings stay elevated after several days of ventilation and dehumidifier use, the foam is trapping moisture and needs removal.
Allow insulation and studs to dry completely for a few days before installing new drywall. That’s not optional. Closing up damp cavities is like putting a lid on leftovers that are still warm. It traps moisture.
Inspect electrical wiring in the cavity for water exposure. Look for corroded connections in junction boxes, melted insulation on wires, or discolored wire nuts. If any wiring was submerged or shows corrosion, shut off power to that circuit and call an electrician. Water and electricity create fire hazards and shock risks that aren’t worth DIYing.
Document what you find with photos. Take close ups of mold growth, damaged framing, corroded electrical components, and plumbing issues. Those images support insurance claims, help contractors understand scope if you need to bring someone in, and create records for future buyers if you sell.
Mold Detection and Contaminated Material Handling
Mold starts growing on wet drywall within 24 to 48 hours if conditions are right. By the time you can see it, spores have colonized the material. The porous nature of damp drywall creates an ideal environment for mold growth because it holds moisture and provides organic material (paper facing and gypsum) for mold to feed on.
Look for these mold indicators:
- Visible spots: Black, green, white, or orange patches with fuzzy, slimy, or powdery texture
- Musty odors: Earthy, damp smell that gets stronger when you disturb materials or close up the room
- Allergic reactions: Sneezing, coughing, itchy eyes, or respiratory irritation that gets worse when you’re in the affected area
- Discoloration patterns: Staining that looks different from water stains, often with irregular borders or spreading edges
- Texture changes: Surfaces that feel slimy to touch or show fuzzy growth when you look closely
Surface mold on structurally sound drywall (no sagging, no softness, no delamination) might respond to treatment if the affected area is small. A diluted bleach solution (one cup chlorine bleach per gallon of water) kills mold on intact surfaces without damaging drywall, and chlorine bleach removes mold traces within one to two days when applied properly and allowed to sit. But here’s the truth: if drywall has mold growth and shows any structural compromise (softness, sagging, blistering), you cannot salvage it. The mold isn’t just on the surface. It’s growing inside the gypsum core and on the back paper facing where you can’t reach it with cleaning solutions.
When water damage involves contaminated categories, disposal requirements change. Clean water (supply lines, rainwater) allows normal demolition debris disposal at most landfills. Gray water (washing machine discharge, dishwasher overflow, toilet tank water) requires caution but usually goes to standard construction waste facilities. Black water (sewage, toilet bowl overflows, flood water contaminated with soil or chemicals) often requires special handling and may need certified disposal through hazardous waste facilities depending on your jurisdiction.
If visible mold growth covers more than about 10 square feet (roughly a 3×3 area), contain the work area before you start cutting. Hang 6 mil plastic sheeting from ceiling to floor, sealing it to walls with duct tape. Create a single entry point and run a box fan in a window to create negative air pressure (pulling air out of the work area so spores don’t spread through your home). That containment setup isn’t overkill. It’s how you keep a bathroom mold problem from becoming a whole house contamination issue.
Call certified mold remediation professionals when you’re dealing with black water contamination, when mold growth exceeds 10 square feet, when anyone in the home has respiratory issues or immune system compromise, or when mold keeps coming back after cleaning. Professionals bring industrial air scrubbers, HEPA filtration, proper disposal procedures, and documentation that matters for insurance claims and home sales.
Drying the Work Area Before Installing Replacement Drywall

Rushing the drying phase is how people end up ripping out the same wall twice. Moist drywall loses structural integrity quickly due to its porous nature, but the bigger problem is moisture trapped behind new drywall growing mold in hidden cavities.
| Material | Target Moisture % | Typical Drying Time |
|---|---|---|
| Wood framing | 12-15% | 3-7 days with active drying |
| Concrete | 4-6% | 7-14 days depending on depth of saturation |
| Plaster | 1-2% | 5-10 days with good ventilation |
| Insulation | Must be dry to touch | 3-5 days for minor dampness; replace if saturated |
| Subfloor | 12-14% | 4-7 days, longer for plywood than OSB |
Set up equipment for continuous drying. Position box fans to create cross ventilation, pointing one fan into the work area and one out to move air through the cavity. Run a dehumidifier in the room continuously, emptying the reservoir or connecting a drain hose so it doesn’t shut off when full. If outdoor humidity is below 60% and it’s not raining, open windows to increase air exchange. Close windows if outdoor humidity climbs above indoor levels or if rain is coming.
Use a moisture meter to track progress. Take readings in framing members, insulation, and any remaining drywall edges every 24 hours. Check multiple locations and at different depths by pressing meter pins firmly into materials. Write down your readings with dates so you can see the trend. You’re looking for moisture content that drops steadily for several days, then stabilizes in the target range for at least two to three consecutive days before you consider the area dry.
Signs that drying is incomplete include surfaces that feel cool to the touch (evaporative cooling from moisture), condensation forming on windows or plastic sheeting, persistent musty odors, and moisture meter readings that stay elevated or fluctuate instead of declining steadily. If you close up with any of those signs present, you’re building mold habitat. The few extra days of drying time are cheaper and easier than ripping out new drywall later.
Proper Disposal Methods for Water Damaged Materials

Wet drywall is heavy and potentially contaminated. How you dispose of it matters for safety, for legal compliance, and for preventing the spread of mold spores or bacteria.
Follow these disposal guidelines:
- Double bag moldy materials in heavy duty contractor bags (3 mil minimum thickness) before transport. Seal bags tightly with duct tape to contain spores.
- Seal bags before moving them through clean areas of your home. Don’t drag open bags of moldy drywall through your living room on the way to the dumpster.
- Separate clean demolition waste (uncontaminated drywall, wood trim, clean framing cutoffs) from potentially contaminated materials. Clean waste goes to standard construction debris disposal.
- Check local landfill acceptance policies before loading up. Some facilities don’t accept wet drywall or charge higher tipping fees for it. Call ahead.
- Understand that black water materials (anything exposed to sewage or toilet overflows) may require disposal through special facilities. Your municipal solid waste department can direct you to approved sites.
- Consider dumpster rental for large projects. A 10 yard dumpster (suitable for one or two rooms) costs $250 to $400 for a week rental in most areas. It’s worth it to avoid multiple dump runs with a pickup truck.
- Keep disposal receipts for insurance claim documentation and for your records. Note what you disposed of, where, and when.
During removal, minimize spore spread by misting moldy drywall lightly with water from a spray bottle before cutting or breaking it up. Damp material releases fewer airborne particles than bone dry moldy drywall. Work carefully rather than smashing and creating dust clouds.
Standard construction debris disposal at landfills typically costs $50 to $150 per ton, with minimum fees often around $25 to $40 even for small loads. Wet drywall weighs significantly more than dry material (a 4×8 sheet of 1/2″ drywall weighs about 57 pounds dry, but can exceed 100 pounds when saturated), so expect higher weight based fees. Contaminated waste from black water situations may cost more and require manifest documentation depending on jurisdiction.
Some areas offer drywall recycling for clean, uncontaminated material. Recycling facilities separate the gypsum from paper facing and reprocess it for agricultural use or new drywall manufacturing. If your demolition waste is from clean water damage with no mold and no contamination, check whether your region has a drywall recycling program. You’ll need to remove all fasteners and separate drywall from other materials, but disposal fees are often lower than landfill rates.
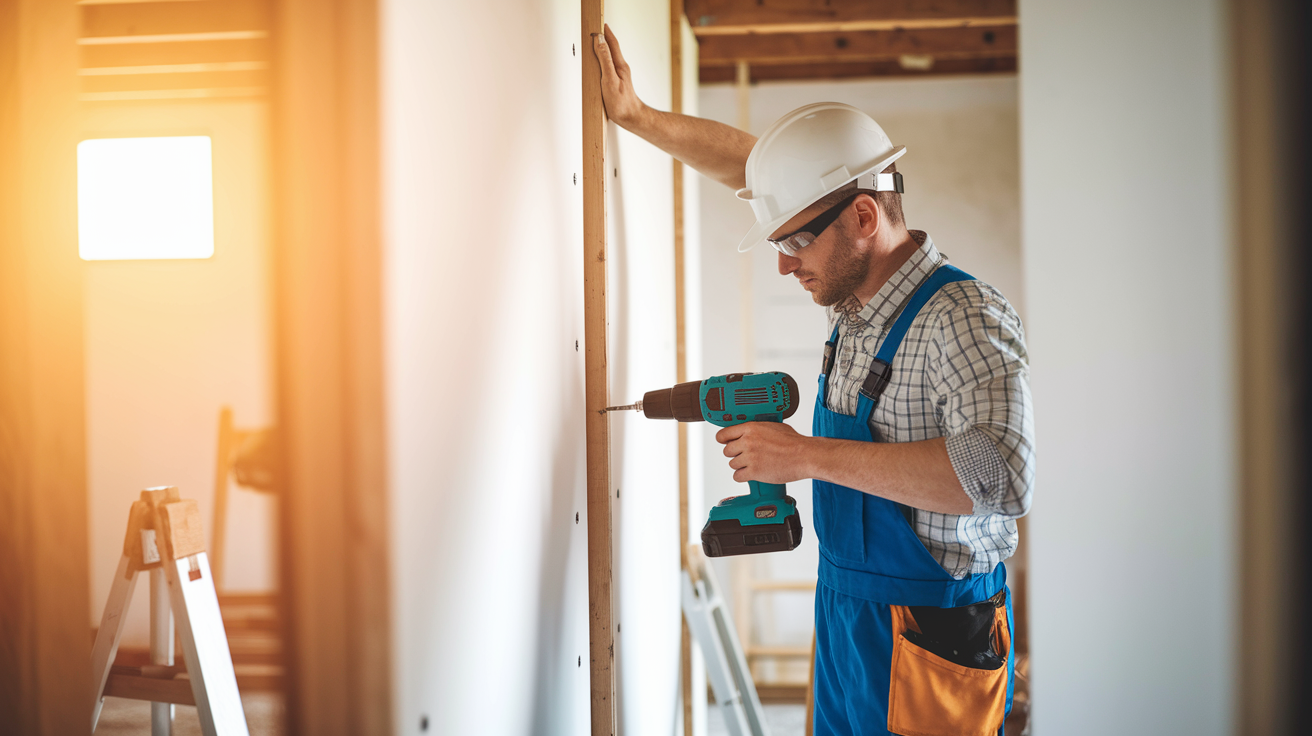
Installing Replacement Drywall Panels After Water Damage
Installation happens only after moisture meter readings confirm the framing and cavity are completely dry for multiple consecutive days. Cutting corners here means you’re just building another mold farm.
Select the right drywall type for the location. Standard 1/2 inch drywall works for most walls. Ceilings typically use 5/8 inch drywall for rigidity and sag resistance. Bathrooms, laundry rooms, and other humid areas benefit from moisture resistant drywall (often called green board or purple board depending on the manufacturer). It costs $2 to $3 more per sheet than standard drywall but resists moisture absorption better.
Follow these installation steps:
- Measure the opening accurately, accounting for any oddities in the framing or remaining drywall edges. Measure twice.
- Cut panels slightly undersized, about 1/8 inch smaller than the opening in each direction. That small gap allows for expansion and makes fitting easier. It will hide under joint compound later.
- Position the panel against the studs, checking that edges land on stud centers. If your removal cuts didn’t land perfectly on studs, add horizontal backing boards (2x4s screwed between studs) behind unsupported edges.
- Drive drywall screws every 8 inches into studs along all edges and every 12 inches in the field (middle area). Use 1 1/4 inch screws for 1/2 inch drywall, 1 5/8 inch screws for 5/8 inch drywall.
- Dimple screws slightly below the surface without breaking the paper facing. The screw head should sit in a shallow depression that will fill with joint compound. Screws that break through the paper lose holding power.
- Stagger seams from the original layout if possible. If old seams were directly behind where you’re patching, shifting new seams a few inches reduces the chance of cracks forming along the same stress lines.
- Install corner bead on any outside corners using crimping tool or screws. Inside corners just need tape and compound.
- Leave a 1/2 inch gap between the bottom edge of drywall and the floor. That gap prevents capillary wicking if minor water exposure happens again. Baseboards cover it.
Screw placement technique matters. Start from the center of the panel and work outward toward edges. That sequence prevents the panel from buckling or creating a bulge in the middle. Keep screws at least 3/8 inch from panel edges to prevent crumbling. Sink screw heads flush with the surface or just barely dimpled. If a screw breaks through the paper facing, drive another screw an inch away and remove the damaged one.
If you need future access to plumbing, electrical junctions, or shutoff valves, install a plastic access panel instead of closing everything up. Access panels cost $8 to $15, screw directly to framing, and give you a clean opening for maintenance later. It’s smarter than cutting into new drywall in two years when you need to get at that shutoff valve again.
Taping, Mudding, and Finishing Replaced Drywall Sections
Finishing turns a rough patch into an invisible repair. It takes patience and multiple coats with drying time between each one. If you try to rush it, you’ll see the patch forever.
Follow this coating sequence:
- Apply the tape coat: Spread a thin layer of all purpose or taping joint compound over seams and screw dimples. Press paper drywall tape into the compound over seams, smoothing out bubbles with a 6 inch taping knife. Feather edges thin.
- Allow 24 hours drying in normal humidity. Don’t use heat guns or fans directly on compound. Rapid drying causes cracking.
- Apply the second coat: Use an 8 inch or 10 inch knife to spread compound 2 to 3 inches wider than the first coat on each side. This coat hides tape edges and fills low spots. Feather edges thin so they blend into surrounding drywall.
- Allow 24 hours drying again. Check for shrinkage. Compound shrinks as it dries, sometimes revealing low spots that need more filling.
- Apply the third coat: Use a 12 inch knife to spread compound even wider, feathering edges 6 to 8 inches beyond the second coat. This coat creates a gradual transition from patch to existing wall.
- Allow final drying, then check the surface by holding a work light at a low angle. Shadows reveal ridges, dimples, and imperfections.
- Sand progressively: Start with medium grit sandpaper (120 grit) to knock down high spots and ridges. Switch to fine grit (150 to 220 grit) for final smoothing. Use light pressure and work in circular motions.
Sanding creates fine dust that gets everywhere. Wear a dust mask. Use a sanding block or pole sander, not just sandpaper in your hand, to keep the surface flat. Check your work by running your hand over the area with eyes closed. You’ll feel imperfections you can’t see. Check with angled light to reveal shadows from ridges or dimples. If you see problems, apply a skim coat of compound and sand again after it dries.
Texture matching is where DIY repairs get tricky. Smooth walls are easiest because you just sand everything flat and prime. Skip trowel, knockdown, orange peel, and other spray textures require practice or professional help. You can buy spray texture in cans or rent a hopper gun, but getting the pattern and density to match existing texture takes trial and error. Practice on scrap drywall first.
Final preparation before painting: vacuum all dust thoroughly from the wall, floor, and surrounding area. Wipe the patched area with a barely damp sponge to remove remaining dust. Prime the repair with a drywall primer (PVA primer works well), feathering primer slightly onto surrounding paint. Let primer cure fully before topcoat, usually 2 to 4 hours. Attempting to paint over unprimed joint compound results in flashing (dull spots where compound absorbs paint differently than surrounding drywall), so don’t skip the primer step.
Understanding Repair Costs and Budget Planning
DIY water damage repair costs vary based on extent of damage, room size, water category, and how much of the work you handle yourself versus hiring out.
| Item | DIY Cost Range | Professional Cost Range |
|---|---|---|
| Drywall sheets (4×8, 1/2″) | $12-20 per sheet | Included in labor |
| Joint compound (5-gallon) | $15-25 per bucket | Included in labor |
| Tools and supplies (first project) | $100-200 if buying everything | Not applicable |
| Disposal fees (10-yard dumpster) | $250-400 for week rental | Often included in contract |
Final Words
Knowing how to remove water damaged drywall comes down to good sequencing and not skipping steps.
Stop the leak, cut power, assess what’s salvageable, and then remove what’s compromised.
Let everything dry completely before you close anything back up. That’s where most people rush and regret it later.
Use a moisture meter, not a guess. And if contamination, mold, or structural issues go beyond your comfort level, call a pro.
You can handle a lot of this work yourself if you’re methodical. Just respect the timeline and the safety checks along the way.
FAQ
Can water damaged drywall be repaired?
Water damaged drywall can be repaired if the damage is limited to surface staining or minor discoloration without structural compromise. However, drywall that is blistered, sagging, soft to the touch, or showing mold growth must be completely removed and replaced, as it has lost structural integrity and cannot be salvaged.
How do you remove drywall that’s gotten wet?
To remove wet drywall, first shut off power to affected areas and stop the water source, then mark cut lines along stud centers and use a utility knife to score the surface multiple times. Cut out damaged sections with a drywall saw or reciprocating saw, remove fasteners, and extract the damaged panels in manageable pieces for disposal.
Can drywall be saved after a flood?
Drywall can be saved after a flood only if it shows minor surface water marks without blistering, sagging, or soft spots, and the water source was clean category water. If floodwater was contaminated, if the drywall remained wet for more than 48 hours, or if any structural compromise or mold is present, complete removal is required.
Will drywall grow mold if it gets wet?
Wet drywall will grow mold if it remains damp for 24 to 48 hours due to its porous nature creating an ideal environment for mold spores. To prevent mold growth, you must dry the drywall completely within this timeframe using dehumidifiers and fans, or remove it entirely if drying cannot be achieved quickly enough.
What moisture level should drywall reach before replacement?
Drywall and its surrounding framing should reach 12 to 15 percent moisture content for wood studs and complete dryness to the touch for all materials before installing replacement panels. Use a moisture meter to verify readings remain stable in this acceptable range for two to three consecutive days before closing up the wall.
How do you know if water damage is too severe for DIY repair?
Water damage is too severe for DIY repair when you encounter black water or sewage contamination, mold growth exceeding 10 square feet, damage to load-bearing walls, structural sagging, or electrical systems exposed to water. These situations require professional assessment and certified remediation to ensure safety and proper restoration.
What safety equipment is needed for removing water damaged drywall?
Removing water damaged drywall requires an N95 or N100 respirator, safety goggles, waterproof or nitrile gloves depending on contamination level, long sleeves and pants, and rubber boots for gray or black water situations. Additionally, ensure power is shut off to affected areas to prevent electrical hazards during removal.
How long does it take to dry out a wall cavity after water damage?
Drying out a wall cavity typically takes a few days to a week depending on humidity levels, ventilation, and extent of saturation. Wood framing must reach 12 to 15 percent moisture content, verified by daily moisture meter readings that stabilize in the acceptable range for two to three consecutive days before installing new drywall.
What type of drywall should be used for water damage replacement?
For water damage replacement, use standard 1/2-inch drywall for walls and 5/8-inch for ceilings, but select moisture-resistant or mold-resistant drywall (greenboard or purple board) for bathrooms, basements, and other areas prone to humidity. This provides better long-term protection against future moisture exposure.
How do you dispose of water damaged drywall safely?
To dispose of water damaged drywall safely, double-bag moldy or contaminated materials in heavy-duty trash bags and seal them before transport to prevent spore spread. Separate clean demolition waste from contaminated waste, check local landfill acceptance policies, and note that black water contaminated materials may require special disposal procedures.
