

Closing up damp drywall is like putting a lid on leftovers that are still warm. It traps moisture, and what happens next isn’t pretty. After a leak, your wall might feel dry on the surface while water stays trapped inside the gypsum core or behind it in the wall cavity. That hidden dampness fuels mold growth and rot you won’t see until you’re tearing things apart months later. This guide walks you through three reliable methods to confirm your drywall actually dried all the way through, not just on the surface where your hand touches.
How to Tell If Drywall Is Dry After Leak
Definitive Methods to Confirm Complete Drywall Dryness
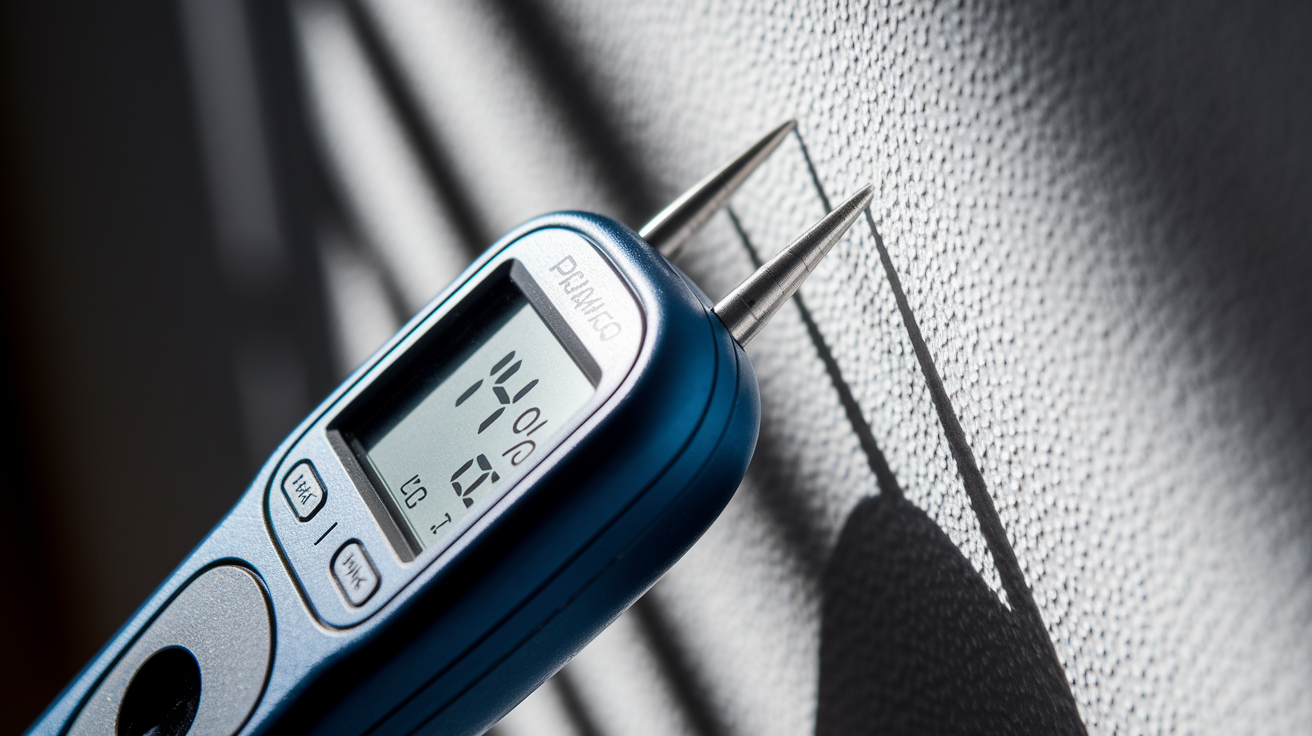
A moisture meter’s the only reliable way to actually confirm your drywall dried all the way through after water damage. This handheld tool measures moisture content inside building materials. Readings below 12–16% tell you the drywall’s safe and dry. To verify things properly, take readings in the damaged spots and compare them to baseline measurements from walls you know are bone dry in other rooms. The numbers should match within a few percentage points. You can use either pin-type meters (they stick metal probes into the material) or pinless scanners (they detect moisture through electromagnetic waves). Pin meters generally give you more accurate readings on dense stuff like drywall, though.
The touch test works as good secondary confirmation once your moisture meter readings look solid. Press your palm firmly against the wall and hold it there several seconds. Dry drywall feels room temperature and firm, just like walls in areas that didn’t get wet. Damp drywall feels noticeably cooler because trapped moisture pulls heat from your hand while it evaporates. Apply gentle pressure with your fingertips across the suspected area. Properly dried drywall resists with solid firmness. Material that hasn’t dried completely feels slightly soft, mushy, or gives more than it should.
Visual inspection adds another verification layer, but it can’t detect hidden moisture inside the wall cavity. Look for water stains showing yellowish or brown discoloration patterns. These indicate moisture moved through the material even if the surface feels dry now. Check paint carefully for bubbling, blistering, peeling, or texture changes that appear days or weeks after the initial leak. Examine the wall surface for warping, bulging, or any areas that look different from surrounding sections. Dark brown or black staining usually signals severe or long term water exposure that penetrated deep into the gypsum core.
Surface appearance alone never confirms complete dryness through the entire thickness of drywall or inside the wall cavity behind it. The paper face and outer gypsum layer can feel dry while moisture stays trapped in the core or between the studs. This hidden dampness creates perfect conditions for mold growth and structural damage you won’t discover until problems force you to open walls months later.
Using a Moisture Meter for Accurate Drywall Moisture Detection

Two types of moisture meters serve different purposes when you’re checking drywall dryness. Pin type meters use two metal probes that penetrate 3/8 to 3/4 inches into the drywall surface, measuring electrical resistance between the pins to calculate moisture content directly in the material at that depth. These give highly accurate readings but leave small holes where the pins penetrate. Pinless meters scan the surface using electromagnetic sensor pads without causing any damage, detecting moisture up to 3/4 inch deep depending on the model. Pinless types work faster for scanning large areas but sometimes give less precise readings on textured surfaces or when metal (like wiring or pipes) sits behind the drywall. Most water damage pros carry both types and use pinless meters for initial scanning, then verify concerning areas with pin type readings.
Proper testing means taking readings at multiple locations to build an accurate picture of remaining moisture. Test every 2 to 3 feet horizontally across the affected wall, and check at different heights from floor level up to 4 feet or higher if water wicked upward. Always take comparison readings on a completely dry wall in an unaffected room. This establishes your baseline for what “dry” actually measures in your specific home. Write down all numbers with location notes. Drywall should read 12–16% or lower, matching your dry baseline areas. Wood framing behind the drywall needs to reach 10–12% before you can safely close walls or install new materials. Retest the same spots every 24 to 48 hours during the drying process. Readings should trend steadily downward each day. If numbers stay flat or rise between tests, you’ve got a problem needing immediate attention.
Watch for problem patterns when you’re interpreting results. Readings significantly higher than your baseline indicate incomplete drying. High readings concentrated in specific areas point to hidden moisture pockets trapped in wall cavities or insulation. Readings that stay elevated near baseboards often mean water migrated into the subfloor or bottom plate. Any reading above 20% signals heavy saturation requiring aggressive drying or possible material replacement. If readings remain above 16% after 5 to 7 days of continuous drying, moisture’s trapped somewhere the equipment can’t reach effectively.
Test multiple locations every 2–3 feet across affected areas to map moisture distribution patterns. Always compare readings to dry baseline areas in rooms with no water damage history. Check at different heights from floor to ceiling since water wicks upward through drywall. Retest same spots over 24–48 hour intervals to confirm downward trend proving drying progress. Test near baseboards where water accumulates and often gets trapped in bottom framing. Document all readings with location notes, dates, and photos for insurance and future reference.
Consumer grade moisture meters sold at hardware stores work adequately for small leaks in accessible areas, but they’ve got significant limitations. Most read only 1/2 inch deep at best and can’t detect moisture behind the drywall in wall cavities where serious problems develop. When you need to verify dryness in walls with insulation, check for hidden moisture behind tile or cabinets, or map the full extent of water migration, thermal imaging equipment becomes necessary. Professional grade infrared cameras detect temperature differences across wall surfaces. Wet areas appear cooler than surrounding dry material because water absorbs heat. This creates a visual map showing exactly where moisture remains trapped, even behind surfaces that look and feel completely dry.
How Long Wet Drywall Takes to Dry After Water Damage

Drying time for water damaged drywall varies significantly based on how much water soaked in, what equipment you use, and environmental conditions during the drying period.
Professional water damage restoration companies using commercial equipment typically dry most wet drywall in 24 to 72 hours. Their high capacity dehumidifiers and powerful air movers create ideal drying conditions by controlling humidity levels and maximizing air circulation across wet surfaces. DIY drying setups using household fans and standard dehumidifiers take considerably longer, usually 3 to 7 days for the same level of water damage, and often stretching past a week for more severe situations. The equipment gap between professional and household tools directly translates to the time difference.
Specific damage scenarios break down into more precise timeframes. Small clean water leaks detected and addressed within hours (like a supply line that dripped for 30 minutes before you noticed) typically dry in 24 to 48 hours when you set up fans and a dehumidifier immediately. Moderate damage where water soaked into wall bases and spread across several feet of drywall generally requires 2 to 4 days to dry completely. Major flooding that saturated walls from floor to 3 feet high or water that sat unnoticed for an extended period demands 3 to 7 days or more, even with good equipment running continuously. The drying clock starts when you actually begin active drying efforts, not when the leak happened.
Extended leak duration exponentially increases both drying time and the depth of water penetration. Water that sits against drywall for several hours soaks deeper into the gypsum core and spreads further through capillary action, wicking upward and outward from the initial contact point. A leak that ran overnight while you slept allows water to saturate materials much more thoroughly than the same volume of water you noticed and stopped within 20 minutes. Leaks that occurred while no one was home for days drive moisture deep into wall cavities, insulation, and framing where it becomes extremely difficult to remove. The longer materials stayed wet before you started drying them, the longer they’ll take to return to safe moisture levels.
Effective Drying Methods to Remove Moisture from Drywall

Setting up proper air circulation provides the foundation for effective drying. Position fans to blow directly across wet wall surfaces from 6 to 12 inches away, angling them slightly upward so air hits the wall and flows up toward the ceiling. This creates maximum air movement across the damp area where evaporation happens. Set up cross ventilation by placing one fan blowing into the affected room and another pulling air out, which cycles humid air out and brings drier air in. Move portable fans every 12 to 24 hours to hit the wall from different angles. Direct airflow needs to continue 24 hours a day without interruption during the entire drying period. Turning fans off at night to reduce noise wastes valuable drying time and allows moisture to redistribute through the material.
Dehumidifiers remove the moisture that fans pull from wet materials into the air. Commercial low grain refrigerant (LGR) dehumidifiers used by restoration professionals remove 100 to 150 pints of water per day while maintaining extremely low humidity levels in the 30 to 40% range. Standard household dehumidifiers typically pull 30 to 50 pints daily and struggle to drop humidity below 50% in a water damaged space. This capacity difference directly impacts drying speed. A commercial unit can extract in one day what takes a household dehumidifier three days to remove. Place dehumidifiers in the center of affected rooms with at least 12 inches of clearance on all sides for proper airflow. Empty collection buckets frequently or run drain hoses to sinks. The unit needs to run continuously until moisture meter readings confirm complete dryness.
| Equipment Type | Moisture Removal Capacity | Best Use |
|---|---|---|
| Commercial LGR dehumidifier | 100–150+ pints per day | Severe water damage, whole home flooding, professional restoration |
| Household dehumidifier | 30–50 pints per day | Small to moderate leaks in single rooms, ongoing humidity control |
| Air movers/commercial fans | 1500–3000 CFM airflow | Professional drying operations, maximum evaporation rate |
| Box fans/household fans | 1000–2000 CFM airflow | DIY surface drying, supplemental air circulation |
Your home’s HVAC system can’t substitute for proper drying equipment after water damage. Air conditioning units are engineered for comfort cooling and moderate humidity control under normal conditions, not for removing the massive moisture load created by water saturated building materials. Running your AC might help slightly by lowering humidity, but it can’t remove moisture fast enough to prevent mold growth, which can begin within 24 to 48 hours. Turning off the AC during water damage drying allows indoor humidity to spike rapidly, which dramatically extends drying time and creates ideal conditions for mold. Keep your HVAC running normally while operating dedicated drying equipment, but understand the AC isn’t doing the real work of structural drying.
Visual Warning Signs of Moisture Still Trapped in Drywall
Visual inspection helps identify potential moisture problems, but it can’t confirm internal dryness. Surface appearance reveals some warning signs that water remains trapped in drywall, but these indicators show you where problems might exist, not definitive proof of complete drying. The outer layer of drywall can look and feel completely normal while the gypsum core inside holds significant moisture. Wall cavities behind the drywall frequently trap water you can’t see or feel from the room side. Use visual checks as a screening tool that tells you where to focus detailed moisture meter testing, not as a replacement for actual measurement.
Structural texture changes signal that moisture has softened and damaged the drywall material. Swelling creates raised areas where the gypsum core absorbed water and expanded. Bulging sections push outward from the wall plane, often most visible when you look down the length of a wall from an angle. Warping shows as waves or curves where the drywall sheet bent from uneven moisture distribution. Sagging appears in ceilings or upper wall sections when water weight overcame the structural strength of saturated material. Press gently on suspected areas. Soft or spongy spots that compress slightly under finger pressure indicate absorbed moisture compromised the material, while properly dry drywall resists with solid firmness throughout.
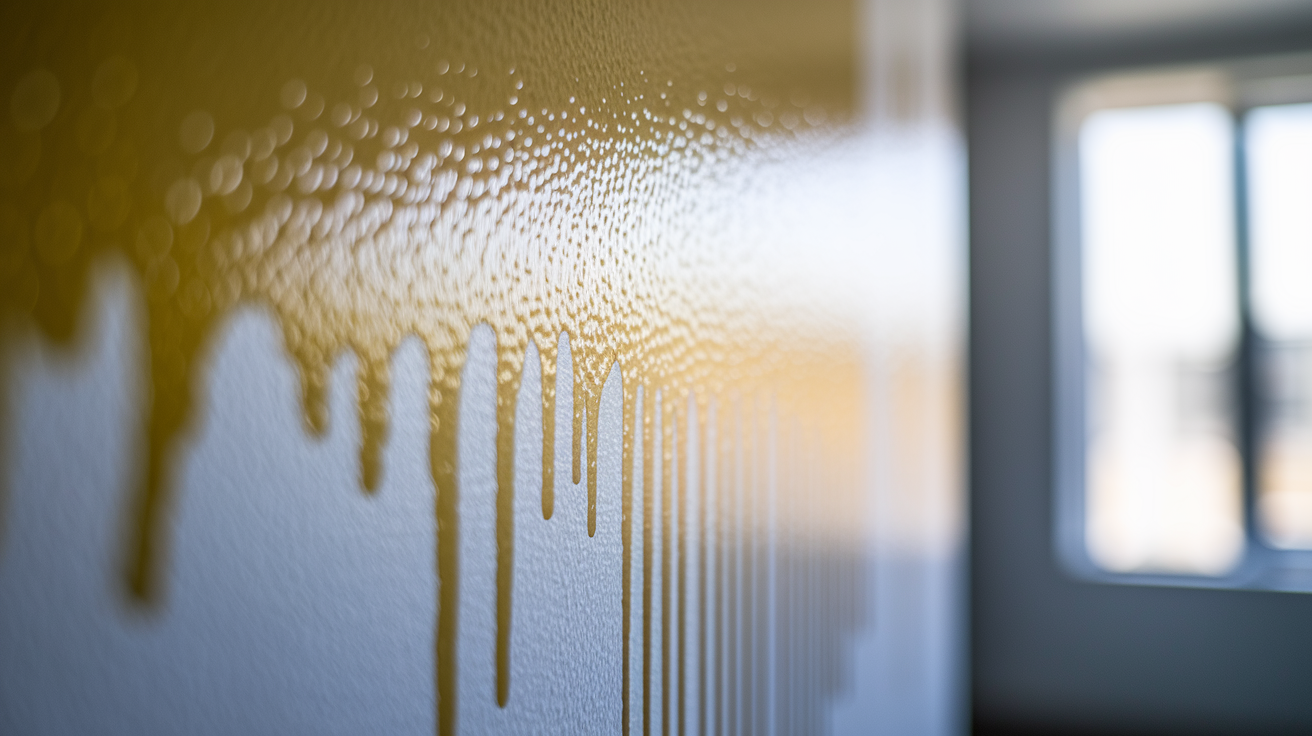
Paint and surface coating failures reveal trapped moisture working its way out through the wall face. Bubbling and blistering appear as raised bumps where water collected under the paint layer, breaking the bond between coating and drywall. Peeling or flaking happens when moisture weakens the adhesive connection between paint and surface. Sheets or strips of finish lift away from the wall. Discoloration and staining show the path water traveled through the material. Yellowish or light brown patches indicate minor leaks or early stage moisture exposure where water carried dissolved minerals and compounds to the surface. Dark brown or black stains signal severe or long term saturation where water penetrated deep into the gypsum core and potentially supported mold growth. Stains often spread wider than the actual saturated area underneath because water moves through the porous gypsum before evaporating at the surface.
Delayed visual damage appears days or even weeks after the initial leak event, catching homeowners by surprise when they thought the problem was resolved. This happens because water trapped deep in the wall cavity or gypsum core slowly evaporates and migrates outward toward the surface. As this internal moisture moves through the material, it pushes from behind the paint layer, creating bubbles, cracks, and peeling that weren’t visible immediately after the leak. You might see new water stains appear above the original damage line as trapped moisture wicks upward through the drywall. Paint might bubble in areas that never showed visible wetness during the initial leak because water spread through wall cavities behind the surface.
When Musty Odors Mean Your Drywall Hasn’t Dried Properly

Your nose provides a reliable early warning system for incomplete drying and developing mold problems. Persistent odors tell you something’s wrong even when moisture meters and visual inspection look acceptable.
Musty or earthy smells come from microbial activity. Bacteria, mildew, and mold begin growing on damp organic materials. The paper facing on drywall and the organic compounds in gypsum provide food for these organisms, which only need moisture and moderate temperatures to colonize and multiply. As microbes break down materials and reproduce, they release volatile organic compounds (VOCs) that create the distinctive damp, musty smell people associate with water damage. The odor intensifies as microbial populations grow larger and penetrate deeper into materials. A faint musty smell often appears within 24 to 48 hours after water damage, while stronger earthy odors develop over several days as colonies establish.
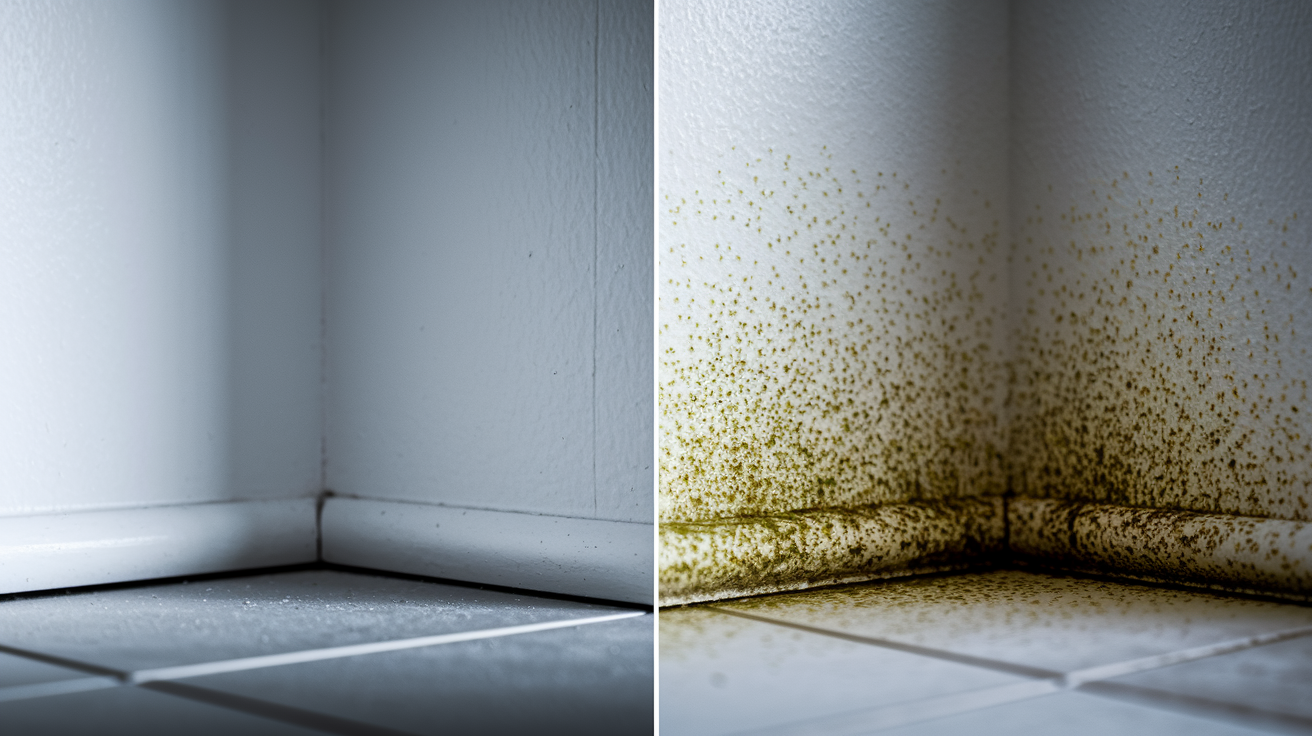
The connection between persistent odors and mold growth risk is direct and concerning. Any musty smell that continues after several days of active drying signals that moisture remains trapped somewhere in the affected materials or wall cavities. Mold only needs moisture, organic material, and time to grow. It doesn’t require standing water. The conditions that create musty odors are the same conditions that support mold colonization. Early mold growth appears as small black, green, or gray spots, typically showing up first near baseboards, in corners, or around the edges of water damaged areas. Once you see visible mold on surfaces, larger colonies have already established inside wall cavities and within porous materials where you can’t see them. Mold that reappears after cleaning confirms active moisture problems continue feeding growth.
Masking odors with air fresheners, deodorizers, or scented candles fails to solve the underlying moisture problem driving microbial growth. These products temporarily cover the smell without removing the moisture causing it. The musty odor will return as soon as the air freshener dissipates because the source (damp building materials supporting microbial activity) remains unchanged. Attempting to hide odors instead of addressing their cause allows mold colonies to continue growing and damage to worsen. If you smell musty or earthy odors in areas affected by water damage, you need to locate and dry the source of remaining moisture, not mask the symptom.
Checking Behind Drywall and Inside Wall Cavities for Hidden Moisture

Water doesn’t stay where it first makes contact with building materials. It spreads through wall assemblies following gravity, construction gaps, and material properties that pull moisture along hidden paths. Water flows downward along studs and behind drywall, pooling at the bottom plate where walls meet floors. It moves laterally through seams between drywall sheets and around electrical boxes or plumbing penetrations. Capillary action and wicking pull water upward through porous materials like drywall and wood framing, often several feet above the visible wetline on the room facing surface. You might see water damage at waist height on your wall while moisture actually wicked up to shoulder level inside the wall cavity. This hidden migration means the affected area’s almost always larger than what you can see from the outside.
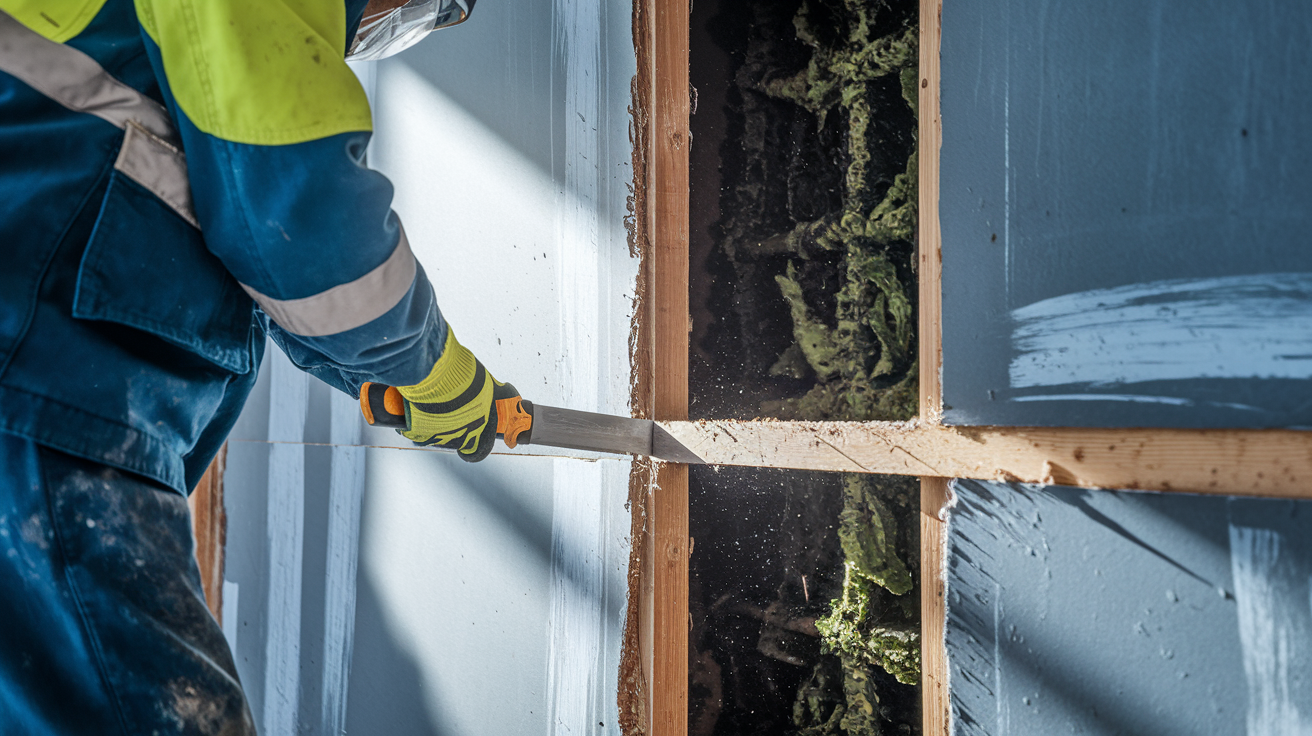
Insulation dramatically complicates wall drying by trapping moisture inside wall cavities. Fiberglass batts absorb and hold water like sponges, creating a moisture reservoir that slowly releases humidity into the cavity space over weeks or months. Spray foam insulation blocks airflow that would otherwise allow some natural drying through air changes. Damp insulation pressed against the back of drywall prevents that surface from drying toward the cavity side, leaving only the room facing surface available for evaporation, which roughly doubles drying time. Wet insulation also adds significant weight that can cause drywall to sag or detach from studs. Insulated exterior walls affected by water damage almost always require partial demolition with at least 2 foot flood cuts to remove compromised insulation and allow direct drying of cavity spaces.
Professional detection methods make hidden moisture visible without demolishing walls unnecessarily. Moisture meters with deep reading probes can test 2 to 3 inches into wall assemblies, detecting dampness in the back of drywall or in wood framing behind the surface. Thermal imaging cameras create heat signature maps showing temperature differences across wall surfaces. Cooler areas indicate trapped moisture because water absorbs heat as it evaporates. An infrared scan reveals the full extent of water migration, including areas that look completely dry from the room side but remain saturated in the cavity. This allows targeted demolition of only the sections that truly need to be opened, rather than guessing how far to cut or peeling back entire walls to find where wet areas end.
Small exploratory inspection holes or controlled flood cuts become necessary when deep moisture readings or thermal imaging confirm hidden saturation. Cut horizontal inspection slots 12 to 18 inches above the floor to check wall cavities for standing water, soaked insulation, or mold growth. Standard flood cuts remove drywall 24 inches above the highest moisture detection reading, exposing wall framing and cavities to direct air circulation. This allows equipment to dry structural lumber and cavity spaces that can’t be reached through intact walls.
Testing Ceiling Drywall for Dryness After Leak Damage

Ceilings present higher risk than walls when water damaged because gravity works against them. A saturated ceiling holds water weight pulling downward on fasteners and framing that were designed for the normal weight of dry materials. As gypsum absorbs water, it becomes heavy and loses structural strength. The combination of increased weight and reduced material integrity can cause ceiling sections to detach and collapse without warning, sometimes days after the initial leak when homeowners assume danger has passed.
Watch for specific visual warning signs that indicate compromised ceiling integrity. Sagging creates visible low spots or downward curves in areas that should be flat. Bulging appears as sections that separated slightly from joists and hang lower than surrounding ceiling. Water stains and discoloration spread outward from leak points, often showing darker wet rings that expand over hours or days. Texture changes become visible when wet drywall loses the crisp definition of knockdown or popcorn finishes, appearing instead as smoothed or flattened areas. Cracks radiating from corners or along seams indicate the ceiling’s pulling against fasteners from water weight. Any ceiling showing multiple warning signs or heavy saturation requires immediate professional assessment for collapse risk.
Test ceiling dryness from below using safe methods that don’t add stress to potentially compromised material. Start with visual inspection from different angles. Use a flashlight held at a low angle to cast shadows that reveal subtle sagging or texture changes invisible under direct lighting. Check temperature by carefully placing the back of your hand against suspected areas without pushing upward. Damp ceiling drywall feels noticeably cooler than dry sections. Use a non contact infrared thermometer to measure surface temperature across the ceiling, mapping cooler spots that indicate remaining moisture. Never press upward on a water damaged ceiling or apply weight that could trigger collapse. Don’t climb ladders to inspect closely if the ceiling shows sagging, bulging, or heavy staining.
Professional intervention for ceiling damage becomes necessary faster than for wall damage due to collapse risk. Any ceiling that held standing water (from roof leaks, upstairs plumbing failures, or HVAC condensate floods) requires immediate professional assessment. Ceilings showing visible sag require bracing or support before any drying attempts begin. Heavy saturation with water dripping or streaming from the surface means collapse risk is imminent. Professional restoration includes moisture mapping with thermal imaging, controlled water extraction, temporary bracing installation where needed, and continuous monitoring during the drying process. Attempting DIY drying on severely damaged ceilings puts you directly beneath a potential collapse hazard.
Understanding the 24 to 48 Hour Mold Growth Window
Mold spores exist everywhere in indoor and outdoor air, constantly landing on surfaces throughout your home. These microscopic organisms remain dormant until they encounter the specific conditions needed for germination and growth. Mold requires only three things to colonize and multiply: moisture, organic material to consume, and temperatures between 40°F and 100°F. Standing water isn’t necessary. Material moisture content above 16–20% provides enough dampness for most mold species to begin growing. The paper facing on drywall and organic compounds in gypsum give mold the food source it needs. This means water damaged drywall creates ideal conditions for mold colonization, and growth can begin within 24 to 48 hours if materials aren’t properly dried and dehumidified during that critical window.
Basements, bathrooms, kitchens, and laundry rooms face the highest mold risk after water damage due to naturally elevated humidity levels and frequent moisture exposure. Basements often lack sufficient ventilation and natural light, creating stagnant air conditions where humidity rises quickly and dissipates slowly. Bathrooms generate humidity from showers and baths that lingers in the air and condenses on surfaces. Kitchens produce moisture from cooking, dishwashing, and appliance use. Laundry rooms experience regular moisture exposure from washing machines and dryer exhaust. These areas already operate near the humidity levels that support mold growth under normal conditions, so water damage in these spaces creates even higher risk of rapid colonization.
Early mold growth appears on drywall surfaces as small spots in various colors depending on the mold species present. Black spots indicate common molds like Stachybotrys or Aspergillus that thrive on damp building materials. Green spots often show Penicillium species that colonize quickly after water damage. Gray and brown discolorations can represent several species or combinations of different molds growing together. These spots typically appear first near baseboards where moisture accumulates at floor level, or in corners where air circulation is weakest and humidity stays higher. Early colonies may have fuzzy or powdery textures depending on whether they produce visible spore bodies or grow as surface films. Some species create slimy appearances when very damp.
Any visible mold on drywall surfaces signals a much larger contamination problem behind the walls. Surface spots represent only the leading edge of colonies that penetrated into the porous gypsum core and established extensive growth inside wall cavities where you can’t see them. By the time a few small spots become visible on the room facing surface, mold typically colonized throughout the thickness of the drywall and spread into insulation and onto wood framing in the cavity. Visible mold that reappears within days or weeks after cleaning confirms that moisture remains elevated in building materials and active growth continues.
Environmental conditions dramatically affect how quickly mold progresses beyond the initial 24 to 48 hour window. Higher temperatures accelerate mold growth. Colonies develop faster at 75°F to 85°F than at 60°F. Sustained humidity above 60% provides ideal conditions for rapid colonization, while humidity maintained below 50% significantly slows growth. The amount of organic material available and the specific mold species present also influence growth speed. Once colonies establish, they continue spreading as long as moisture and temperature remain favorable, creating progressively worse contamination and structural damage the longer conditions persist.
When Water Damaged Drywall Needs Replacement Rather Than Drying
Deciding whether to dry and salvage water damaged drywall or remove and replace it depends on several factors including water contamination level, material condition, and economic practicality.
Water damage falls into three distinct contamination categories that determine appropriate treatment approaches and salvageability. Category 1 clean water comes from sanitary sources like supply lines, faucets, and toilet tanks (not bowls), and carries minimal contamination when the leak’s caught quickly. Most Category 1 damage can be dried successfully within 24 to 72 hours if addressed immediately, leaving drywall structurally intact and safe to keep. Category 2 grey water contains moderate contamination from sources like washing machine overflows, dishwasher leaks, and toilet bowls. This water carries bacteria and organic matter that can colonize in building materials. Category 2 water absorbed into drywall for more than 24 to 48 hours typically requires partial demolition because contamination penetrated materials and microbial growth likely began. Category 3 black water contains severe contamination from sewage backups, flooding from rivers or streams, and any water that sat stagnant for days. Category 3 exposure always requires complete removal and replacement of contacted drywall regardless of exposure duration. No amount of drying makes contaminated material safe to keep.
Structural damage indicators signal that water exposure degraded drywall beyond the point where it can safely remain in place. Press suspected areas firmly. Material that feels soft, mushy, or compresses under pressure has lost structural integrity. Test the surface by pushing gently. Drywall that feels spongy or gives more than surrounding areas indicates the gypsum core broke down. Check for a crumbly or chalky texture by running your hand across the surface or gently scraping with a fingernail. Deterioration and flaking mean the material degraded chemically. Look for sagging sections that detached partially from framing or pulled fasteners through softened material. Any of these conditions indicate replacement is necessary.
Contact with sewage or Category 3 contaminated water regardless of drying time or appearance. Category 2 grey water saturation lasting over 48 hours before drying began. Visible mold growth on surfaces indicating larger colonies throughout the material. Crumbling, chalky, or disintegrating texture when touched or scraped. Sagging, severe warping, or structural failure from prolonged saturation. Wet insulation behind drywall in exterior walls requiring cavity access for insulation removal.
Professional Moisture Detection Tools Versus DIY Testing Methods
Homeowners have access to basic moisture detection tools and techniques that work adequately for small, straightforward water damage. Professionals use advanced equipment and systematic protocols that detect hidden problems and provide documentation quality data.
| Assessment Method | DIY Capability | Professional Capability |
|---|---|---|
| Visual inspection | Identifies surface staining, paint damage, obvious deformation | Systematic documentation with photography, material identification, scope mapping |
| Touch/temperature test | Detects cooler areas suggesting moisture, tests for soft spots | Calibrated infrared surface thermometers with data logging for comparison |
| Consumer moisture meter | Basic pin or pinless readings 1/4–1/2 inch deep on accessible surfaces | Multiple specialized meters reading 3+ inches deep with species calibrated scales |
| Thermal imaging | Not available to most homeowners | High resolution infrared cameras creating detailed moisture maps behind surfaces |
| Moisture mapping | Hand drawn notes of concerning areas | Comprehensive documentation tracking readings across dozens of points over days |
| Drying equipment | Household fans (1000–2000 CFM), dehumidifiers (30–50 pints/day) | Commercial air movers (1500–3000 CFM), LGR dehumidifiers (100–150+ pints/day) |
Thermal imaging technology provides professionals with detection capabilities that visual inspection and surface moisture meters can’t match. Infrared cameras measure surface temperatures across entire walls, floors, and ceilings, displaying results as color coded heat maps where blue or purple areas indicate cooler temperatures and red or orange show warmer spots. Moisture evaporating from wet building materials creates cooling through evaporation, causing affected areas to appear several degrees cooler than surrounding dry surfaces. This temperature differential reveals the exact boundaries of water migration, showing precisely where wet areas end and dry material begins. Thermal imaging detects moisture behind tiles, under flooring, above ceilings, and in wall cavities where no other method can reach without demolition. The visual moisture maps help target exactly where to cut inspection holes, place drying equipment, and verify complete drying before closing walls.
Commercial moisture detection equipment extends far beyond the basic pin or pinless meters available at hardware stores. Deep penetrating meters use longer probes or stronger electromagnetic fields to measure moisture 2 to 3 inches into materials, detecting trapped water in the back half of drywall, inside wood framing, and beneath surface layers. Hygrometers measure ambient humidity levels in rooms and inside wall cavities, tracking how environmental moisture changes during the drying process. Thermo-hygrometers combine temperature and relative humidity measurements to calculate actual drying potential, the air’s capacity to absorb additional moisture at current conditions. Professional grade meters store thousands of readings with location tagging, creating comprehensive data sets that track drying progress and prove work completion. These tools cost hundreds to thousands of dollars, require training to interpret correctly, and need regular calibration to maintain accuracy.
DIY moisture testing works for small, localized leaks caught within hours where water affected only surface areas with no wall cavity involvement. A clean water supply line that dripped for 30 minutes onto drywall, mopped up immediately, with fans and a dehumidifier running continuously would be a reasonable DIY drying situation. Professional assessment becomes necessary when water damage spreads to multiple rooms, affects structural cavities behind drywall, involves contaminated Category 2 or 3 water, shows mold presence or persistent musty odors, or leaves you uncertain whether materials dried completely. Insurance claims almost always require professional documentation. If drying efforts extend past 5 to 7 days without achieving complete dryness, professional intervention prevents worsening damage.
Climate and Environmental Factors Affecting Drywall Drying Speed
Relative humidity in the air surrounding wet drywall has the single greatest impact on evaporation rates and total drying time. Humidity represents the amount of moisture already present in the air compared to the maximum amount the air can hold at that temperature. Dry air below 40% relative humidity pulls moisture rapidly from wet surfaces through aggressive evaporation. As humidity climbs toward 60%, evaporation slows noticeably. Air at 70 to 80% relative humidity approaches saturation and can barely absorb additional moisture, causing drying to proceed at a crawl. Research shows that humidity levels between 50% and 90% at 55°F can increase drying time by up to 4 times compared to ideal conditions. This explains why the same water damage might dry in 2 days under some conditions but take over a week under others. The air’s ability to accept moisture varies dramatically with humidity levels.
Temperature affects drying speed by changing how much moisture air can hold and how quickly water molecules evaporate from surfaces. Warmer air holds significantly more moisture than cooler air. Air at 80°F can hold roughly twice as much water vapor as air at 60°F. Higher temperatures also speed molecular activity, causing water to evaporate more readily from materials into surrounding air. Raising room temperature from 65°F to 75°F while maintaining the same relative humidity roughly doubles the actual amount of moisture air can absorb, which translates directly to faster drying. This is why professional drying operations typically raise building temperature to 75–80°F during restoration.
Opening windows during water damage drying seems logical but often makes the problem worse by introducing humid outdoor air into the drying environment. This mistake happens most commonly after storms that caused the leak. Outdoor humidity frequently exceeds 70% after rain events. When outdoor humidity runs higher than 60 to 70%, opening windows brings in moisture saturated air that can’t absorb additional water from your wet drywall. This damp outdoor air actually raises indoor humidity levels, slowing evaporation and extending drying time. You might even introduce more moisture than your dehumidifier can remove, causing no net drying progress. Windows should stay closed during active drying unless outdoor humidity measures below 50% and outdoor temperature is warmer than indoor temperature.
Regional climate and seasonal factors create very different drying challenges depending on location and time of year. Austin experiences warm temperatures year round that help evaporation, but the climate brings frequently humid conditions that complicate drying. Spring and summer typically see relative humidity above 60 to 70% for extended periods. Morning dew points stay elevated. Opening windows during humid seasons introduces the moisture laden air discussed earlier. Fall and winter provide lower average humidity that supports faster natural drying, though occasional winter storms raise humidity temporarily. Indoor heating during cooler months creates drier air that helps drying, while summer air conditioning focuses on cooling but doesn’t dry effectively.
Drying Process Steps from Water Intrusion to Complete Restoration
Following a systematic sequence for water damage response prevents mistakes that extend drying time, worsen damage, or create unsafe conditions. Skipping steps or working out of order typically causes problems that become evident only after walls are closed and finished.
Stop the Water Source and Prevent Further Intrusion
Locate and eliminate the active water source before beginning any drying efforts. Shut off supply line valves for plumbing leaks, patch or tarp roof damage, repair appliance connections, or stop whatever continues adding water to the situation. No amount of drying equipment can overcome an ongoing leak that keeps introducing new water. Stopping the source first prevents the damaged area from expanding and allows drying to make actual progress rather than fighting a losing battle. Take photos showing the source and extent of water damage before cleanup begins.
Remove Standing Water and Extract Absorbed Moisture
Use wet vacuums, mops, or pumps to remove standing water from floors and carpets. Extract as much absorbed moisture as possible from affected materials using wet/dry vacuums or extraction equipment. The faster you remove bulk water, the less time
Final Words
Knowing how to tell if drywall is dry after a leak comes down to three checkpoints: use a moisture meter for readings below 12–16%, touch-test for cool spots or soft areas, and look for stains or warping that signal trapped water.
Don’t rely on surface appearance alone. Hidden moisture behind drywall causes the expensive problems later.
If readings stay high after several days, odors persist, or you see mold starting, stop and call a pro. You caught it early enough to prevent a bigger rebuild.
FAQ
How long does drywall take to dry after a leak?
Drywall takes 24 to 72 hours to dry with professional equipment, while DIY methods using household fans and dehumidifiers require 3 to 7 days or longer. Small clean-water leaks caught within hours typically dry in 24 to 48 hours with proper airflow and dehumidification. Moderate leaks soaking wall bases take 2 to 4 days. Major flooding or long-term hidden leaks require 3 to 7 days or more depending on saturation depth and environmental conditions.
How do you know if drywall needs to be replaced after water damage?
Drywall needs replacement when it contacts sewage or Category 3 water, shows visible mold growth, has a crumbly texture that breaks easily, sags or bulges indicating structural failure, or contains wet insulation behind exterior walls. Category 2 grey water from appliances soaking drywall for over 48 hours also requires replacement. Clean supply line water caught early can often be dried and salvaged if no structural compromise or contamination occurred.
How do you dry out walls after a water leak?
You dry out walls after a water leak by positioning fans to create cross-ventilation across wet surfaces, running a dehumidifier to pull moisture from the air, and maintaining indoor temperature above 60°F to increase evaporation rates. Check moisture levels every 24 to 48 hours using a moisture meter until readings drop below 12 to 16 percent. Remove baseboards to allow air circulation behind drywall and expose hidden moisture at wall bases.
Is drywall ruined if it gets wet?
Drywall is not always ruined if it gets wet, depending on water source, saturation time, and contamination level. Clean supply line water affecting drywall for less than 24 hours can usually be dried and saved with proper equipment. Sewage contact, prolonged saturation beyond 48 hours, visible mold growth, or structural softening means the drywall is ruined and requires replacement to prevent health hazards and building failure.
What moisture meter reading confirms drywall is completely dry?
A moisture meter reading below 12 to 16 percent moisture content confirms drywall is completely dry and safe for repair. Compare affected area readings to dry baseline areas in unaffected rooms to verify moisture levels match. Wood framing behind drywall should read 10 to 12 percent moisture content before closing walls to prevent trapped moisture and mold growth.
Can you visually tell if drywall is still wet inside?
You cannot visually tell if drywall is still wet inside because surface appearance misses hidden moisture trapped in the gypsum core and wall cavity. Paint may look normal while moisture remains behind it. Visual signs like water stains, bubbling paint, or warping indicate moisture presence but cannot confirm complete dryness. Only moisture meters reliably detect what is happening inside walls and building materials.
How does humidity affect drywall drying time?
Humidity affects drywall drying time dramatically, with relative humidity between 50 and 90 percent at 55°F increasing drying time by up to 4 times compared to low-humidity conditions. Opening windows when outdoor humidity exceeds 60 to 70 percent introduces humid air that slows evaporation instead of helping. Dehumidifiers become essential in humid climates to control indoor moisture levels and maintain effective drying rates.
What does a musty smell mean after drying drywall?
A musty smell after drying drywall means moisture remains trapped inside the wall, microbial growth has started, or hidden water damage exists behind surfaces. Musty or earthy odors indicate mold or mildew colonization on damp materials. Air fresheners only mask the problem without fixing the underlying moisture issue. Persistent odors after 72 hours of drying require professional moisture detection and possible demolition.
When should you call a professional for wet drywall?
You should call a professional for wet drywall when sewage or contaminated water is involved, flooding affects multiple rooms, leaks lasted several hours or occurred while no one was home, visible mold appears, ceilings sag, or uncertainty exists about complete drying. Early professional intervention often reduces total repair costs by preventing secondary damage like hidden mold growth, structural wood rot, and insurance claim complications.
How do professionals detect hidden moisture behind drywall?
Professionals detect hidden moisture behind drywall using thermal imaging cameras that show cold wet areas as temperature differentials, deep-penetrating moisture meters that measure inside wall cavities, and moisture mapping techniques that document the full extent of water migration. Commercial equipment locates trapped water that visual inspection and household tools miss. Thermal imaging creates visual maps showing exactly where moisture has spread through building materials.
What is the difference between pin-type and pinless moisture meters?
The difference between pin-type and pinless moisture meters is that pin-type meters penetrate 3/8 to 3/4 inch into the surface to measure moisture content directly while pinless types use electromagnetic scanning to detect moisture without causing surface damage. Pin-type meters provide accurate readings at specific penetration depths. Pinless meters scan larger areas quickly but may miss localized moisture pockets and typically cannot measure as deep into materials.
Can wet ceiling drywall be dried or does it need replacement?
Wet ceiling drywall can sometimes be dried if caught early with minimal saturation, but gravity works against ceilings and creates collapse risk when heavily saturated. Sagging, bulging, or soft spots indicate the drywall has absorbed too much water and compromised structural integrity requiring immediate replacement. Ceilings with leak duration exceeding a few hours often need professional bracing during drying or complete removal to prevent dangerous collapse.
How long before mold grows on wet drywall?
Mold grows on wet drywall within 24 to 48 hours if materials are not properly dried and dehumidified. Mold spores already exist everywhere and only need moisture plus organic material like paper facing on drywall to begin colonization. High humidity areas like basements and bathrooms experience faster mold development. Any visible surface mold indicates more extensive hidden growth inside wall cavities behind the drywall.
What is Category 2 and Category 3 water damage?
Category 2 water damage is grey water from appliances like dishwashers and washing machines containing some contamination that may require partial drywall removal if saturation exceeds 24 to 48 hours. Category 3 water damage is sewage or floodwater containing dangerous pathogens that always requires complete removal and replacement of affected drywall. Category 1 clean water from supply lines can often be dried and salvaged within days.
Should you remove baseboards when drying wet drywall?
You should remove baseboards when drying wet drywall because water accumulates at wall bases and baseboards trap moisture preventing airflow to the bottom few inches of drywall. Removing baseboards exposes hidden dampness, allows air circulation behind the drywall bottom edge, and reveals the true extent of water damage. Gaps between baseboards and walls after water damage indicate underlying moisture has caused swelling or warping.
