

The honest answer is no, you probably shouldn’t stay in your house right after a flood. Electricity in standing water can kill you, hidden structural damage can collapse, and contaminated floodwater carries bacteria that send people to the hospital. The mess and stress make you want to stay and start cleaning, but the risks hiding in wet walls and behind baseboards aren’t worth it. This guide walks you through the real hazards, the safety checks you need before re-entry, and the specific scenarios where staying puts you in danger.
Determining Whether Your Flooded House Is Safe for Occupancy
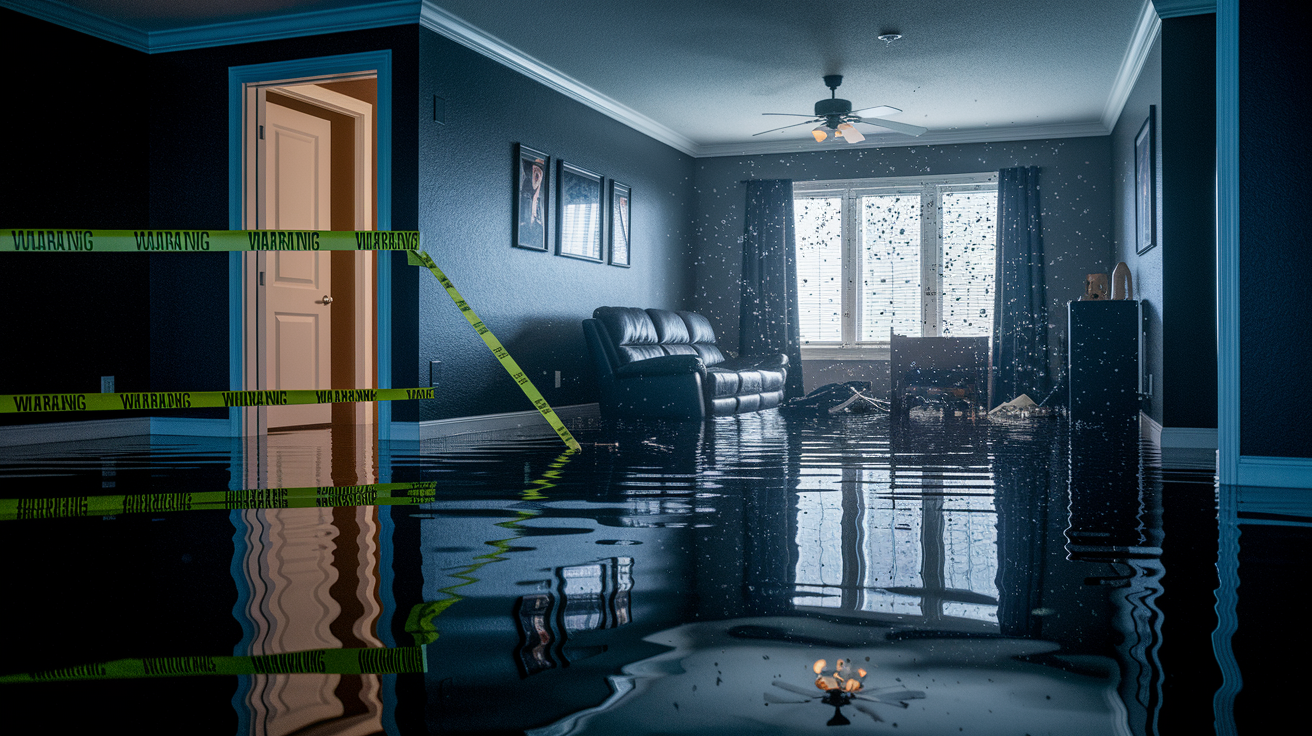
Staying in a house after flooding is usually a bad idea, especially when you’re dealing with serious water intrusion. You’ve got electrical hazards, structural damage you can’t see, contamination, and mold that starts growing faster than you’d think. The risks aren’t worth the convenience of sleeping in your own bed. You need to assess things right away because a lot of flood dangers hide until they become serious problems, and some get worse by the hour.
Three situations mean you leave immediately, no discussion. First, if floodwater reached outlets, your breaker box, or any appliances, the electrocution risk is real and it’s deadly. Second, visible structural problems like wall cracks, sagging ceilings, bowed walls, or doors and windows that won’t close right mean the building might not be stable. Third, any sewage contamination means everyone gets out until professionals clean and disinfect everything. Sewage exposure can cause bacterial infections that put you in the hospital.
Don’t go back until local authorities say it’s clear. Emergency management checks for downed power lines, gas leaks, and damaged infrastructure that you can’t safely evaluate on your own. This isn’t bureaucracy. It confirms utilities are controlled, streets are passable for emergency vehicles, and the area won’t collapse around you when you walk in.
You need professional inspection in specific scenarios. When floodwater came from sewage or chemicals, only certified pros can verify safe cleanup. Large foundation cracks or wall damage require a structural engineer before anyone steps inside. If electrical systems got wet, a licensed electrician has to inspect wiring, panels, and connections. Extensive water intrusion affecting multiple rooms demands professional moisture detection to find hidden damage threatening your safety.
Minor, contained flooding from clean water might allow you to stay with the right precautions, but that’s the exception. A small supply line leak in one bathroom, quickly addressed and immediately dried, represents the narrow scenario where staying could work. Even then, professional assessment is smart to verify what looks minor hasn’t created hidden moisture problems. If you’re wondering whether your situation counts as minor, treat it as major and leave until professionals confirm it’s safe.
Electrical Hazards and Power System Dangers After Flooding

Water and electricity kill people through multiple pathways. Floodwater conducts electricity really well, meaning standing water touching energized outlets, appliances, or wiring can electrify an entire room. The danger extends past what you see. Water seeping into outlets, traveling through wall cavities along wiring, or soaking electrical boxes creates shock and fire risk even after surface water disappears. Electrical damage behind walls stays energized and dangerous until you shut off power and get professional assessment.
Watch for visible warning signs that demand immediate action. If water reached outlet level anywhere in your home, assume electrical hazards exist. Submerged appliances including water heaters, washers, dryers, refrigerators, or HVAC equipment are compromised and dangerous. Breaker box exposure to water means your entire electrical system might be unsafe. Discolored outlets, switches, or breaker boxes show water got in even if you didn’t see flooding there. Flickering lights, burning smells, or sparking after flooding mean shut everything off and get out.
Keep power off until a licensed electrician completes inspection. If your breaker box was under water or got seriously wet, don’t try turning power back on yourself. If you shut power off at the main breaker or meter and you have any doubt about electrical system integrity, leave it off. Even if only one area flooded, water travels through walls to reach electrical components in other rooms. The cost of temporary generator power or staying elsewhere is nothing compared to electrocution or electrical fire.
Take these electrical safety steps immediately:
Turn off main electrical power at the breaker panel or meter if you can reach it safely without stepping in water. Contact your utility company to disconnect power at the meter if you can’t safely access your breaker panel. Avoid all submerged or water-exposed appliances, don’t unplug them or try moving them. Use battery flashlights instead of candles, matches, or any open flames that can ignite gas leaks. Wait for professional inspection and clearance from a licensed electrician before restoring power to any part of your home.
Structural Integrity Assessment After Water Damage

Water saturation changes how building materials work. Structural materials like wood framing, drywall, and flooring absorb water fast and swell, losing their designed strength and ability to support weight. A soaked floor joist that normally holds thousands of pounds might sag or fail under regular loads. Drywall and plaster get soft and can pull away from framing. The longer materials stay wet, the worse the deterioration gets, with rot starting within days in some wood. This isn’t cosmetic. It’s whether your house can support its own weight plus everything and everyone inside.
Specific visible warnings indicate serious structural problems. Foundation cracks wider than 1/4 inch, especially jagged patterns or stair-step formations in masonry, suggest foundation movement or failure. Doors and windows that suddenly stick, won’t close right, or show gaps around frames mean the house frame shifted from where it should be. Sagging or visibly uneven floors indicate damage to floor joists, beams, or foundation supports underneath. Ceiling areas that look bowed, show water stains, or have visible sag represent collapse risk and evidence of trapped water above. Separated walls where drywall or plaster pulled away from corners or joints show movement beyond normal tolerance.
Hidden structural damage develops inside wall cavities and floor systems where you can’t see it. Water trapped between finished surfaces and framing keeps saturating structural members long after surface areas look dry. Floor joists and subflooring can rot from underneath finished flooring that appears intact from above. Wall studs behind drywall can develop mold and rot while the visible wall looks fine. This hidden damage progresses fast in humid conditions that follow flooding. What might’ve been repairable in the first 48 hours can become a major structural issue within a week.
You need a structural engineer or certified building inspector before occupancy when foundation damage is visible, when doors and windows show misalignment throughout the home, when floors have noticeable sag or unevenness, or when flooding was extensive enough to soak structural framing. This professional assessment includes checking load-bearing walls, evaluating the foundation, examining the floor system, and reviewing roof structure if upper levels flooded. The engineer’s report documents current condition, identifies immediate safety concerns, and guides repair requirements. This inspection isn’t optional when structural warnings appear. It’s the only way to verify the building is safe to occupy.
Comprehensive Health Hazards From Flood Exposure and Contamination

The restoration industry sorts water damage into three categories based on contamination level and health risk. Understanding which category hit your home determines when it’s safe to go back and what precautions you need. Category 1 water damage comes from clean sources like burst supply pipes or rainwater without contaminants, representing the lowest health risk if you address it quickly. Category 2 gray water contains contamination from sources like washing machine overflow or toilet bowl water without feces, carrying bacteria that can make you sick with direct contact or if you swallow it.
Category 3 black water includes sewage, river or stream floodwater, or any water that sat long enough to develop bacterial growth. It poses serious health risks through contact, breathing it in, or swallowing it. The CDC warns that Category 3 water exposure can cause serious illness including severe stomach and intestinal problems, respiratory infections, and skin conditions. Most natural flooding starts as Category 1 but rapidly becomes Category 3 as water flows through urban areas, contacts sewage systems, or sits stagnant long enough for bacteria to grow. Common waterborne diseases from floods include gastroenteritis causing severe diarrhea and vomiting, hepatitis A affecting liver function, and leptospirosis transmitted through animal urine that can damage kidneys and cause respiratory failure.
| Water Category | Source Examples | Health Risk Level | Safe for Occupancy |
|---|---|---|---|
| Category 1 Clean Water | Burst supply lines, rainwater direct from roof, broken faucet connections | Low if addressed within 24 to 48 hours | Possibly, with immediate drying and monitoring |
| Category 2 Gray Water | Washing machine overflow, dishwasher leak, toilet bowl water without feces | Moderate, can cause illness with exposure | Not until cleaned, disinfected, and dried |
| Category 3 Black Water | Sewage backup, river flooding, storm surge, standing water over 48 hours | Severe, serious illness from contact or breathing it in | Not until professional remediation completed and verified |
Mold starts growing within 24 to 48 hours after flooding, making this timeline critical for safety. In humid Central Florida conditions, mold often starts within 24 hours when moisture and warmth combine with organic materials like drywall paper, wood, and insulation. This aggressive timeline means you can’t wait to see visible mold before treating the situation as urgent. By the time you see mold growth or smell musty odors, contamination is already extensive.
Mold develops in hidden areas long before you see it on surfaces you can inspect. Inside wall cavities where wet insulation contacts drywall paper, under flooring where moisture is trapped against subflooring, and in HVAC systems where spores colonize damp ductwork. Mold thrives in dark, moist environments you can’t see. Respiratory health risks from mold range from mild allergic reactions to serious breathing problems, particularly for children, elderly people, and anyone with existing respiratory conditions or weakened immune systems. Symptoms showing unsafe air quality include persistent coughing, wheezing or difficulty breathing, frequent headaches, and fatigue that doesn’t improve when you’re away from the home.
Keep monitoring health after returning to a flood-damaged home because symptoms may develop gradually as exposure builds up. If anyone in your household experiences health issues that started or got worse after flooding, reevaluate whether it’s safe to stay immediately. You might need professional air quality testing and additional moisture assessment. Persistent symptoms aren’t something to wait out. They’re warning signs that contamination or air quality problems exist that initial assessment missed or that developed since your return.
Health warning symptoms showing unsafe conditions:
Persistent coughing that gets worse at home or improves when you’re away. Difficulty breathing, wheezing, or chest tightness. Skin rashes or irritation appearing after returning home. Headaches that are worse indoors. Nausea or dizziness when spending time in specific rooms. Unusual fatigue or weakness that improves with time away from home. Allergy symptoms including runny nose, watery eyes, or sneezing that started after flooding.
Gas Leaks and Carbon Monoxide Dangers After Flooding

Flooding damages gas infrastructure through multiple ways. Moving water can shift gas meter connections, corrode fitting connections, and compromise pipe joints. Underground supply lines can separate at connections when surrounding soil shifts from saturation and erosion. Inside the home, water can corrode gas valve connections, damage flexible gas lines to appliances, and compromise shutoff valves. Gas appliances including furnaces, water heaters, dryers, and ranges that were under water or partially flooded may have damaged parts that create leak points when gas service comes back on.
Warning signs of gas leaks need immediate response. The distinctive mercaptan scent added to natural gas (often described as rotten eggs or sulfur) is the most obvious indicator, but also listen for hissing or whistling sounds near gas lines, appliances, or the meter showing escaping gas. Damaged, bent, or corroded connections visible at your gas meter, appliance connections, or along exposed pipe runs need professional attention before gas service resumes. Dead vegetation in a line across your yard can indicate an underground gas line leak. Inside, if pilot lights won’t stay lit after flooding or if you notice yellow or orange flames instead of blue on gas appliances, shut everything down.
If you think there’s a gas leak, take these safety steps without delay. Don’t use light switches, thermostats, or any electrical devices including garage door openers, as the spark can ignite gas. Get everyone out immediately, leaving the door open as you exit to let gas dissipate. Don’t try to find the leak source or shut off gas unless you can reach the outdoor meter valve immediately and safely without going back inside. From a safe location away from the building, call your gas utility company’s emergency line right away. Don’t go back in until utility company personnel or qualified technicians confirm it’s safe. Your utility company will shut off gas at the meter, verify line integrity, and conduct leak testing before authorizing service restoration.
First 24 Hours: Immediate Safety Assessment Steps for Flood-Damaged Homes

Wait for official clearance from local authorities before trying to return to your flooded home. Emergency management assesses area-wide hazards including downed power lines, damaged roads, compromised water and sewer infrastructure, and gas leaks that you can’t safely evaluate on your own. This clearance confirms emergency services can reach you if needed, utilities are controlled, and the area is stable for supervised entry. Start with exterior-only inspection once clearance is given. Walk the perimeter looking for obvious structural damage, foundation cracks, sagging roof lines, or severely damaged areas showing interior entry would be unsafe.
You need specific protective equipment for any flood cleanup. Wear disposable nitrile or latex gloves that extend up your forearms, not just standard household cleaning gloves. Use N95 respirator masks, not simple dust masks or cloth face coverings, to filter mold spores and airborne contaminants. Safety glasses or goggles protect eyes from splashes and particles. Rubber boots extending above ankle height keep contaminated water away from your feet and prevent puncture wounds from submerged debris. Long sleeves and pants made of material that won’t absorb water minimize skin contact with contaminated materials.
Schedule professional inspection for scenarios needing expert assessment, verification of hidden damage, and documentation for insurance. Professional assessment finds hidden moisture using thermal imaging and moisture meters that penetrate surfaces, evaluates structural integrity beyond visible damage, tests air quality for mold and contaminants, and provides documentation your insurance company needs. IICRC certified restoration professionals understand how water damage progresses, know where hidden problems develop, and can verify whether self-cleanup adequately addressed contamination and moisture.
First 24 hours action steps:
Wait for official all clear from local emergency management before returning to the area. Conduct exterior-only inspection walking completely around your home looking for structural damage. Photograph all visible damage from the outside before touching anything. Contact your insurance company to report the claim and ask about emergency services coverage and temporary housing benefits. Check with utility companies about current service status and safety clearance before entering. Get all required personal protective equipment before any interior entry. Schedule professional inspection if your situation involves sewage contamination, visible structural damage, electrical exposure, or extensive water intrusion. Arrange temporary housing immediately if professional assessment will take several days or if damage severity makes occupancy clearly unsafe.
Moisture Detection, Drying Requirements, and Safe Re-Occupancy Verification

Surface dryness is misleading and doesn’t show moisture levels in structural materials. Water penetrates deep into porous materials including wood framing, drywall, insulation, and subflooring, where it stays long after visible surfaces look dry. A wall that feels dry to touch can have studs inside at 30% moisture content, well above the safe threshold. Flooring that appears dry can be hiding saturated subflooring and floor joists beneath. This hidden moisture keeps supporting mold growth, causing rot, and creating health hazards regardless of what surface conditions suggest.
Moisture meter readings provide objective measurement that touching things and looking can’t give you. Professional restoration technicians use pin-type and pinless moisture meters to measure moisture content percentage in different materials. Industry standards define when things are dry enough: wood framing should measure below 16% moisture content, drywall below 1% on moisture meter scales calibrated for gypsum, and concrete below 4% on appropriate scales. These numbers matter because mold growth speeds up above these levels, and putting finished materials back over damp structural components traps moisture that causes progressive damage.
Industrial drying equipment outperforms consumer options by huge margins in both speed and effectiveness. Professional restoration companies use commercial dehumidifiers removing 50 to 200 pints of water per day compared to residential units removing 20 to 30 pints daily. Industrial air movers create directed airflow patterns reaching inside wall cavities and under flooring, while standard household fans simply move air across surfaces. IICRC certification shows technicians understand psychrometric principles, know how to calculate required equipment for specific cubic footage and moisture loads, and follow established protocols for structural drying. This isn’t about using bigger fans. It’s about applying proven science to moisture removal.
Materials that hold hidden moisture:
Wall cavities where insulation gets saturated and stays wet against hidden drywall surfaces. Insulation batts that compress when wet, losing air spaces and staying damp for weeks. Subfloors beneath vinyl, tile, or engineered flooring where trapped moisture can’t escape through. Ceiling cavities above damaged rooms where water pooled and saturated insulation and framing. HVAC ductwork where moisture condenses and creates environments for mold growth. Concrete and masonry that absorbs water slowly but releases it very slowly, staying damp for months.
Safe entry needs multiple verification points, not just a judgment that things look dry. Professional clearance documentation should include moisture meter readings showing all structural materials at or below acceptable thresholds, notes on areas that required extended drying time or specialized treatment, confirmation that sanitization was completed in contaminated areas, and clearance for specific categories of work to proceed. This documentation protects you by confirming the environment is safe and provides evidence for insurance companies and future buyers that restoration was done right.
Keep monitoring after initial return for weeks because moisture can reappear and conditions can change. Check previously damaged areas weekly for any musty odors, new staining, or soft spots suggesting moisture problems initial drying didn’t fully address. Run dehumidifiers continuously for at least two weeks after the restoration company finishes work, keeping indoor humidity below 50%. Professional restoration completion timeline for major flooding typically takes two to four weeks from initial water extraction through final repairs, with occupancy clearance coming midway once structural drying is verified but before all finish work is complete.
Safe occupancy verification requirements:
Structural engineer clearance if foundation or structural concerns were identified during initial assessment. Electrical system inspection approval from licensed electrician confirming all affected circuits, outlets, and panels are safe for use. Moisture readings at acceptable levels in all structural materials including hidden framing, subflooring, and wall cavities. Air quality testing passed showing mold spore counts and contaminant levels within safe parameters. Contamination remediation completed and verified if gray water or black water was involved. All repairs to building envelope completed so no additional water can get in during ongoing restoration.
Damaged Building Materials: What Must Be Removed for Safety

Porous materials absorb and hold water, contamination, and microorganisms within their structure, while non-porous surfaces can be cleaned and sanitized because contaminants stay on the surface. This difference determines what can be saved after flooding. Drywall, insulation, upholstered furniture, and carpet are porous materials that can’t be adequately cleaned once contaminated. Metal, glass, and solid plastic are non-porous and can typically be saved with proper cleaning. Wood sits in the middle where whether you can save it depends on finish, contamination level, and how long moisture sat.
Contamination category directly affects what can be saved regardless of material type. Category 1 clean water allows maximum salvageability if items dry within 24 to 48 hours before mold gets established. Category 2 gray water eliminates salvageability for porous materials that contacted the water and requires thorough sanitization of non-porous items. Category 3 black water contamination means porous materials must be thrown out without exception due to health hazards, and non-porous materials need aggressive sanitization with antimicrobial solutions. The longer any water sits before extraction, the more the category degrades toward black water conditions.
Keeping contaminated porous materials creates ongoing health risks that stick around even if materials appear to dry successfully. Bacteria, viruses, and mold spores embedded in porous structures can’t be removed by surface cleaning or drying. These contaminants keep releasing into indoor air, causing respiratory issues and infection risks. Materials that smell musty are actively growing mold and releasing spores. Trying to save heavily contaminated materials to cut restoration costs creates long-term health expenses and ongoing air quality problems that exceed the initial savings. The practical and safe approach removes contaminated porous materials and replaces them with new materials that don’t pose health risks.
| Material Type | Can Be Salvaged? | Conditions/Notes |
|---|---|---|
| Drywall | Rarely above flood line, never below | Remove all drywall that contacted floodwater plus 12 inches above water line; paper backing absorbs contamination and supports mold |
| Insulation (fiberglass/cellulose) | No | Must be removed and replaced; can’t be dried effectively and holds contamination and moisture |
| Carpet and padding | No for padding; rarely for carpet | Padding must be removed; carpet can potentially be saved only if Category 1 water and dried within 24 hours |
| Hardwood flooring | Sometimes | Depends on water exposure time, contamination level, and whether cupping/warping occurred; often must be refinished |
| Subflooring | Depends on material | Plywood can sometimes be saved if dried thoroughly; particleboard swells and must be replaced; concrete can be dried but takes weeks |
| Baseboards and trim | Usually no | MDF and particleboard based trim swells and can’t be saved; solid wood can sometimes be salvaged depending on finish and contamination |
| Concrete and tile | Yes | Non-porous surfaces can be thoroughly cleaned and sanitized; grout lines may need treatment or sealing |
Cleanup Process Safety and Contamination Prevention During Flood Recovery

Ventilation during cleanup is critical for air quality and safety. Open all windows and exterior doors to create cross-ventilation that pushes contaminated air out and brings fresh outdoor air in. Use box fans positioned in windows blowing outward to create negative pressure pulling indoor air out rather than just circulating it. This airflow pattern prevents mold spores, bacteria, and volatile organic compounds from concentrating at breathing height. Don’t work in enclosed spaces without active ventilation. A closed room with wet materials quickly develops high humidity and contaminant concentrations exceeding safe exposure levels. Cross-contamination prevention means setting up clean and dirty zones. Remove shoes, gloves, and outer clothing in a contained area before entering clean spaces. Don’t walk through clean areas while moving between contaminated rooms. Bag all contaminated materials at removal location rather than carrying loose debris through the house.
Disinfection methods vary by surface type and contamination level. For non-porous hard surfaces like tile, counters, and appliances that contacted Category 2 or Category 3 water, use a bleach solution of 1 cup household bleach per gallon of water, applied with spray bottle or mop, allowed to contact surfaces for at least 10 minutes before rinsing or air drying. For wood surfaces including framing and subfloors, use the same bleach solution but apply with pump sprayer or brush rather than soaking, focusing on thorough coverage without oversaturation extending drying time. Don’t mix bleach with any other cleaning products, especially ammonia based cleaners or acids, as dangerous gases result. Wear gloves and eye protection during all disinfection work. For porous materials you’re trying to save, antimicrobial solutions designed for restoration work perform better than bleach because they penetrate surfaces, but these are specialty products typically applied by professionals.
Tetanus vaccination importance increases after flooding because puncture wounds and cuts from debris are common, and floodwater contamination introduces tetanus bacteria risk into any break in skin. If your last tetanus booster was more than five years ago and you’ll be doing cleanup work involving demolition, debris handling, or work in contaminated areas, get a booster before starting. Get immediate medical attention for any puncture wounds, deep cuts, or injuries contaminated by floodwater even if they seem minor. Watch for signs of infection including increased pain, redness spreading from wound site, red streaking up arms or legs from injury location, fever, or swelling. Get immediate care if you develop sudden severe headache, stiff neck, confusion, or extreme fatigue after working in flooded areas, as these can indicate serious infection.
Drinking Water Safety and Well Contamination After Flooding

Flooding contaminates both municipal and private water systems through multiple pathways. Municipal water systems can experience contamination when floodwater gets into treatment plants, overwhelms sewer systems creating backflow conditions, or enters water distribution lines through broken pipes or submerged connection points. Cross-connections where flooding submerges outdoor faucets or hose connections can create back-siphoning pulling contaminated water into supply lines. Private wells face direct contamination risk when floodwater overtops well caps, seeps through damaged well casings, or infiltrates through soil surrounding shallow wells.
Boil water advisories are issued by local health departments or water utilities when water supply contamination is suspected or confirmed. These advisories instruct residents to bring water to a rolling boil for at least one minute before using for drinking, cooking, making ice, brushing teeth, or washing dishes. Boiling kills bacteria, viruses, and parasites but doesn’t remove chemical contamination. During a boil water advisory, use boiled or bottled water for all consumption and food preparation. Water used for bathing and laundry generally doesn’t require boiling, though avoiding getting water in your mouth is important. Advisories stay in effect until testing confirms water safety, typically requiring at least two consecutive days of clear test results.
Well testing requirements and timeline before resuming use are specific and non-negotiable after flooding. Don’t use well water until testing confirms safety. Before testing, pump the well continuously for at least 30 minutes to flush contaminated water from the system. Disinfect the well, pressure tank, and all distribution lines with chlorine solution following health department guidelines or hiring a well contractor for this service. After disinfection, flush the system again until chlorine odor disappears completely. Wait at least 7 to 10 days after disinfection before collecting water samples for testing, letting the system stabilize. Test for coliform bacteria at minimum, and consider additional testing for chemicals, nitrates, and other contaminants if agricultural or industrial areas flooded nearby. Use only state certified laboratories for testing. Don’t resume regular use until test results confirm safety.
Safe water practices after flooding:
Use only bottled water for drinking, cooking, and brushing teeth until municipal supply is cleared or private well is tested safe. Boil water at a rolling boil for at least one full minute before use if boil water advisory is in effect; let cool before consuming. Don’t make ice with potentially contaminated water; throw out all ice made before flooding and thoroughly clean ice maker. Private wells require pumping, disinfection, flushing, and testing by certified lab before use, regardless of how clean water appears. Sanitize water lines and fixtures in your home after municipal water safety is confirmed, running all faucets for several minutes to flush lines.
Insurance Documentation and Emergency Services Coordination for Flooded Homes
Document everything before any cleanup or repairs begin using both photos and video. Walk through every affected area slowly with your phone or camera, narrating what you’re recording to create audio notes about damage details. Photograph each room from multiple angles showing overall conditions, then take close-up shots of specific damage to floors, walls, ceilings, appliances, and belongings. Open cabinets, closets, and storage areas to document hidden damage. Photograph water lines on walls showing flood height, and capture serial numbers and model information on damaged appliances and equipment. Take exterior shots showing property damage, yard conditions, and any structural concerns visible from outside. This documentation is essential evidence your insurance company needs and protects your interests if claim disputes come up.
Immediate insurance notification requirements are typically outlined in your policy under duties after loss provisions. Contact your insurance company within 24 hours of discovering damage if possible, using their 24/7 claim reporting lines. Provide your policy number, describe the general nature and extent of damage, and ask specific questions about what emergency services are covered, whether you should hire a restoration company immediately or wait for the adjuster, what your temporary housing benefits include, and what documentation they need from you. Most policies cover reasonable emergency services to prevent further damage including water extraction, temporary repairs, and board-up services, even before an adjuster inspects. Ask your insurer whether they have preferred vendor programs and whether using their vendors affects your claim. Document the date, time, and name of every person you speak with at your insurance company.
FEMA assistance eligibility and application process begins with presidential disaster declaration for your area. If your area receives federal disaster declaration, register with FEMA immediately even if you have insurance because some FEMA programs provide assistance insurance doesn’t cover or help with expenses before insurance pays. Register online at DisasterAssistance.gov or call 800-621-3362. FEMA assistance can include temporary housing, home repair grants, low-interest disaster loans through Small Business Administration, and crisis counseling. Document all disaster-related expenses with receipts and records as FEMA requires detailed documentation. FEMA inspectors will visit to assess damage, usually within 10 days of registration. This assistance is for essential items and disaster-related necessary expenses, not comprehensive rebuilding.
Temporary housing options include several potential sources of assistance and coverage. Review your homeowner insurance policy declarations page to confirm whether you have Additional Living Expense coverage or Loss of Use coverage, which pays for hotel, rental housing, meals, and other increased living costs while your home is unlivable. These benefits typically have time limits and dollar caps, so understand your specific policy terms. The American Red Cross opens emergency shelters after major flooding events providing immediate safe housing, meals, and basic necessities for displaced families. Local churches, community organizations, and social service agencies often coordinate temporary housing assistance after disasters. If you’re a renter, your renters insurance may include loss of use coverage. If you have no insurance coverage, FEMA temporary housing assistance may provide hotel vouchers or rental assistance after disaster declaration.
Basement Flooding and Below-Grade Space Safety Considerations
Basement flooding creates heightened electrical and structural risks because water naturally flows to and accumulates in the lowest areas of your home. Electrical panels located in basements, a common setup in many homes, represent extreme electrocution hazard when flooded. Submerged outlets, light fixtures, sump pumps, and basement appliances stay energized unless power is shut off at the main panel, which may itself be in the flooded basement creating a dangerous situation. Foundation walls face greater lateral pressure from saturated soil outside pushing inward while water inside pushes outward, stressing walls beyond design loads. Floor joists and support columns sit directly in standing water for extended periods, speeding up structural deterioration.
Standing water removal safety requires electrical shutoff verification before entering the basement or trying to operate a pump. If your main electrical panel is in the basement and is submerged or in standing water, call your utility company to disconnect power at the meter outside before any entry. Don’t walk through standing water in a basement if any possibility exists that power is still on. If you can safely verify all power is off and water depth is manageable, use submersible pumps designed for the purpose rather than shop vacs not rated for continuous submersion. Remove water gradually if depth exceeds two feet, taking out roughly one-third of water volume per day, because rapid removal can cause foundation failure when exterior soil stays saturated and creates inward pressure on walls no longer supported by water inside. After water removal, ventilate aggressively with fans and dehumidifiers because basements naturally trap humid air.
Foundation and wall assessment specific to below-grade spaces focuses on damage patterns common in basements. Horizontal cracks near the middle of foundation walls indicate lateral pressure exceeded wall strength, creating serious structural concern. Vertical cracks at corners or near windows are often less severe but need monitoring. Bowing or bulging of foundation walls inward shows ongoing soil pressure and requires immediate structural engineer assessment. White powdery deposits on concrete walls indicate efflorescence where water carried minerals through the concrete, confirming water came through the foundation. Inspect carefully where walls meet floor slab for cracks or separation that can allow ongoing water infiltration. Check support posts and columns for rust, corrosion, or concrete damage at the base where they sat in standing water.
Crawl space inspection importance can’t be overstated because these areas concentrate moisture, provide ideal mold growth conditions, and house critical structural and mechanical components. Access crawl spaces only after confirming ventilation is adequate, no gas leaks exist, and you have proper protective equipment including a respirator, because mold concentrations in post-flood crawl spaces can be severe. Inspect floor joists and subflooring from below for saturation, sagging, or visible mold growth. Check for standing water that hasn’t drained, showing grading or drainage problems that will cause recurring issues. Look at vapor barriers for damage and standing water on top of barriers showing water came from above through flooring rather than rising from ground. Access safety requires making sure entry openings are clear, having someone know you’re entering the space, and never entering if you smell gas, see electrical hazards, or encounter structural instability.
Final Words
Standing water in your home creates urgent safety decisions that can’t wait. Is it safe to stay in house after flood? Not if electrical systems got wet, structural damage is visible, or sewage contamination occurred.
Wait for official clearance before re-entry. Document everything for insurance. Get professional inspection when water touched outlets, foundations cracked, or contamination happened.
Surface dryness doesn’t mean safe occupancy. Hidden moisture behind walls and under floors needs weeks of proper drying with moisture meter verification before rebuild.
You can recover from this, but only if you do the safety checks right from day one.
FAQ
Is it safe to live in a house after flooding?
Living in a house after flooding is not safe when major water intrusion has occurred, electrical systems are exposed, structural damage is visible, or sewage contamination is present. Wait for official clearance from local authorities and professional inspection approval before returning to occupancy.
How many inches of water can make you lose control?
As little as 6 inches of moving water can knock you down, and 12 inches of rushing water can carry away most vehicles. Inside a flooded home, even shallow standing water near electrical outlets or appliances creates immediate electrocution risk requiring evacuation.
How long does it take to dry a room after a flood?
A flooded room typically takes 3 to 5 days to dry with proper industrial dehumidifiers and air movers, but hidden moisture in wall cavities, subfloors, and insulation can require 1 to 2 weeks or longer depending on materials affected and saturation levels.
What should you avoid doing after a flood?
After a flood, avoid entering the home before official clearance, using electrical appliances exposed to water, touching standing water near outlets, attempting repairs before documentation, using open flames instead of flashlights, and assuming visible dryness means the structure is safe for occupancy.
When can I return home after flooding evacuation?
You can return home after flooding evacuation only when local authorities issue official clearance, utility companies restore and approve services, professional inspections confirm structural and electrical safety, moisture readings reach acceptable levels, and contamination remediation is verified complete.
What are the biggest health risks from living in a flooded house?
The biggest health risks from living in a flooded house include electrocution from water-damaged electrical systems, waterborne diseases like gastroenteritis and hepatitis A from contaminated floodwater, mold-related respiratory problems developing within 24 to 48 hours, and structural collapse from weakened building materials.
How do I know if my flooded house has structural damage?
Your flooded house has structural damage if you notice foundation cracks wider than 1/4 inch, doors and windows that won’t open or close properly, sagging or uneven floors, visible ceiling bowing, or new wall cracks appearing after the flood event.
Can I use electricity after my house floods?
You cannot use electricity after your house floods until a licensed electrician inspects the electrical system, verifies all components are dry and undamaged, confirms the main panel wasn’t submerged, and provides written clearance that power restoration is safe.
What type of floodwater is most dangerous?
Category 3 black water is most dangerous, containing sewage, river or stream floodwater, groundwater intrusion, or any water sitting long enough to develop harmful bacteria. This contamination level causes serious illness and requires professional remediation before safe occupancy.
How quickly does mold grow after flooding?
Mold grows within 24 to 48 hours after flooding occurs, developing first in hidden areas including wall cavities, under flooring, inside HVAC systems, and behind baseboards before becoming visible or producing noticeable odor.
Do I need professional inspection after minor flooding?
You need professional inspection after minor flooding when the water came from contaminated sources, reached electrical components, affected structural materials, or if you’re unsure about complete drying. Professional assessment identifies hidden moisture and health hazards homeowners typically miss.
What building materials must be replaced after flooding?
Building materials that must be replaced after flooding include drywall saturated above 4 feet, all carpet and padding exposed to contaminated water, soaked insulation, particle board or MDF materials, and any porous materials like drywall or subflooring exposed to Category 3 black water.
Is well water safe to drink after flooding?
Well water is not safe to drink after flooding until the well is tested by a certified laboratory, shows no contamination, and is properly sanitized following health department procedures. Use bottled water until test results confirm safety, which typically takes 7 to 10 days.
