

That discolored patch on your basement wall might not be a stain. It could be active mold spreading behind the drywall right now. Water damaged drywall gives off warning signs before contamination becomes a major problem, but you have to know what to look for. Most homeowners miss early symptoms because mold grows inside wall cavities first, long before dark spots show up on the surface. Learn to recognize visual clues, smells, and texture changes so you can catch mold early and decide whether you need cleanup or full removal.
Visual and Olfactory Signs of Mold on Water-Damaged Drywall

Catching mold early makes the difference between a manageable cleanup and a major remediation project. You’ve got a 24 to 48 hour window after water hits drywall before mold spores start germinating. After that, growth accelerates fast.
Signs can range from obvious to subtle. Don’t rely on just one indicator. Check for multiple clues, because mold doesn’t always announce itself with a big dark patch on the wall.
Watch for these specific signs:
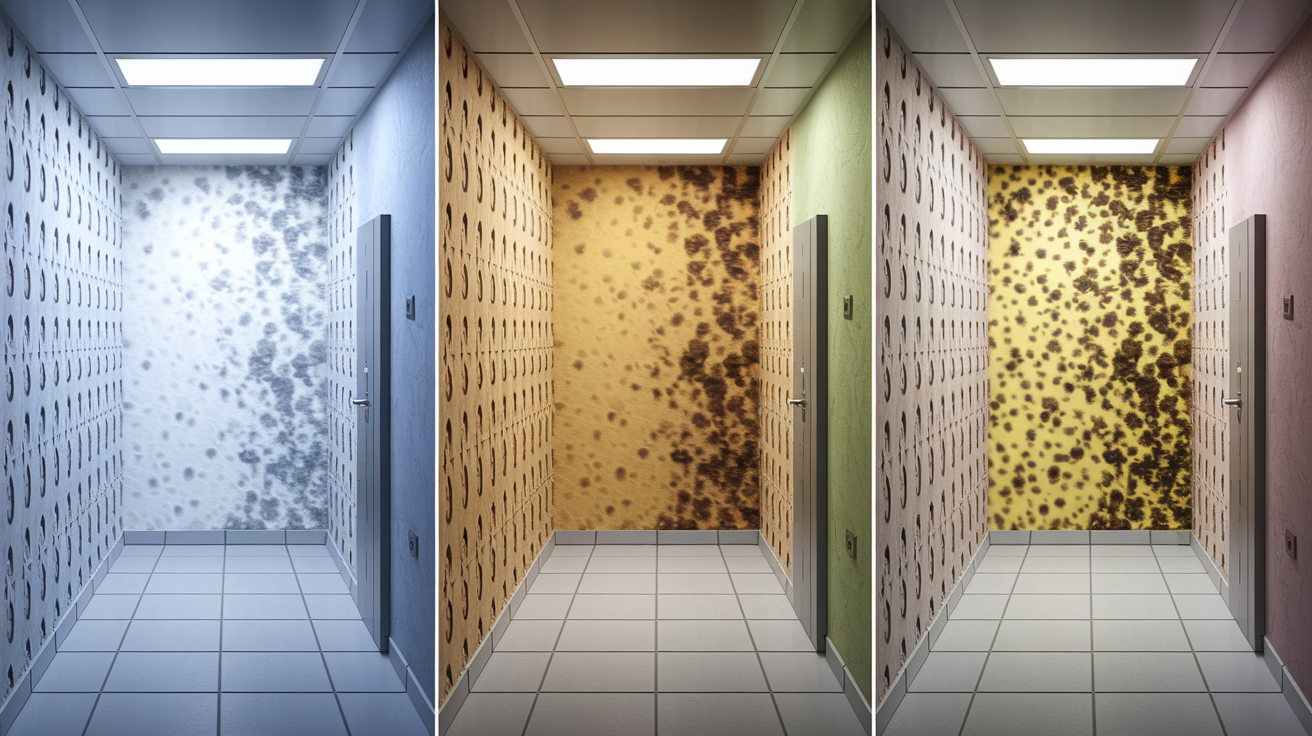
- Black, green, or brown patches appearing as spots, streaks, or fuzzy clusters on wall surfaces or ceilings
- Dark spots or staining on interior walls, especially along baseboards, corners, or crown molding
- Discoloration patterns that look like watercolor bleeding across the drywall surface
- Peeling, bubbling, or cracking paint where moisture pushes the finish away from the wall
- Peeling wallpaper that lifts at seams or corners, sometimes releasing a puff of musty air when touched
- Musty, damp earthy odor similar to wet leaves or a basement after rain
- Smell concentration near outlets and baseboards where odors seep through gaps in the drywall
- Fuzzy or velvety texture on wall surfaces when mold colonies mature
- Spotted growth patterns that spread outward from a central moisture source
- Chalky or powdery residue around affected areas, sometimes accompanied by discoloration
Use multiple signs together for confirmation. A musty smell plus soft spots beats just seeing a small stain. Odors often give you the first warning before visual signs appear, because mold grows behind the drywall before breaking through to the surface. Pay attention when a room smells off, even if walls look clean. That smell is telling you something’s happening inside.
Assessing Severity and Structural Impact of Mold Growth

Knowing how bad the damage is helps you decide what comes next. Small surface mold might respond to cleaning. Deep structural damage means calling a pro and planning for replacement.
Check for these severity indicators:
- Surface mold versus penetrated growth. Surface fuzz wipes off, penetrated mold is embedded in the material
- Soft or spongy wall texture when you press gently with your hand
- Visible warping, buckling, or waves in walls that were previously flat
- Crumbling or flaking drywall that breaks apart with light pressure
- Sagging ceiling areas where moisture weight pulls material downward
- Extensive discoloration covering more than a few square feet
- Structural instability where walls flex or move when touched
Moisture destroys drywall’s structural integrity. The gypsum core absorbs water like a sponge, loses rigidity, and turns soft. Push gently on a suspect area. If your finger sinks in or the surface feels spongy, the material is compromised. That’s not repairable.
Warping, buckling, and sagging all signal severe moisture penetration. When drywall appears wavy, lumpy, or uneven, moisture pressure is pushing the material outward or gravity is pulling saturated sections down. These aren’t cosmetic issues. The drywall has lost its structural function.
Test carefully. Don’t push hard on ceilings or heavily damaged walls. Water saturated drywall can collapse suddenly, and sagging ceiling sections are especially dangerous. If you see obvious sagging or the material feels soft, stay clear and mark the area. That’s a job for professionals with proper safety equipment.
DIY Cleanup vs. Professional Remediation Decision Criteria

The scope of damage, contamination level, and structural condition determine whether you can handle cleanup yourself or need to bring in remediation specialists.
| Factor | DIY Appropriate | Professional Required |
|---|---|---|
| Affected Area Size | Less than 10 square feet | More than 10 square feet |
| Location | Surface only, accessible areas | Behind walls, inside HVAC, structural cavities |
| Water Source | Category 1 (clean water from supply lines) | Category 2 greywater or Category 3 blackwater |
| Structural Damage | None, drywall firm and intact | Soft, crumbling, or compromised drywall |
| Health Symptoms | No respiratory or allergic reactions | Sneezing, coughing, breathing issues present |
| Recurrence | First occurrence, source identified and fixed | Recurring mold, unknown or unfixed source |
| Household Members | Healthy adults only | Immunocompromised, children, elderly, or asthma sufferers present |
Professional remediation follows a structured process. Certified assessors inspect the property, map moisture levels, identify contamination categories, and prepare a detailed remediation plan. Technicians then contain the work area to prevent spore spread, use HEPA filtration to clean air during removal, cut out and dispose of contaminated materials properly, treat remaining surfaces, and conduct verification testing after completion. The process typically takes three days to two weeks depending on extent, with costs ranging from a few hundred dollars for small contained areas to several thousand for whole room remediation with structural repairs.
DIY has clear limits. You can clean small surface mold on non-porous materials like tile or painted wood. You need an N95 mask, gloves, eye protection, and proper ventilation. But here’s what you can’t DIY: anything involving waterlogged drywall. Once drywall absorbs significant moisture, it must be cut out and replaced. You also can’t handle mold behind walls, inside ductwork, or in areas larger than 10 square feet. And if the water came from greywater sources like dishwashers or washing machines, or blackwater from sewage, stop. That requires professional handling because of contamination and health risks.
How Water Damage Progresses to Mold Growth in Drywall
Standard drywall is thin, porous, and absorbs moisture like a sponge. The paper facing and gypsum core both soak up water fast. That’s the problem. Drywall wasn’t designed to get wet and stay wet.
Within 24 to 48 hours after water contacts drywall, mold spores that are always present in the air start germinating. They don’t need much. Moisture, organic material to feed on (the paper facing provides that), and darkness are all they need. The gypsum core holds moisture, creating a perfect environment for colonies to establish and spread.
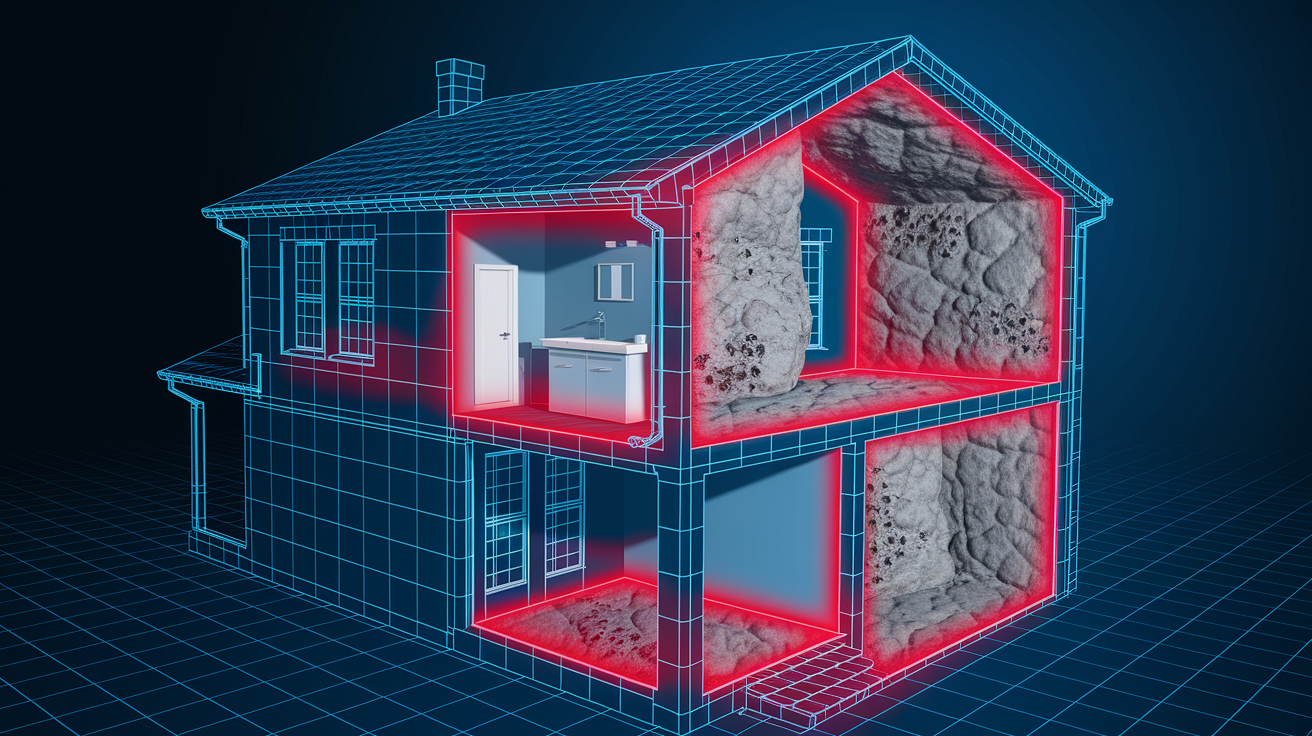
The real issue happens inside the wall cavity. Water runs down the surface, but it also soaks through and collects in spaces between studs. These hidden areas stay damp longer because they don’t get airflow. Moisture trapped between drywall and framing lumber creates ideal conditions for aggressive mold growth. While you’re looking at a small damp spot on the surface, there might be extensive contamination spreading behind it.
That’s why visible signs show up late. By the time you see dark patches on the face of the wall or smell that musty odor seeping out, mold has been growing inside for days or weeks.
Common Hidden Locations and Source Identification
Finding the mold is only half the job. If you don’t identify and fix the moisture source, mold will just come back after cleanup.
Visible surface mold is usually connected to much larger contamination hidden inside walls, under floors, or above ceilings. Here are the most common locations and what causes them:
- Behind drywall and baseboards. Usually from leaking supply lines, drain pipes, or slow plumbing failures that drip inside wall cavities for weeks before anyone notices
- Ceiling areas near bathrooms and kitchens. Roof leaks from storm damage, missing shingles, or ice dams allow water to soak insulation and ceiling drywall
- Basement walls below grade. Foundation cracks, hydrostatic pressure, or poor exterior drainage cause seepage that saturates bottom portions of drywall
- Around windows and exterior doors. Condensation from temperature differences or failed sealing lets moisture collect in framing and drywall edges
- Bathroom walls behind showers and tubs. Grout failures, missing caulk, or splash moisture penetrates walls, especially in older homes without proper vapor barriers
- Kitchen walls near sinks and dishwashers. Small supply line leaks, disposal failures, or appliance overflow saturate cabinets and adjacent drywall
- HVAC areas and ductwork. Condensation from temperature differences or drain line clogs cause moisture accumulation on or near drywall
- Interior corners where walls meet. Poor ventilation and air circulation create condensation zones, especially in humid climates or poorly insulated spaces
- Under flooring adjacent to walls. Hidden plumbing leaks, flooding events, or groundwater seepage spread from floors into bottom wall sections
- Behind cabinets and vanities. Supply and drain line connections fail slowly, soaking wall surfaces that can’t be seen without removal
- Attic spaces with roof penetrations. Vent pipes, skylights, or chimney flashing failures allow water into insulation and drywall
- Crawl spaces with poor vapor control. Ground moisture rises and condenses on floor joists and subfloor, affecting walls above
Water contamination categories matter for health and handling. Category 1 is clean water from supply lines. Still causes mold but no sewage pathogens. Category 2 greywater comes from sinks, showers, washing machines, and dishwashers. Contains bacteria and requires more careful handling. Category 3 blackwater from toilet overflows or sewer backups contains dangerous pathogens and always requires professional remediation.
Professional moisture meters can detect hidden dampness behind surfaces without cutting holes. In high humidity climates like Florida and the Southeast, routine storm seasons and constant moisture levels mean drywall mold risk stays elevated year round, making prevention and quick response even more critical.
Distinguishing Between Water Stains and Active Mold Growth
Not every discoloration on drywall means active mold, but every water stain tells you moisture got in at some point. Knowing the difference helps you respond correctly.
| Sign | Water Stain (Inactive) | Active Mold Growth |
|---|---|---|
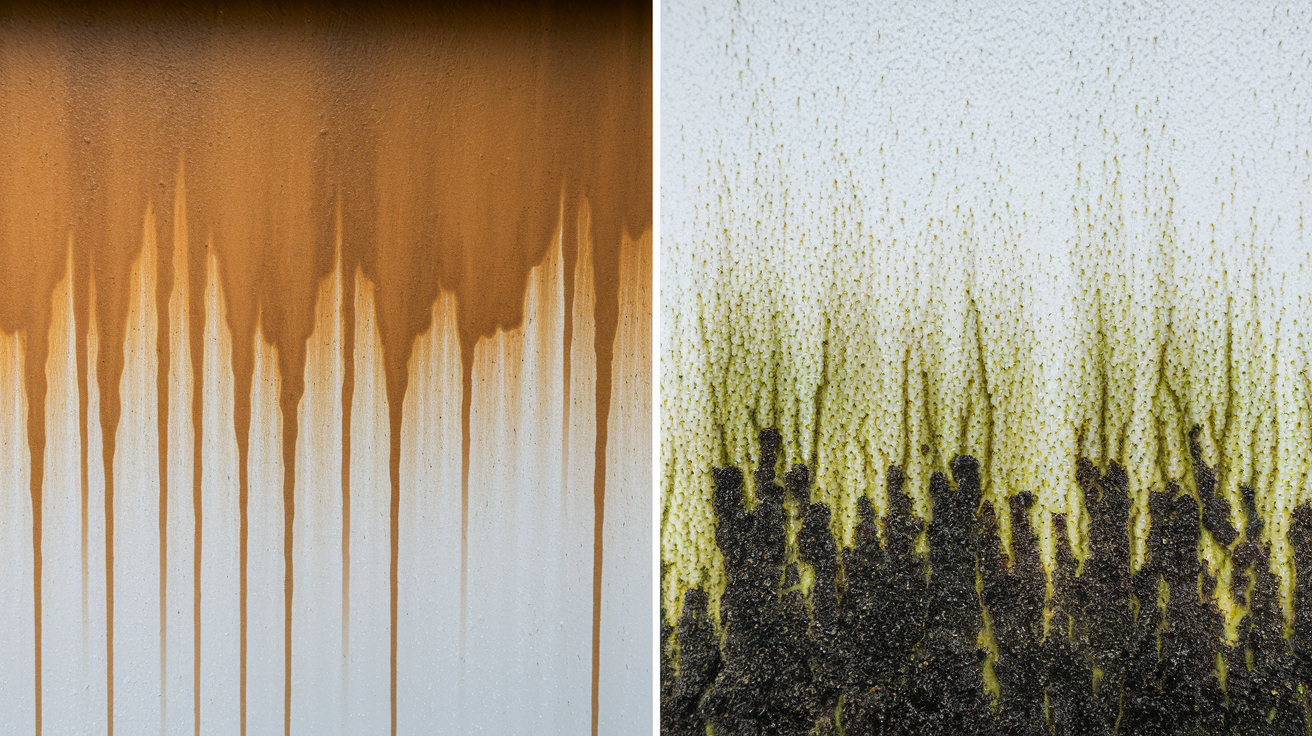
| Color | Brown or yellow rings, tan discoloration | Black, green, or dark brown patches |
| Texture | Flat, smooth, same as surrounding drywall | Fuzzy, raised, velvety, or spotty appearance |
| Smell | None, or faint musty odor only when close | Strong musty, earthy, damp smell from several feet away |
| Spread Pattern | Defined edges, doesn’t change over time | Irregular edges, growing or spreading outward |
| Surface Feel | Dry and firm to touch | Damp, soft, or spongy when pressed |
Old water stains still need investigation. Even if the discoloration is dry and inactive, you need to confirm the moisture source was fixed. An old roof leak that’s been repaired won’t cause new problems. An old leak that’s still slowly dripping will. Check the area during rain or high humidity to verify it stays dry. Feel around the stain for soft spots that indicate ongoing moisture issues.
Efflorescence looks like white chalky powder or crusty deposits on drywall surfaces. It’s not mold. It’s mineral residue left behind when water evaporates through the wall, carrying dissolved salts to the surface. Efflorescence itself is harmless, but it proves water is moving through the material. That moisture pathway can support mold growth, so treat efflorescence as a warning sign to investigate further and address the moisture source.
Systematic Inspection Methods for Detecting Hidden Mold

A thorough inspection catches problems before they spread. Work through each area methodically rather than spot checking random locations. For initial safety steps and what to check first after discovering water damage, see Immediate Steps After Water Damage.
Follow this sequence:
- Check for musty odors room by room. Walk through each space slowly, especially rooms with plumbing, and note where smells are strongest
- Inspect all walls and ceilings for discoloration. Look for stains, dark spots, or color changes, paying attention to corners and edges
- Examine paint and wallpaper condition closely. Check for peeling, bubbling, cracking, or lifting, which signal moisture behind the surface
- Feel walls for soft, damp, or cool spots. Use the back of your hand to detect temperature differences that indicate moisture
- Check corners and baseboards at floor level. These areas trap moisture and show damage first after flooding or leaks
- Smell near electrical outlets and switches. Odors seeping through openings help locate hidden mold in wall cavities
- Inspect areas below known or suspected leaks. Trace water paths downward from sources like roof damage or plumbing failures
- Examine the perimeter of windows and doors. Look for condensation marks, staining, or soft material around frames
- Check basement and attic spaces thoroughly. These areas often show damage before living spaces because they’re visited less frequently
- Use a moisture meter on suspect areas. Check readings on drywall surfaces and compare to dry reference areas elsewhere
- Look for visible mold patches or growth. Document size, location, and appearance with photos
- Test for warping or buckling by sight and touch. Stand at an angle to walls and ceilings to spot irregularities in flat surfaces
Wear gloves and an N95 mask during inspection. Don’t disturb suspected mold by scraping or touching it directly. Keep windows open or run fans to maintain ventilation while you work.
DIY inspection has limits. You can’t see behind drywall without cutting exploratory holes, and you can’t accurately assess moisture deep inside wall cavities without specialized equipment. If you find extensive visible damage, smell strong odors without locating a source, or experience health symptoms in specific rooms, that’s when professional assessment with thermal imaging cameras, professional grade moisture meters, and borescope inspection becomes necessary. Professionals can see and measure what’s hidden.
Testing and Confirming Mold Presence

Confirming whether suspected contamination is actually mold helps you decide on the right remediation approach and supports insurance claims if needed.
Visual inspection and smell identification work for obvious cases. If you see dark fuzzy patches and smell that earthy basement odor, you’ve got mold. But these methods can’t identify mold species, measure contamination levels, or detect hidden growth behind surfaces.
DIY assessment has clear boundaries. You can spot surface mold and document what’s visible. You can note odors and trace them to general areas. But you can’t determine whether discoloration is mold or mineral deposits without testing. You can’t measure airborne spore counts. And you can’t safely investigate inside walls or above ceilings without creating bigger problems.
Professional mold testing uses three main methods. Air sampling measures spore concentrations in indoor air compared to outdoor baseline levels, helping confirm whether hidden mold is releasing spores into living spaces. Surface sampling collects material from suspected growth areas for laboratory analysis to identify specific mold species. Bulk sampling removes pieces of contaminated material for testing when visual inspection suggests extensive penetration. Labs analyze samples and provide detailed reports on mold types present and contamination severity.
Professional inspection becomes necessary in several situations. When damage is extensive across multiple rooms or floors, certified assessment ensures nothing is missed. When household members experience persistent health symptoms like coughing or breathing difficulty, testing confirms whether mold is the cause and documents conditions for medical treatment. When filing insurance claims, professional documentation supports coverage decisions. When you smell mold but can’t locate it visually, professionals use moisture meters, thermal imaging, and borescope cameras to find hidden sources. When you discover damage behind closed walls during renovation, assessment determines how far contamination has spread.
Certified inspectors hold credentials from organizations like IICRC or ACAC. Comprehensive assessment includes moisture mapping throughout affected areas, visual inspection with documentation, air and surface sampling when indicated, identification of moisture sources, and written reports with remediation recommendations. Good inspectors provide clear next steps whether you need immediate professional remediation or can handle cleanup yourself.
Safe DIY Mold Removal Limitations and Methods

You can handle small surface mold yourself if conditions are right. DIY works for areas smaller than 10 square feet, surface growth only on non-porous materials, and water from clean sources like supply lines. Anything beyond that scope needs professionals.
For limited surface cleaning:
- Wear an N95 mask and waterproof gloves before starting. Protect yourself from spore exposure and cleaning solution contact
- Isolate the affected area by closing doors. Contain potential spore spread to other rooms during cleaning
- Remove loose surface mold with a damp cloth. Don’t dry brush or sweep, which launches spores into the air
- Scrub the area with a detergent and water solution. Use regular dish soap or laundry detergent mixed with water in a bucket
- Apply an antimicrobial solution if desired. Commercial products labeled for mold, or a diluted bleach solution on appropriate surfaces
- Dry the cleaned area completely with fans and dehumidifiers. Moisture left behind allows mold to return within days
- Dispose of all cleaning materials in sealed bags. Double bag used rags, sponges, and protective gear before throwing out
- Monitor the area weekly for two months. Watch for mold returning, which signals an unfixed moisture source
Protective equipment isn’t optional. An N95 mask filters mold spores. Regular dust masks don’t work. Wear waterproof gloves, eye protection, and clothes you can wash immediately after. Work with windows open and fans exhausted to the outside.
Here’s where DIY stops. Waterlogged drywall cannot be cleaned or saved. Once drywall absorbs significant moisture, it must be cut out and replaced. The material loses structural integrity and holds moisture that supports continued mold growth even after surface cleaning. Trying to save saturated drywall guarantees mold will return.
Stop DIY efforts immediately if contamination spreads during cleaning, if household members develop worsening respiratory symptoms or allergic reactions, or if you discover the affected area is larger than initially visible. These signs mean you need professional containment, removal, and remediation. Pushing forward with DIY in these situations risks your health and allows the problem to worsen.
Immediate Drying Actions and Prevention Strategies
The clock starts ticking the moment water contacts drywall. You’ve got a 24 to 48 hour window to dry materials aggressively before mold takes hold. Miss that window and you’re managing mold instead of preventing it. For detailed airflow and drying techniques during this critical period, see Water Damage Drying Techniques.
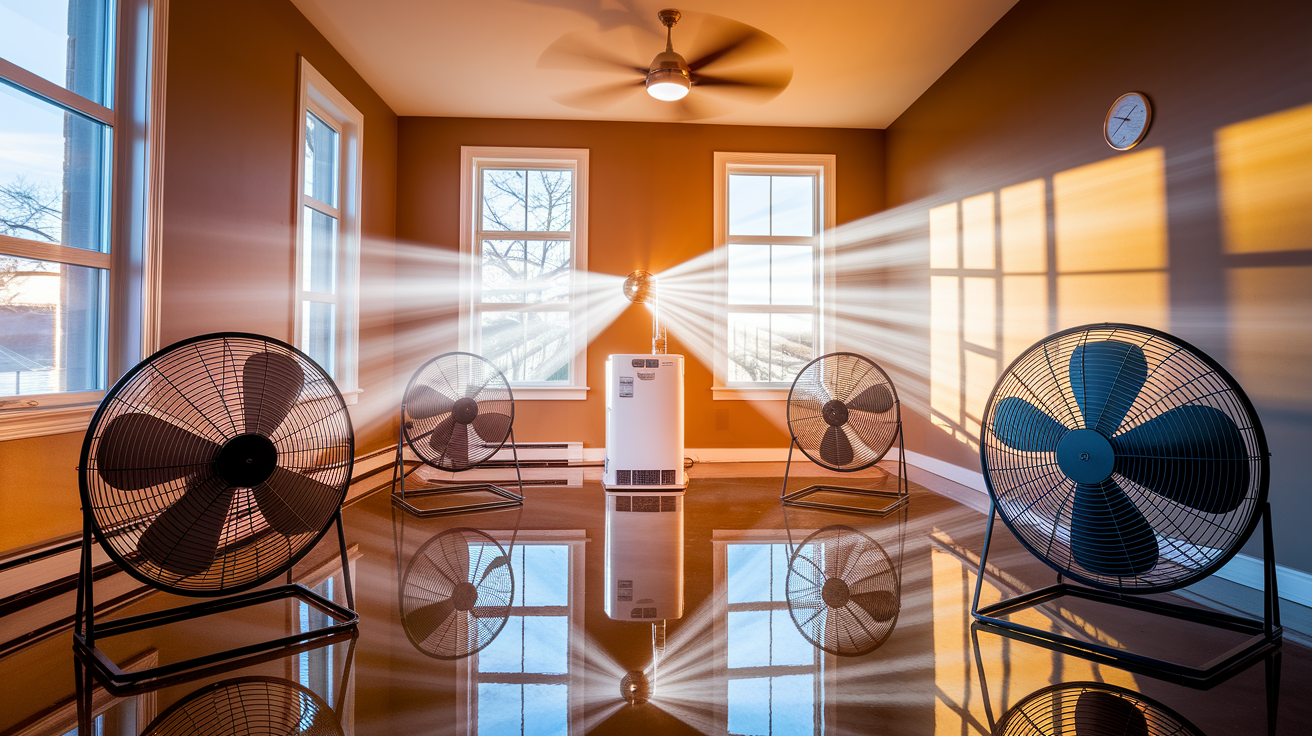
Start ventilation immediately. Open windows and doors to create cross ventilation. Set up box fans or floor fans to blow air across wet surfaces and aim another set to exhaust humid air outside. Position fans at angles that keep air moving constantly over affected walls. Still air lets moisture sit. Moving air carries it away.
Run dehumidifiers in enclosed spaces where you can’t ventilate to the outside. Size matters. A small residential dehumidifier won’t handle a flooded basement. You need equipment rated for the space volume and moisture load. Empty collection buckets frequently or run drain lines to sinks. A full dehumidifier shuts off and stops removing moisture.
Target environmental conditions aggressively. Keep indoor temperature above 70°F if possible, because warmer air holds more moisture and speeds evaporation. Drive humidity levels down below 50%. Use a simple hygrometer to monitor progress. Position fans to create layered airflow patterns. Low fans push air up wet walls, high fans move humid air toward exhaust points, dehumidifiers pull moisture from the air.
Drying isn’t done when surfaces feel dry. Moisture hides inside walls, behind baseboards, and in the gypsum core. Use a moisture meter to check drywall at multiple points. Compare readings to dry reference areas in unaffected rooms. If suspect areas read higher, keep drying equipment running. Closing up walls or starting repairs before complete drying traps moisture inside and guarantees mold development behind sealed surfaces within weeks.
Replacement Requirements for Mold Compromised Drywall
Once mold penetrates drywall or moisture saturates the material, replacement is the only option. Cleaning doesn’t work on porous materials that have absorbed water and mold growth.
Drywall must be replaced when:
- Visible mold growth appears on the surface (indicates deeper penetration into the paper facing and gypsum core)
- Material feels soft or crumbles when touched (shows moisture has destroyed structural integrity)
- Drywall has lost structural soundness (can’t safely support finishing materials or maintain wall function)
- Water saturation extends beyond surface dampness (moisture meters show elevated readings deep in the material)
- Musty odors are absorbed into the drywall itself (smell persists even after surface cleaning and drying)
- Exposure to Category 2 greywater or Category 3 blackwater (contamination makes material unsafe to keep)
Standard replacement after flooding removes the bottom two to four feet of drywall around the affected area. Cut horizontally above the water line, accounting for wicking that pulls moisture higher than visible damage. If flooding reached three feet up the wall, cut at four feet to ensure all compromised material is removed. Remove baseboards first so you can make clean cuts and check the bottom plate and floor for damage.
More extensive damage requires removing entire drywall sheets from floor to ceiling. When moisture readings stay high throughout the wall height, when odors indicate mold growth in upper sections, or when walls show buckling and warping, partial removal won’t solve the problem.
The process is disruptive and expensive. Plan for one to three weeks of construction depending on the number of rooms and extent of damage. Costs run from a few hundred dollars for a single wall section to several thousand for multiple rooms with insulation replacement and extensive finishing work. That timeline and cost are necessary. Skipping proper replacement or trying to salvage damaged material guarantees recurring mold problems, ongoing health impacts, and bigger repair bills later. Complete replacement creates a clean slate, lets you inspect and treat framing lumber for moisture damage, and ensures long term habitability.
Health Symptoms Indicating Mold Exposure
Your body often detects mold before you see visible growth. Unexplained symptoms that develop or worsen in specific rooms signal hidden contamination.
Watch for symptoms that don’t match seasonal allergies or obvious illness causes. If your nose runs constantly at home but clears up when you leave for the day, that’s not a cold.
Mold exposure causes:
- Constant sneezing and runny nose that doesn’t respond to allergy medication
- Ongoing nasal congestion making it hard to breathe through your nose
- Persistent coughing especially worse at night or in certain rooms
- Wheezing sounds when breathing even without a history of asthma
- Itchy or red irritated eyes that water frequently indoors
- Unexplained skin rashes or hives appearing without other cause
- Dry, scaly, or irritated skin particularly on exposed areas
- Chest tightness and shortness of breath during normal activities
- Worsening asthma symptoms including more frequent or severe attacks
- Ongoing low grade fever between 99 and 100°F without infection signs
- Recurring respiratory infections like bronchitis or sinusitis
Certain groups face significantly higher risks. Children’s developing respiratory systems make them more vulnerable to mold exposure and more likely to develop long term sensitivities. Elderly individuals with weakened immune systems or existing respiratory conditions experience severe reactions to mold levels that might only cause minor symptoms in healthy adults. Anyone with asthma faces dangerous exacerbations including severe attacks, increased rescue inhaler use, and potential hospitalization from mold exposure. Immunocompromised individuals from cancer treatment, HIV, organ transplants, or chronic conditions risk serious infections from mold species that don’t affect healthy people.
If symptoms consistently improve when you’re away from home and return within hours of coming back, hidden mold is likely. Track patterns in a simple journal. If symptoms correlate with time spent in specific rooms like the basement or a particular bedroom, investigate those areas for water damage and mold signs. Consider medical attention if symptoms persist, worsen over time, or affect daily activities. Tell your doctor about potential mold exposure so they can evaluate appropriately.
Long Term Prevention Strategies
Preventing water damage and mold costs far less than remediation. Build habits and systems that keep moisture controlled.
Implement these prevention strategies:
- Maintain indoor humidity between 30 and 50% using dehumidifiers or air conditioning during humid months
- Install and run dehumidifiers in basements year round even when spaces feel dry to touch
- Ensure bathroom and kitchen ventilation works properly with exhaust fans vented outside, not into attics
- Regularly inspect plumbing under sinks and behind appliances checking for small leaks, corrosion, or moisture signs
- Clean gutters twice yearly and ensure downspouts drain away from the foundation preventing water accumulation near basement walls
- Repair roof damage immediately after storms including missing shingles, flashing failures, or penetration sealing
- Install water leak detectors near water heaters, washing machines, and under sinks to catch failures early
- Improve insulation and install vapor barriers in crawl spaces, basements, and exterior walls prone to condensation
- Maintain HVAC systems with annual professional service to prevent condensation issues and ensure proper drainage
- Seal gaps around windows and doors with proper caulking and weatherstripping to prevent moisture intrusion
- Grade soil away from the foundation with a slope directing water away from the house
- Consider moisture resistant or mold resistant drywall in high risk areas like basements, bathrooms, and laundry rooms
In high humidity climates like Florida and throughout the Southeast, prevention becomes even more critical. Routine storm seasons bring repeated moisture events. Ambient humidity stays elevated year round. These conditions mean drywall faces constant moisture stress. Standard building practices that work in dry climates fail in humid regions without enhanced moisture control, better ventilation, and more aggressive dehumidification.
Long term benefits extend beyond avoiding repairs. Effective moisture control protects property values, maintains healthy indoor air quality, prevents damage to belongings stored in basements and attics, reduces energy costs by improving HVAC efficiency, and creates comfortable living spaces. Prevention is an investment that pays returns every month you don’t face water damage and mold remediation.
Documentation and Insurance Considerations
Thorough documentation protects your interests whether you’re dealing with insurance claims, property sales, or rental properties.
Document damage immediately when you discover it. Take clear photos from multiple angles showing the full extent of visible damage. Include close ups of mold growth, water staining, and structural issues. Shoot video walkthroughs of affected areas narrating what you’re seeing. Write detailed notes with dates, locations, and descriptions of conditions. Measure and record the size of damaged areas. This documentation establishes the scope before remediation begins.
Homeowner insurance coverage for mold varies significantly by policy. Most standard policies cover mold that results from a covered peril like a burst pipe or storm damage. Policies typically don’t cover mold from gradual leaks, maintenance issues, or flooding that requires separate flood insurance. Coverage limits for mold remediation often cap at $10,000 or less even when water damage itself is covered. Review your policy or call your agent to understand specific terms, exclusions, and limits.
The claims process requires prompt action. Notify your insurance company immediately after discovering damage, usually within 24 to 48 hours depending on policy terms. Document everything before cleanup begins. Get professional assessment and moisture mapping from certified inspectors. Obtain detailed written estimates for remediation and repairs. Keep all receipts for emergency services, temporary housing if needed, and remediation work. Follow the adjuster’s instructions precisely and maintain records of all communications with the insurance company.
Landlords carry legal responsibilities for tenant occupied properties. Most jurisdictions require landlords to maintain habitable premises, which includes addressing water damage and mold promptly. Document notification from tenants about water damage or mold concerns immediately. Arrange professional inspection and remediation quickly. Notify tenants of remediation timelines and any necessary temporary relocation. Some areas require landlords to provide alternative housing during major remediation. Failure to address mold promptly can result in tenant rent withholding, legal action, or liability for health impacts.
Property sale disclosure requirements vary by state but generally require sellers to disclose known material defects including past water damage and mold remediation. Document remediation work completely with professional reports, receipts, and post remediation verification testing. Buyers often request this documentation during home inspections. Proper documentation shows the issue was handled correctly and reduces liability. Undisclosed mold problems discovered after closing can result in legal action and financial liability.
Reference EPA mold remediation guidelines and CDC recommendations when making decisions about remediation scope and methods. These authoritative sources establish industry standards that insurance adjusters, contractors, and courts recognize. Following established guidelines protects you from inadequate remediation and supports claims that work was performed properly.
Final Words
Catching water damaged drywall mold signs early makes the difference between a quick cleanup and a major renovation. The musty smell, dark patches, and soft spots all point to the same problem: moisture that needs immediate attention.
Start by checking the obvious places first. Then move to the hidden spots behind baseboards and around fixtures. If you’re seeing widespread discoloration, feeling spongy walls, or smelling that damp earthy odor room after room, it’s time to call in a pro.
But you can handle a lot of the prevention work yourself. Keep humidity low, fix leaks fast, and dry things out completely before closing anything back up.
FAQ
How do you tell if you have mold after water damage?
You can tell if you have mold after water damage by looking for visual signs like dark spots, discoloration, or fuzzy patches on walls and ceilings, and smelling for a musty or damp earthy odor. Peeling paint, bubbling wallpaper, and soft or spongy drywall texture also indicate mold growth has started.
Will drywall always mold if it gets wet?
Drywall will not always mold if it gets wet, but mold can begin forming within 24 to 48 hours if moisture remains trapped in the porous material. Quick drying using fans, dehumidifiers, and proper ventilation within that critical window prevents mold germination and growth.
What are the warning signs of mold toxicity?
The warning signs of mold toxicity include constant sneezing, ongoing nasal congestion, persistent coughing and wheezing, itchy red eyes, unexplained skin rashes, chest tightness, worsening asthma symptoms, recurring respiratory infections, headaches, and ongoing low-grade fever. People with asthma or compromised immune systems experience more severe reactions.
How do you know if your drywall has mold?
You know your drywall has mold by checking for black, green, or brown patches on the surface, feeling for soft or damp spots, smelling for musty odors near baseboards and outlets, and looking for peeling paint or bubbling wallpaper. If the wall feels spongy when pressed or shows visible discoloration, mold has likely penetrated the material.
Can you clean mold off drywall or does it need replacement?
You cannot effectively clean mold off drywall because the porous material absorbs moisture and mold penetrates deep into the paper backing and gypsum core. Wet or mold-contaminated drywall must be cut out and completely replaced to eliminate the health hazard and restore structural integrity.
What is the difference between a water stain and active mold growth?
A water stain appears as flat brown or yellow rings with defined edges, feels dry, and has no smell, while active mold growth shows black or green patches with fuzzy or raised texture, feels damp, and produces a strong musty odor. Water stains indicate past moisture problems, but active mold requires immediate attention.
When should you call a professional for mold in drywall?
You should call a professional for mold in drywall when the affected area exceeds 10 square feet, when mold appears behind walls or in HVAC systems, when the water source was contaminated (Category 2 greywater or Category 3 blackwater), or when anyone experiences respiratory symptoms. Soft or crumbling drywall always requires professional assessment and replacement.
How quickly does mold grow after water damage?
Mold grows after water damage within 24 to 48 hours once spores land on damp drywall. The porous material absorbs moisture like a sponge, and trapped water behind walls creates ideal dark, damp conditions for unnoticed mold spread if not dried aggressively within that critical window.
What protective equipment do you need to inspect for mold?
You need protective equipment including an N95 respirator mask, disposable gloves, and eye protection to inspect for mold safely. This prevents inhaling mold spores or getting them on your skin during visual examination, especially when checking behind baseboards or near suspected contamination.
Where does hidden mold grow after water damage?
Hidden mold grows after water damage behind drywall and baseboards, inside wall cavities near leaking pipes, around windows and doors with condensation, in ceiling spaces below roof leaks, behind bathroom walls with poor ventilation, and in basement corners with foundation seepage. Moisture meters detect dampness before visible signs appear.
How do you prevent mold after discovering water damage?
You prevent mold after discovering water damage by starting aggressive drying within 24 to 48 hours using fans, dehumidifiers, and cross-ventilation to increase airflow. Remove standing water immediately, pull wet materials like carpet padding, monitor moisture levels until completely dry, and fix the water source before closing up any walls.
What documentation do you need for mold damage insurance claims?
You need documentation for mold damage insurance claims including dated photos and videos of all affected areas, written records of when water damage occurred, professional moisture readings, remediation estimates from licensed contractors, and receipts for emergency mitigation efforts. Notify your insurance company immediately after discovering damage for coverage consideration.
